
CanoScan Toolbox v1.5 User's Guide


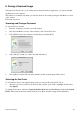
Table Of Contents
- Table of Contents
- 1. Introduction
- 2. Installing the CanoScan Toolbox
- 3. Starting CanoScan Toolbox - with Start Buttons
- 4. Starting CanoScan Toolbox - with Double-clicking the icon
- 5. Selecting the Scanner
- 6. Scanning
- 7. Saving Scanned Images
- 8. Opening Files
- 9. Faxing a Scanned Image
- 10. Printing Copies of a Scanned Image
- 11. Enhancing a Scanned Image
- 12. Editing a Scanned Image
- 13. Working with Catalogs
- 14. Linking and Using the Applications
CanoScan Toolbox
9
8. Opening Files
Opening a Stored File
You can store image files that you have scanned as well as other image files using the CanoScan Toolbox.
To open a stored file:
1. Choose the Open Image command from the File menu, or click the Edit button in the CanoScan
Toolbox toolbar. The Open Image dialog box appears.
2. Select the desired file and click the Open button. The selected file opens in an image window.
Opening a New Image Window
When you choose the New Image command from the File menu, an empty image window appears. You
can create a new image by pasting data into or drawing directly in the image window. The image window
remains Untitled until you save the data to a file.