
CanoScan D646U Plug-in Module CS-U 4.0 for Mac Guide
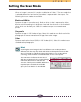


Table Of Contents
- How to Make Best Use of the Manuals
- How to Use this Guide
- Table of Contents
- Installing Plug-in Module CS-U
- Control Panel Features
- Scanning Procedures
- Plug-in Module CS-U Special Features
- Quick Start Instructions
- Step 1
- Step 2
- Step 3
- Appendices

30
S T E P 2
Setting the Scan Area
Using the image in the preview window, you can define the actual area to be scanned.
Operating Procedures
Position the pointer in the preview window.
The [+] symbol marks the current position of the pointer.
Click and drag the mouse in the direction you want to define on the
image as a frame.
The selected area is enclosed in a dotted frame. The area enclosed in this dotted
frame is the area that will actually be scanned.
• You may drag the frame in any direction.
• Clicking the mouse button outside the selection frame causes the selected area
to be deselected.
• Moving the mouse cursor within the selection frame changes it to an
omni-directional arrow [ ]. Dragging the cursor in this state will cause the
selection frame to move without changing its shape.
• Placing the mouse cursor over the dotted line of the selection frame causes the
cursor to change into one of four shapes [ ] [ ] [ ] [ ]. Dragging the
selection frame with the mouse cursor changes its shape.
• Double-clicking the mouse button anywhere in the preview window selects the
entire image.
Hint
• To specify small areas with precision, it is convenient to expand the
preview display with the Zoom In button. See Zooming (P. 31).
Selection Frame