
Product Setup, User Guides & Manuals


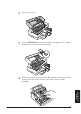

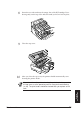
Table Of Contents
- Chp.1: Welcome
- Chp.2: General Precautions
- Chp.3: Selecting a Location for the Printer
- Chp.4: Getting Acquainted With Your Printer
- Chp.5: Setting Up and Using the Printer
- Connecting the Printer and Computer
- Connecting the Printer to a Power Source
- Switching the Printer Power On/Off
- Installing the BJ Cartridges
- Installing and Loading the Paper Cassette
- Installing the Paper Output Receiver
- Loading Paper in the Sheet Feeder
- Installing the Printer Driver
- Aligning the Print Heads
- Chp.5: Printing on Paper and Other Media
- Media You Can Use With this Printer
- Colour Set and Media Selection
- Ink Optimizer and the Selected Media
- Quick Reference Media Loading Table
- Paper Size That Can Be Used With This Printer
- Printing on Plain Paper and Bubble Jet Paper
- Printing on Envelopes
- Printing on High Resolution Paper
- Printing on Glossy Photo Paper
- Printing on Glossy Photo Cards
- Printing on Transparencies
- Printing on High Gloss Photo Film
- Printing on Banner Paper
- Printing on T-Shirt Transfers
- Printing on Fabric Sheet
- Using Manual Feed
- Installing Color BJ Cartridge BC-82 Photo
- Changing BJ Cartridges
- Chp.6: Printer Maintenance
- Chp.7: Some Advice About Colour Printing
- Chp.8: Troubleshooting
- App.A: Installing/Removing the Optional Cassette
- App.B: Options and Consumables
- App.C: General Specifications
- User's Manual Menu

92 Canon BJC-8500 User’s Manual
Printer maintenance
This section describes important procedures required to maintain the per-
formance of the printer. Here we will show you how to:
■ Replace ink tanks
■ Test print head performance
■ Clean the print heads
■ Replace a BJ Cartridge
■ Clean the printer
■ Store BJ Cartridges in the BJ Cartridge Container SB-80
Replacing an ink tank
Follow these general guidelines for replacing ink tanks:
■ When the ink supply in an ink tank becomes low, the printer will beep, a
message will appear on the screen, and the ERROR lamp will light. If
you want to continue the print job with the nearly depleted ink tank,
press the RESUME button. Replace the ink tank as soon as possible.
If you are using a network, an error message will not appear but the
printer will beep and the ERROR lamp will light when an ink tank
runs low.
■ The print heads should be cleaned every time an ink tank is replaced.
■ After your replace an empty ink tank, the printer will start print head
cleaning automatically. However, if you replace a partially full ink tank,
or if you remove a partially full ink tank and insert it again, the printer
may not start print head cleaning automatically.
■ After you insert an ink tank, close the top cover or press the REPLACE
button to move the BJ Cartridge holder to the home position.
■ After the cartridge holder moves back to the home position, always check
the POWER lamp and make sure that it is blinking to indicate that print
head cleaning has started. If the POWER lamp does not start flashing,
start print head cleaning with the operation panel. (☞ 98)
Remove an ink tank only after it has run out of ink. To avoid printing
problems, do not remove ink tanks unnecessarily.
1
Press the POWER button to turn on the printer