
User Guide


1.3.3 Installing BJ cartridges
1) Removing the protective cap from the BJ cartridge
Remove the BJ cartridge from the aluminum bag, and remove the protective cap
from the nozzles.
Do not reuse head caps that have been removed once. If they are reused,
the head may become clogged with foreign matter, or colors of ink may be
mixed.
Gently remove the protective cap from the print head, taking care not to
touch the print head directly with your hand or fingers.
Poor printing may be caused by scratches on the print head or any foreign
matter adhered to it.
After removing the cap, do not shake the BJ cartridge. Ink could splatter
out if you do.
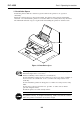
2) Installing the BJ cartridge
Open the printer’s top cover, and press the BJ cartridge
REPLACE
button. The
buzzer sounds once, and the carriage moves to the BJ cartridge replacement
position. Install the BJ cartridge on the carriage. Install Color BJ cartridge BC-81
on the holder on the right, and install Black BJ cartridge BC-80 (or Photo BJ
cartridge BC-82 Photo) on the holder on the left.
After installing the BJ cartridges, either press the BJ cartridge
REPLACE
button, or
close the top cover. The buzzer sounds once, and after warming up for about 40
seconds, the carriage returns to the capping position (right edge of printer body).
3-5
BJC-8500
Part 3: Operating Instructions
Figure 3-6 Removing the Protective Cap
Figure 3-7 Installing BJ Cartridges
Protective Cap
BJ Cartridge
REPLACE
Button
Black BJ Cartridge
BC-80 or
Photo BJ Cartridge
BC-82 Photo
Color BJ Cartridge BC-81
*
* This illustration shows Black BJ cartridge BC-80.