
Owner's Manual
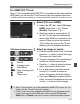


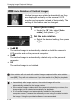

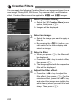
Table Of Contents
- Instruction Manual
- Conventions Used in This Manual
- Table of Contents
- Supplied Accessories
- Parts & Controls
- Quick Start Guide
- Getting Started
- Attaching Camera Strap
- Charging the Battery
- Installing / Removing the Battery
- Using the LCD Monitor
- Power On
- Setting Date & Time
- Setting the Language
- Installing and Removing SD Card
- Mounting / Detaching a Lens
- Lens Hood
- Image Stabilizer
- Basic Operation
- Using the Quick Control Screen
- Menu Operations
- Before You Start
- Basic Shooting
- Setting the AF and Drive Modes
- Image Settings
- Image-Recording Quality
- ISO Speed
- Selecting a Picture Style
- Customizing a Picture Style
- Registering a Picture Style
- Setting the White Balance
- White Balance Correction
- Auto Lighting Optimizer
- Lens Peripheral Illumination Correction
- Creating and Selecting a Folder
- File Numbering Methods
- Setting Copyright Information
- Setting the Color Space
- Advanced Operations
- Using a Flash
- Shooting with the LCD Monitor
- Shooting Movies
- Image Playback
- Image Playback
- Shooting Information Display
- Searching for Images Quickly
- Magnified View
- Rotating the Image
- Setting Ratings
- Quick Control During Playback
- Enjoying Movies
- Playing Movies
- Editing the Movie’s First and Last Scenes
- Slide Show
- Viewing the Images on a TV
- Protecting Images
- Erasing Images
- Changing Image Playback Settings
- Post-Processing Images
- Sensor Cleaning
- Printing Images
- Customizing the Camera
- Optional Accessories
- Chart of Available Functions per Mode
- Menu Settings
- Troubleshooting
- Error Codes
- System Accessory Map
- Specs
- Index
- Software Start Guide
- Pocket Guide
- Correction to Instruction Manual
- Scans of Supplied CD-ROMs
- Great Photography IS Easy
- Do More with Macro
- Lens Warranty Information
- Camera Warranty Information

216
L Erasing Images
2
Select [Select and erase images].
Select [Select and erase images],
then press <0>.
X The images will be displayed.
To display the three-image display,
press the <I> button. To return
to the single-image display, press the
<u> button.
3
Select the images to be erased.
Turn the <5> dial to select the
image to be erased, then press the
<V> key.
X A <X> checkmark will be displayed
on the upper left.
To select other images to be erased,
repeat step 3.
4
Erase the images.
Press the <L> button.
Select [OK], then press <0>.
X The selected images will be erased.
You can erase all the images in a folder or card at once. When the [3
Erase images] menu option is set to [All images in folder] or [All
images on card], all the images in the folder or card will be erased.
3 Erasing All Images in a Folder or Card
To also erase protected images, format the card (p.48).