
User Guide


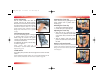


Recline Adjustment
Pull the recline handle, then slide the
restraint shell into the desired position.
Release the recline handle, then verify that
the child restraint has locked into position.
IMPORTANT: Restraint must be in the full
upright position when installed in forward
facing mode with children over 33 pounds
(15 kg).
Infant Positioning System
The Infant Positioning System is designed
to provide better fit and comfort for
infants using this restraint. The system
consists of a body pillow and infant pillow,
connected to the harness.
For additional side support, fold side flaps,
as shown in figure B.
NOTE: Remove after child can sit
comfortably in restraint without additional
support (see pg. 34).
Toddler Pillow
The toddler pillow provides extra head support and comfort for taller
children.
NOTE: Although the toddler pillow can remain installed through the life
of the restraint, instructions for removal are located on page 34.
Restraint Functions
26 27
Restraint Functions
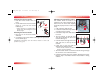
Fastening the Chest Clip
Fasten the chest clip by pushing the two
halves together until a positive click is
heard (fig. C).
Releasing the Chest Clip
1 Squeeze the middle tabs together.
2 Pull the two pieces apart (fig. D).
Adjusting the Chest Clip
1
Slide chest clip up or down (fig. E) on
harness so it is positioned at the middle
of the child's chest, level with the child's
armpit.
2
Slide the HUGS™ pads and comfort
pads to a location that is comfortable for
the child.
HUGS™ and Comfort Pads
IMPORTANT: HUGS™ (Harness Ultra Guard
System) pads must be installed for forward
facing use. Removal of HUGS is optional for
rear facing use.
A
B
E
C
D
P2500_R01b.qxd 12/7/2004 9:31 AM Page 28