Installation S19-270C, S19-270E, S19274C, S19274E S19-270C eyewash douche oculaire lavador de ojos Swing-Activated Eyewash and Eye/Face Wash Douche oculaire et oculaire/faciale activée par bras mobile Lavador de ojos y de ojos/rostro activado por brazo oscilante S19-270E eye/face wash douche oculaire/faciale lavador de ojos/rostro S19274C Halo™ eyewash douche oculaire lavador de ojos S19274E Halo™ eye/face wash douche oculaire/faciale lavador de ojos/rostro 215-1326 Rev.
S19-270C, S19-270E, S19274C, S19274E Installation Table of Contents Pre-Installation Information . . . . . . . . . . . . . . . . . . . . . . . . . . . . . . . . . . . . . . . . . . . . . . . . . . . . . . . . . . . . . . . . . . 3 S19-270C, S19274C Dimensions . . . . . . . . . . . . . . . . . . . . . . . . . . . . . . . . . . . . . . . . . . . . . . . . . . . . . . . . . . . . . .
S19-270C, S19-270E, S19274C, S19274E Installation WARNING The installation and location of all Safety drench showers, eye and eye/face washes must comply with the requirements of ANSI Z358.1. Emergency equipment must be supplied with tepid water (60-100°F/ 15.6-37.8°C). Any prolonged exposure to near freezing water affects the body’s ability to maintain body temperature, increasing the risk of hypothermia. Flush the water supply lines before beginning installation and after installation is complete.
S19-270C, S19-270E, S19274C, S19274E Installation Dimensions — S19-270C Off On Ø 2³⁄₈" (60mm) 3¹⁄₈" (79mm) 11⁵⁄₈" (295mm) 4¹⁄₈" (105mm) 2³⁄₈" (60mm) 28-7/8" to 40-7/8" (733 mm to 1038 mm) to finished floor 2½" (64mm) Ø ⁷⁄₈" Dimensions — S19274C 1³⁄₈" (35mm) Max. Off Ø 1¹⁄₈" On 1⁵⁄₈" (41mm) Ø 2³⁄₈" (60mm) 7¼" (181mm) 2⁷⁄₈" (73mm) 2³⁄₈" (60mm) 30-1/8" to 42-1/8" (765 mm to 1070 mm) to finished floor 2½" (64mm) Ø ⁷⁄₈" 4 10/5/2017 1³⁄₈" (35mm) Max. Bradley • 215-1326 Rev.
S19-270C, S19-270E, S19274C, S19274E Installation Dimensions — S19-270E Off On Ø 2³⁄₈" (60mm) 3¹⁄₈" (79mm) 11³⁄₈" (289mm) 5¾" (146mm) 2³⁄₈" (60mm) 27-1/4" to 39-1/4" (692 mm to 997 mm) to finished floor 2½" (64mm) Ø ⁷⁄₈" Dimensions — S19274E 1³⁄₈" (35mm) Max. Off On Ø 2³⁄₈" (60mm) 1⁵⁄₈" (41mm) 11" (279mm) 3³⁄₈" (86mm) 29-5/8" to 41-5/8" (752 mm to 1057 mm) to finished floor 2³⁄₈" (60mm) 2½" (64mm) Ø ⁷⁄₈" Bradley • 215-1326 Rev. V; ECN 15-05-042 10/5/2017 1³⁄₈" (35mm) Max.
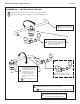
S19-270C, S19-270E, S19274C, S19274E Installation Installation — Eyewash Halo eyewash right-hand unit is shown on a sample 25" deck. Other units are similar. For classic eyewash installation, refer to the dimensions on page 4 to determine optimal mounting position. Refer to page 8 for left-hand units. Minimum dimensions necessary to contain splashing from Halo units are shown. Apply pipe sealant (supplied by installer) to all male-threaded pipe joints.
S19-270C, S19-270E, S19274C, S19274E Installation Installation — Eye/Face Wash Halo eye/face wash right-hand unit is shown on a sample 25" deck. Other units are similar. For classic eye/face wash installation, refer to the dimensions on page 5 to determine optimal mounting position. Refer to page 8 for left-hand units. Minimum dimensions necessary to contain splashing from Halo units are shown. Apply pipe sealant (supplied by installer) to all male-threaded pipe joints.
S19-270C, S19-270E, S19274C, S19274E Installation Installation — Left-Hand Units (Classic) Classic eyewash unit is shown. Classic eye/face wash unit is similar. Apply pipe sealant (supplied by installer) to all male-threaded pipe joints. B A Rotate the bent arm 180° around the valve. Remove the sprayhead from the bent arm. Remove the set screw from the valve assembly with an Allen key (1/16"(1.5mm)). Set the two items aside. D C Rotate the bent arm 180° around the valve.
S19-270C, S19-270E, S19274C, S19274E Installation Installation — Left-Hand Units (Halo) Halo eyewash unit is shown. Halo eye/face wash unit is similar. Apply pipe sealant (supplied by installer) to all male-threaded pipe joints. B Rotate the arm 180° around the valve. C A Remove the set screw from the valve assembly with an Allen key (1/16"(1.5mm)) and set aside.
S19-270C, S19-270E, S19274C, S19274E Installation Assembly of Components and Parts List — S19-270C Right-hand swivel version is shown in the "ON" position. R P.O. Box 309, Menomonee Falls, WI 53051 TEST THIS UNIT EACH WEEK DIESES GERÄT 1ST WÖCHENTLICH ZU PRÜFEN. ESSAI HEBDOMADAIRE Test-operate valve(s) each week and sign below. Report any malfunctions immediately. Ventil(e) wöchentlich im Testbetrieb prüfen, bestätigt durch Unterschrift. Jegliche Störung sofort melden.
S19-270C, S19-270E, S19274C, S19274E Installation Assembly of Components and Parts List — S19274C Right-hand swivel version is shown in the "ON" position. R P.O. Box 309, Menomonee Falls, WI 53051 TEST THIS UNIT EACH WEEK DIESES GERÄT 1ST WÖCHENTLICH ZU PRÜFEN. ESSAI HEBDOMADAIRE Test-operate valve(s) each week and sign below. Report any malfunctions immediately. Ventil(e) wöchentlich im Testbetrieb prüfen, bestätigt durch Unterschrift. Jegliche Störung sofort melden.
S19-270C, S19-270E, S19274C, S19274E Installation Assembly of Components and Parts List — S19-270E Right-hand swivel version is shown in the "ON" position. R P.O. Box 309, Menomonee Falls, WI 53051 TEST THIS UNIT EACH WEEK DIESES GERÄT 1ST WÖCHENTLICH ZU PRÜFEN. ESSAI HEBDOMADAIRE Test-operate valve(s) each week and sign below. Report any malfunctions immediately. Ventil(e) wöchentlich im Testbetrieb prüfen, bestätigt durch Unterschrift. Jegliche Störung sofort melden.
S19-270C, S19-270E, S19274C, S19274E Installation Assembly of Components and Parts List — S19274E Right-hand swivel version is shown in the "ON" position. R P.O. Box 309, Menomonee Falls, WI 53051 TEST THIS UNIT EACH WEEK DIESES GERÄT 1ST WÖCHENTLICH ZU PRÜFEN. ESSAI HEBDOMADAIRE Test-operate valve(s) each week and sign below. Report any malfunctions immediately. Ventil(e) wöchentlich im Testbetrieb prüfen, bestätigt durch Unterschrift. Jegliche Störung sofort melden.
S19-270C, S19-270E, S19274C, S19274E Installation AVERTISSEMENT L’installation et l’emplacement de toutes les douches d’urgence, oculaires et oculaires-faciales doivent être conformes aux exigences d’ANSI Z358.1. Le matériel d’urgence doit être alimenté en eau tiède (15,6 °C à 37,8 °C/60 °F à 100 °F). Toute exposition prolongée à de l’eau proche de la température de congélation peut altérer la capacité de l’organisme à maintenir la température corporelle, ce qui accroît le risque d’hypothermie.
S19-270C, S19-270E, S19274C, S19274E Installation Dimensions — S19-270C Off On Ø 2³⁄₈" (60mm) 3¹⁄₈" (79mm) 11⁵⁄₈" (295mm) 4¹⁄₈" (105mm) 28-7/8" to 40-7/8" (733 mm to 1038 mm) au plancher fini 2³⁄₈" (60mm) 2½" (64mm) Ø ⁷⁄₈" Dimensions — S19274C 1³⁄₈" (35mm) Max. Off On Ø 2³⁄₈" (60mm) 1⁵⁄₈" (41mm) 7¼" (181mm) 2⁷⁄₈" (73mm) 30-1/8" to 42-1/8" (765 mm to 1070 mm) au plancher fini 2³⁄₈" (60mm) 2½" (64mm) Ø ⁷⁄₈" Bradley • 215-1326 Rev. V; ECN 15-05-042 10/5/2017 1³⁄₈" (35mm) Max.
S19-270C, S19-270E, S19274C, S19274E Installation Dimensions — S19-270E Off On Ø 2³⁄₈" (60mm) 3¹⁄₈" (79mm) 11³⁄₈" (289mm) 5¾" (146mm) 2³⁄₈" (60mm) 27-1/4" to 39-1/4" (692 mm to 997 mm) au plancher fini 2½" (64mm) 1³⁄₈" (35mm) Max. Ø ⁷⁄₈" Dimensions — S19274E Off On 1⁵⁄₈" (41mm) Ø 2³⁄₈" (60mm) 11" (279mm) 3³⁄₈" (86mm) 2³⁄₈" (60mm) 29-5/8" to 41-5/8" (752 mm to 1057 mm) au plancher fini 2½" (64mm) Ø ⁷⁄₈" 16 10/5/2017 1³⁄₈" (35mm) Max. Bradley • 215-1326 Rev.
S19-270C, S19-270E, S19274C, S19274E Installation Installation — Douche Oculaire La douche oculaire Halo droite est montrée sur un exemple de comptoir de 25" (635 mm). Les autres unités sont similaires. Pour l’installation d’une douche oculaire classique, voir les dimensions à la page 15 pour déterminer la position optimale de montage. Consulter les pages19–20 pour un montage gaucher. Les dimensions minimales nécessaires pour contenir les éclaboussures des unités Halo sont indiquées.
S19-270C, S19-270E, S19274C, S19274E Installation Installation — Douche Oculaire/Faciale La douche oculaire/faciale Halo droite est montrée sur un exemple de comptoir de 25". Les autres unités sont similaires. Pour l’installation d’une douche oculaire/faciale classique, voir les dimensions à la page 15 pour déterminer la position optimale de montage. Consulter les pages 19–20 pour un montage gaucher. Les dimensions minimales nécessaires pour contenir les éclaboussures des unités Halo sont indiquées.
S19-270C, S19-270E, S19274C, S19274E Installation Installation — Unités Gaucher (classique) Douche oculaire classique illustrée. L'unité douche oculaire/faciale classique est similair. Mettez du produit d’étanchéité (non fourni) sur tous les filetages mâles. B A Faire pivoter le bras coudé de 180° autour du robinet. Retirer la tête de douche du bras coudé. Retirer la vis calante du l’aide d’une clé Allen (1/16"(1.5mm)). Mettre ces deux articles de côté.
S19-270C, S19-270E, S19274C, S19274E Installation Installation — Unités Gaucher (Halo) Douche oculaire Halo illustrée. L'unité douche oculaire/faciale Halo est similaire. Mettez du produit d’étanchéité (non fourni) sur tous les filetages mâles. B Faire pivoter le bras de 180° autour du robinet. C A Retirer la vis calante du robinet à l’aide d’une clé Allen (1/16"(1.5mm)) et la mettre de côté.
S19-270C, S19-270E, S19274C, S19274E Installation Assemblage des composantes et liste des pièces — S19-270C La version pivotante à droite est montrée en position « Ouverte ». R P.O. Box 309, Menomonee Falls, WI 53051 TEST THIS UNIT EACH WEEK DIESES GERÄT 1ST WÖCHENTLICH ZU PRÜFEN. ESSAI HEBDOMADAIRE Test-operate valve(s) each week and sign below. Report any malfunctions immediately. Ventil(e) wöchentlich im Testbetrieb prüfen, bestätigt durch Unterschrift. Jegliche Störung sofort melden.
S19-270C, S19-270E, S19274C, S19274E Installation Assemblage des composantes et liste des pièces — S19274C La version pivotante à droite est montrée en position « Ouverte ». R P.O. Box 309, Menomonee Falls, WI 53051 TEST THIS UNIT EACH WEEK DIESES GERÄT 1ST WÖCHENTLICH ZU PRÜFEN. ESSAI HEBDOMADAIRE Test-operate valve(s) each week and sign below. Report any malfunctions immediately. Ventil(e) wöchentlich im Testbetrieb prüfen, bestätigt durch Unterschrift. Jegliche Störung sofort melden.
S19-270C, S19-270E, S19274C, S19274E Installation Assemblage des composantes et liste des pièces — S19-270E La version pivotante à droite est montrée en position « Ouverte ». R P.O. Box 309, Menomonee Falls, WI 53051 TEST THIS UNIT EACH WEEK DIESES GERÄT 1ST WÖCHENTLICH ZU PRÜFEN. ESSAI HEBDOMADAIRE Test-operate valve(s) each week and sign below. Report any malfunctions immediately. Ventil(e) wöchentlich im Testbetrieb prüfen, bestätigt durch Unterschrift. Jegliche Störung sofort melden.
S19-270C, S19-270E, S19274C, S19274E Installation Assemblage des composantes et liste des pièces — S19274E La version pivotante à droite est montrée en position « Ouverte ». R P.O. Box 309, Menomonee Falls, WI 53051 TEST THIS UNIT EACH WEEK DIESES GERÄT 1ST WÖCHENTLICH ZU PRÜFEN. ESSAI HEBDOMADAIRE 30 31 Test-operate valve(s) each week and sign below. Report any malfunctions immediately. Ventil(e) wöchentlich im Testbetrieb prüfen, bestätigt durch Unterschrift. Jegliche Störung sofort melden.
S19-270C, S19-270E, S19274C, S19274E Installation ADVERTENCIA La instalación y ubicación de todas las duchas, lavaojos y lavaojos/lavacara de seguridad deben cumplir con los requisitos de ANSI Z358.1. Los equipos de emergencia deben contar con agua tibia (entre 15,6 °C y 37,8 °C). Cualquier exposición prolongada a aguas bajo cero afecta la capacidad del cuerpo para mantener su temperatura, lo que incrementa el riesgo de hipotermia.
S19-270C, S19-270E, S19274C, S19274E Installation Dimensiones — S19-270C Off On Ø 2³⁄₈" (60mm) 3¹⁄₈" (79mm) 11⁵⁄₈" (295mm) 4¹⁄₈" (105mm) 2³⁄₈" (60mm) 28-7/8" to 40-7/8" (733 mm to 1038 mm) al suelo terminado 2½" (64mm) Ø ⁷⁄₈" 1³⁄₈" (35mm) Max. Off Dimensiones — S19274C On Ø 2³⁄₈" (60mm) 1⁵⁄₈" (41mm) 7¼" (181mm) 2⁷⁄₈" (73mm) 2³⁄₈" (60mm) 30-1/8" to 42-1/8" (765 mm to 1070 mm) al suelo terminado 26 10/5/2017 2½" (64mm) Ø ⁷⁄₈" 1³⁄₈" (35mm) Max. Bradley • 215-1326 Rev.
S19-270C, S19-270E, S19274C, S19274E Installation Dimensiones — S19-270E Off On Ø 2³⁄₈" (60mm) 3¹⁄₈" (79mm) 11³⁄₈" (289mm) 5¾" (146mm) 2³⁄₈" (60mm) 27-1/4" to 39-1/4" (692 mm to 997 mm) al suelo terminado 2½" (64mm) 1³⁄₈" (35mm) Max. Ø ⁷⁄₈" Dimensiones — S19274E Off On Ø 2³⁄₈" (60mm) 1⁵⁄₈" (41mm) 11" (279mm) 3³⁄₈" (86mm) 29-5/8" to 41-5/8" (752 mm to 1057 mm) al suelo terminado 2³⁄₈" (60mm) 2½" (64mm) Ø ⁷⁄₈" Bradley • 215-1326 Rev. V; ECN 15-05-042 10/5/2017 1³⁄₈" (35mm) Max.
S19-270C, S19-270E, S19274C, S19274E Installation Instalación — Lavador de ojos Se observa la unidad de lavado ocular Halo del lado derecho en una cubierta de muestra de 25" . Las otras unidades son similares. Para la instalación del lavaojos clásico, consulte las dimensiones en la página 26 para determinar la posición óptima de montaje Consulte la páginas 30–31 para el montaje de la izquierda. Se muestran las dimensiones mínimas necesarias para contener las salpicaduras de las unidades Halo.
S19-270C, S19-270E, S19274C, S19274E Installation Instalación — Lavador de ojos y rostro Se observa la unidad de lavado ocular y facial Halo del lado derecho en una cubierta de muestra de 25". Las otras unidades son similares. Para la instalación de lavado ocular y facial clásico, consulte las dimensiones en la página 27 para determinar la posición óptima de montaje. Consulte la páginas 30–31 para el montaje de la izquierda.
S19-270C, S19-270E, S19274C, S19274E Installation Instalación — Unidades izquierda (clásico) Se muestra una unidad lavador de ojos clásico. La unidad lavador de ojos/rostro clásico son similares. Aplicar sellador de tubería a todas las juntas de tubería de rosca macho. B A Gire el brazo doblado en 180º alrededor de la válvula. Retire la boquilla rociadora del brazo doblado. Retire el tornillo de ajuste del conjunto de válvula con la llave Allen (1/16"(1.5mm)). Deje ambos elementos a un lado.
S19-270C, S19-270E, S19274C, S19274E Installation Instalación — Unidades izquierda (Halo) Se muestra una unidad lavador de ojos Halo. La unidad lavador de ojos/rostro Halo son similares. Aplicar sellador de tubería a todas las juntas de tubería de rosca macho. B Gire el brazo en 180º alrededor de la válvula. C A Retire el tornillo de ajuste del conjunto de válvula con la llave Allen (1/16"(1.5mm)) y déjelo a un lado.
S19-270C, S19-270E, S19274C, S19274E Installation Armado de los componentes y lista de piezas — S19-270C La versión que oscila hacia la derecha se muestra en la posición abierta. R P.O. Box 309, Menomonee Falls, WI 53051 TEST THIS UNIT EACH WEEK DIESES GERÄT 1ST WÖCHENTLICH ZU PRÜFEN. ESSAI HEBDOMADAIRE Test-operate valve(s) each week and sign below. Report any malfunctions immediately. Ventil(e) wöchentlich im Testbetrieb prüfen, bestätigt durch Unterschrift. Jegliche Störung sofort melden.
S19-270C, S19-270E, S19274C, S19274E Installation Armado de los componentes y lista de piezas — S19274C La versión que oscila hacia la derecha se muestra en la posición abierta. R P.O. Box 309, Menomonee Falls, WI 53051 TEST THIS UNIT EACH WEEK DIESES GERÄT 1ST WÖCHENTLICH ZU PRÜFEN. ESSAI HEBDOMADAIRE Test-operate valve(s) each week and sign below. Report any malfunctions immediately. Ventil(e) wöchentlich im Testbetrieb prüfen, bestätigt durch Unterschrift. Jegliche Störung sofort melden.
S19-270C, S19-270E, S19274C, S19274E Installation Armado de los componentes y lista de piezas — S19-270E La versión que oscila hacia la derecha se muestra en la posición abierta. R P.O. Box 309, Menomonee Falls, WI 53051 TEST THIS UNIT EACH WEEK DIESES GERÄT 1ST WÖCHENTLICH ZU PRÜFEN. ESSAI HEBDOMADAIRE Test-operate valve(s) each week and sign below. Report any malfunctions immediately. Ventil(e) wöchentlich im Testbetrieb prüfen, bestätigt durch Unterschrift. Jegliche Störung sofort melden.
S19-270C, S19-270E, S19274C, S19274E Installation Armado de los componentes y lista de piezas — S19274E La versión que oscila hacia la derecha se muestra en la posición abierta. R P.O. Box 309, Menomonee Falls, WI 53051 TEST THIS UNIT EACH WEEK DIESES GERÄT 1ST WÖCHENTLICH ZU PRÜFEN. ESSAI HEBDOMADAIRE 30 31 Test-operate valve(s) each week and sign below. Report any malfunctions immediately. Ventil(e) wöchentlich im Testbetrieb prüfen, bestätigt durch Unterschrift. Jegliche Störung sofort melden.