
Installation Sheet


20
Powder Coated & Stainless Steel Restroom Partitions, Floor-Mounted with Overhead Brace — Series 400 Installation
3/21/2018 Bradley • HDWT-INSTR-009 Rev K; ECN 17-14-007
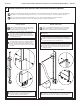
Secure the top and bottom pilaster hinge to the pilaster
with the #10-24 x 3/4" barrel nuts and #10-24 x 1"
shoulder screws provided.
C
Assemble the bottom hinge cam and pin as shown.
Insert into the bottom hinge and thread the locknut
loosely onto the bottom hinge pin.
D
Rotate the door to the desired "at rest" position. Push
down on the door while holding it in the "at rest"
position. This sets the male and female cams in the
bottom hinge. Tighten the hex nut to secure the door in
the "at rest" position.
F
9
Wraparound Gravity Hinges (Continued)
The door hinge assembly consists of separate door
and pilaster hardware.
Door cam surfaces can become worn under normal use.
The application of lithium grease can help prolong door
cam life and reduce friction between surfaces.
The top hinge pin should snap securely
into place.
Bottom
Hinge
Pin
Cam
Lock Nut
Top Hinge
Pin
Finished View
of Top Hinge
Finished View
of Bottom Hinge
Place the bottom door hinge opening onto the bottom
pilaster hinge. Position the top door hinge opening into
the top pilaster hinge and insert the top hinge pin.
E
For doors requiring a full close, rotate the
door 15° past the closed position.