
User Manual


BX8848 Installation Instructions
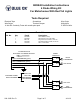
4 Diode Wiring Kit
For Motorhomes With Amber Turn Signals
292-1305 Rev. D Page 4 of 5 4/11/12
13. There are several brown wires in the loom. Depending on your model, 2 to 4 are used for the tail lights. Turn on the
tail lights and use the needle point tester to identify the tail light wires. (Remember, stereo must be off.) When all are
identied, cut the wires, strip them, and twist them together. Crimp a male spade terminal on the wires from the front
of the car and a female spade terminal on the wires going to the tail lights. Plug the male terminal into the “in” side of
a diode block and plug the female terminal into the “out” side of the diode block.
14. Plug the brown wire from the four wire harness into the “in” side of the diode block. Test the car tail lights to make
sure they work.
15. There are multiple yellow wires in the loom. One of them is the left turn signal. Use the needle point tester to nd the
correct wire. When you have the correct wire, cut it , strip the ends, and put a male terminal on the wire from the front
and a female terminal on the wire going to the turn light. Plug the male terminal into the “in” side of a diode block and
the female terminal into the “out” side. Plug the yellow wire from the four wire harness into the remaining terminal on
the diode block.
16. The dark green wire in the loom is the right turn signal. Use the needle point tester to verify that you have the correct
wire. When you have the correct wire, cut it , strip the ends, and put a male terminal on the wire from the front and
a female terminal on the wire going to the turn light. Plug the male terminal into the “in” side of the fourth diode
block and the female terminal into the “out” side of the diode. Plug the green wire from the four wire harness into the
remaining terminal on the diode block.
17. Test the turn signals to make sure they work.
18. The last part of the wiring is to ground the harness. A 36” piece of white wire has been supplied as the ground wire.
In the engine compartment nd a bolt that will provide a metal-to-metal contact. Strip and crimp the ring terminal on
one end of the wire. Remove the bolt and place the ring terminal under it and tighten. Run the other end of the wire
out to the grill by the four wire harness.
19. Using the cable ties provided, secure the four wire harness several places between the grill and the rewall to keep
the harness from getting tangled up in moving parts or touching parts that will get hot.
20. The last thing to wire is the 6 pin trailer plug. If your motorhome already has a plug on it, identify which pins are what
on that plug and match the wires to the pins as you wire the plug on the car. You can also go ahead and wire the plug
and make adjustments for mismatched wires by switching wires where they plug into the diodes.
21. Hook up the towing vehicle to the wire harness and test the installation by operating the tail lights, turn signals, and
brake lights. If the wiring on the towing vehicle does not match, you will need to change either the wires in the back
seat or on the towing vehicle to match.
22. When the installation is working properly, replace as many wires as possible back into the plastic loom in the back
seat. Use electrical tape to secure the rest of the wires together. Lay the diode blocks and wiring as at as possible
against the oor under the seat. Replace the rear seat. Feed all the seat belt straps and buckles through the holes in
the seat as you replace it.