
Specifications


Model AC
139A
12
3. Configuration and Operation
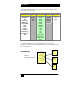
3.1 Front Panel
1. Power: Press this button to turn ON or turn OFF (standby) the
power to the unit.
2. Menu/Enter: This button serves two purposes.
A. Pressing the button will bring up the OSD main menu as
shown in the "OSD Menus" section of this manual.
B. To act as an "Enter" key to enter sub menu or to adjust setting
value of the selected parameter.
3. ▲or▼ buttons: The buttons provide 3 functions:
A. Input Select (▲): Press the ▲ button repeatedly to select
your desired input source. The input sources are toggled through
in the following sequence.
B. Auto Tune (▼): Press the ▼ button to initiate picture auto
adjust for analog inputs (component or PC/VGA). The scaler
will fine tune the position (centering) and color of the output
picture.
C. When in the OSD menu mode: Press the ▲ or ▼ buttons to
move up or down the highlighted bar to the desired parameter.
Once a parameter is highlighted then press the MENU / Enter
button to adjust the setting.
4. Input LED Indicators: The illuminated LED indicates that
corresponding source is being selected as input.
5. IR Sensor: Infrared remote control sensor.
Figure 6
Input Selection Sequence
1
2
3
5
4
Figure 5 –
Front Panel