
User Manual


4
Assembly Instructions
1. Unpack the unit and confirm that you have all the hardware and required parts. Assembly the unit on a
carpeted floor or the empty carton to avoid any scratch.
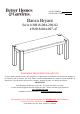
2. Position the Bench Top (A) upside down on a level and protective surface, as shown.
3. Attach four Legs (B) to the corners of Bench Top (A) by using eight 2-1/2” Bolts (1) with Lock Washers
(2) and Flat Washers (3) through the corner blocks and screw into the threaded inserts in the Legs.
Securely tighten the bolts with the provided open wrench.
4. Ask for assistance to lift the unit upright and position it at the desired location.
DO NOT fully tighten the bolts or nuts initially until all the bolts or nuts are
ready to assemble. To avoid causing damages to the thread, DO NOT over-tighten the nuts or bolts.
B
1
A
2
3
A
B
B
B
B
2-1/2” Bolt (8 used in this step)
①
Flat Washer
(8 used in this step)
③
Lock Washer
(8 used in this step)
②