Avaya Solution & Interoperability Test Lab Application Notes for Configuring the Extreme Networks Sentriant Security Appliance in an Avaya IP Telephony Infrastructure – Issue 1.1 Abstract These Application Notes describe a configuration where the Extreme Networks Sentriant network security appliance protects the subnets where an Avaya Media Server and Avaya IP Telephones reside against rapidly propagating threats.
1. Introduction These Application Notes describe a configuration where the Extreme Networks Sentriant security appliance is deployed in an Avaya IP telephony infrastructure. Sentriant is a security appliance that is designed to protect the internal corporate network against rapidly propagating threats and LAN attacks. Sentriant operates within the network interior, and is complementary to perimeter security solutions.
BD10K Vlan 1(default): 1.1.10/24 Vlan 1: 1.1.1.1 port 1:1 - 4 Vlan 10 (core): 10.4.4.0/24 Vlan 10 (core): 10.4.4.1 port 1:5 - 10 Vlan 20 (voice): 20.1.1.0/24 Vlan 20 (voice): 20.1.1.1 port 1:11 - 16 Vlan 30 (data): 30.1.1.0/24 Vlan 30 (data): 30.1.1.
2. Equipment and Software Validated The following equipment and software/firmware were used for the sample configuration provided: Equipment Avaya S8300 Media Server with G700 Gateway Avaya 4620 Series IP Telephones Extreme Networks Sentriant Extreme Networks Black Diamond 10K Switch Attacker PC Software/Firmware Avaya Communication Manager 3.0 Load (340.3) 2.2.3 (4620SW) 2.2 Build 4583 XOS 11.2.0.5 Red Hat Linux ES 3 3.
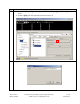
Step Description 1. Assume that the Sentriant Manager Application software has been installed on a computer and an IP address 172.16.254.207 has been assigned to Sentriant. Follow the steps below to access Sentriant configuration menu. • • • SZ; Reviewed: SPOC 2/9/2006 Launch the Sentriant Manager application. Enter the IP address in the Appliance IP Address field. Log in with the appropriate credentials. Solution & Interoperability Test Lab Application Notes ©2006 Avaya Inc. All Rights Reserved.
Step 2. • • 3. Description Select the Edit Config tab and expand the Network Topology tree to the Segments level. Select a QTag (VLAN) and click on the icon next to it. Assign a descriptive name and click on “OK”. SZ; Reviewed: SPOC 2/9/2006 Solution & Interoperability Test Lab Application Notes ©2006 Avaya Inc. All Rights Reserved. 6 of 26 Sentriant.
Step 4. Click on the icon next to Segment IP. Description 5. Assign an available IP Address to the Sentriant on this VLAN and click on “OK”. 6. Select the Subnets tab and click on the “+” icon. SZ; Reviewed: SPOC 2/9/2006 Solution & Interoperability Test Lab Application Notes ©2006 Avaya Inc. All Rights Reserved. 7 of 26 Sentriant.
Step 7. • • Description Enter the subnet information for this VLAN, and check the Add Protected Range checkbox to protect the entire subnet. Click on OK. IP subnet 10.4.4.* is included in Protected Range. To protect specific ranges within the subnet, uncheck the Add Protected Rang checkbox and configure the ranges in the Protected Range tab (not described in these Application Notes) SZ; Reviewed: SPOC 2/9/2006 Solution & Interoperability Test Lab Application Notes ©2006 Avaya Inc. All Rights Reserved.
Step Description 8. Select the Gateway tab and click on the “+” icon. 9. Enter the default gateway of the subnet and click on OK. 10. Select the Deception tab. Set Deception Mode to On. SZ; Reviewed: SPOC 2/9/2006 Solution & Interoperability Test Lab Application Notes ©2006 Avaya Inc. All Rights Reserved. 9 of 26 Sentriant.
Step Description 11. Click the Cloak tab and retain the default value On Demand for the Cloak field. SZ; Reviewed: SPOC 2/9/2006 Solution & Interoperability Test Lab Application Notes ©2006 Avaya Inc. All Rights Reserved. 10 of 26 Sentriant.
Step Description 12. Select the Advanced tab. Set MAC Validation to On. Note: MAC validation is required in order to detect spoofing. SZ; Reviewed: SPOC 2/9/2006 Solution & Interoperability Test Lab Application Notes ©2006 Avaya Inc. All Rights Reserved. 11 of 26 Sentriant.
Step Description 13. Expand the VLAN tree and select one of the two interfaces. These two VLAN interfaces reside on the two ports connected to the Extreme BlackDiamond Switch. Click on the Enable tab. Repeat this step for the other interface. SZ; Reviewed: SPOC 2/9/2006 Solution & Interoperability Test Lab Application Notes ©2006 Avaya Inc. All Rights Reserved. 12 of 26 Sentriant.
Step Description 14. Select one of the interfaces and click on the Pair button. This will make the “Read” port pair to “Write” port. 15. Select the other interface from the pull-down list and click on OK. SZ; Reviewed: SPOC 2/9/2006 Solution & Interoperability Test Lab Application Notes ©2006 Avaya Inc. All Rights Reserved. 13 of 26 Sentriant.
Step Description 16. Click on the Configure Changes icon on the bottom left of the Sentriant Manager main window. SZ; Reviewed: SPOC 2/9/2006 Solution & Interoperability Test Lab Application Notes ©2006 Avaya Inc. All Rights Reserved. 14 of 26 Sentriant.
Step 17. Click on “Save” and then “Close”. Description 18. Repeat Step 2 – 17 as necessary to protect other VLANs. In this configuration, the steps were repeated for VLAN 20 (Voice VLAN). 3.1. Configure Rules on Sentriant Security Appliance Rules are what drive the Detection and Response actions of the Sentriant appliance. Once a segment is configured and is being monitored by the Sentriant appliance, Rules must be assigned before mitigation actions are in effect.
Step 1. To create a Rule: 2. Description • From Edit Config > Network Topology > Policy, click on Rules in the Navigation Panel. • Click the “+” icon to add a new rule. • • • Type the name of the new rule in the Name field. From the Rule Type drop down list, select the rule type. Click OK. SZ; Reviewed: SPOC 2/9/2006 Solution & Interoperability Test Lab Application Notes ©2006 Avaya Inc. All Rights Reserved. 16 of 26 Sentriant.
Step 3. Description Click the Detection tab and modify the # of Packets and Time Period. In this configuration, 100 RAS packets in 10 seconds period are selected since there are only two IP telephones in network. These two perimeters must be adjusted according to the number of IP endpoints in the network. The number of RAS packets defined by the rule must be greater than the number of total RAS packets generated by IP endpoints.
Step 4. • • SZ; Reviewed: SPOC 2/9/2006 Description Click the Response tab and select Threat Medium from the Priority drop down menu. Select Cloak in the Type field. Solution & Interoperability Test Lab Application Notes ©2006 Avaya Inc. All Rights Reserved. 18 of 26 Sentriant.
Step 5. • • • • SZ; Reviewed: SPOC 2/9/2006 Description Click the Include tab and select the “+” icon. Select Protocol UDP. Enter 1719 in the Port field under Target. Click OK. Solution & Interoperability Test Lab Application Notes ©2006 Avaya Inc. All Rights Reserved. 19 of 26 Sentriant.
Step Description 6. A Rule Set is added to each Segment Set allowing for the best detection possible based on the type of network segment configuration. When a rule is triggered by a source threat, deception, alerts and cloaking activities are activated. In this configuration, the default rule set is used for protection. • • • • SZ; Reviewed: SPOC 2/9/2006 From Edit Config > Network Topology > Policy, click on Rule Sets in the Navigation Panel. Select Rule Set Default.
Step 7. Description Click on the Configure Changes icon on the bottom left of the Sentriant Manager screen. Follow steps 1-7 to create other customized rules if needed. SZ; Reviewed: SPOC 2/9/2006 Solution & Interoperability Test Lab Application Notes ©2006 Avaya Inc. All Rights Reserved. 21 of 26 Sentriant.
4. Configure Extreme BlackDiamond 10K Switch This section describes the steps on the Extreme BlackDiamond 10K for configuring the VLAN, port mirroring and Clear-Flow feature for the two ports connected to the Extreme Networks Sentriant. Step Description 1. From the Extreme BlackDiamond 10K Command Line Interface (CLI), assign the protected VLANs (10 and 20 in the sample configuration) to the two ports connected to the Sentriant appliance, and configure the ports as trunk ports with 802.1q encapsulation.
Step Description 2. Configure a monitor session to mirror all VLAN traffic from the protected VLANs to the port in Step 1 connected to the “Reader” port on the Sentriant. # Mirroring configuration. Port 1:2 (Read Only), Port 1:3 (Read/Write). enable mirroring to port 1:2 tagged configure mirroring add port 1:3 Configure an access list for the protected VLAN and enable CLEAR-Flow on the switch. 3. # Enable CLEAR-Flow on Extreme Switch and configure Module acl for protected # VLANs.
5.2. Test Results The test objectives of Section 5.1 were verified. The Sentriant was able to detect the basic ping and port scans as well as H.323 RAS attacks, and mitigate basic non-spoofed DoS attacks generated by the attacker PC. 6. Verification Steps The following steps may be used to verify the configuration: • • • • From the attacker PC, run ping scans on the protected subnets and verify that the Sentriant correctly reports the scans.
9. Additional References [1] Administrator Guide for Avaya Communication Manager - Release 3.0/3.0.1. http://support.avaya.com/japple/css/japple?temp.documentID=232034&temp.productID=136527 &temp.releaseID=228560&temp.bucketID=159898&PAGE=Document [2] Sentriant Manager 2.2 User Guide. http://www.extremenetworks.com/services/documentation/Sentriant_UG.pdf SZ; Reviewed: SPOC 2/9/2006 Solution & Interoperability Test Lab Application Notes ©2006 Avaya Inc. All Rights Reserved. 25 of 26 Sentriant.
©2006 Avaya Inc. All Rights Reserved. Avaya and the Avaya Logo are trademarks of Avaya Inc. All trademarks identified by ® and ™ are registered trademarks or trademarks, respectively, of Avaya Inc. All other trademarks are the property of their respective owners. The information provided in these Application Notes is subject to change without notice.