
User’s Manual
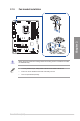


Table Of Contents
- Safety information
- Chapter 1: Product Introduction
- Chapter 2: Basic Installation
- 2.1 Building your PC system
- 2.1.1 CPU installation
- 2.1.2 Cooling system installation
- 2.1.3 DIMM installation
- 2.1.4 M.2 installation
- 2.1.5 Fan bracket installation
- 2.1.6 Motherboard installation
- 2.1.7 ATX power connection
- 2.1.8 SATA device connection
- 2.1.9 Front I/O connector
- 2.1.10 Expansion card installation
- 2.1.11 Wi-Fi antenna installation
- 2.2 Motherboard rear and audio connections
- 2.3 Starting up for the first time
- 2.4 Turning off the computer
- 2.1 Building your PC system
- Chapter 3: BIOS and RAID Support
- Appendix

2-14
Chapter 2: Basic Installation
Chapter 2
To install ThunderboltEX 3-TR card
Thunderbolt header
USB Type-C
®
port connects
to Thunderbolt
devices
MiniDP in port
connects to DP
out port on the
motherboard
or a VGA card
USB 2.0 header
6-pin PCIe power connector
Ensure to install the ThunderboltEX 3-TR card to a PCIe slot from PCH.
• Step 6 is optional, please connect a 6-pin PCIe power connector when you wish to
use the USB Type-C
®
port Thunderbolt quick charge feature to charge a 5V or more
device. The ThunderboltEX 3-TR card can support quick charging up to 100W.
• The TypeC_1 port can support up to 20V devices, and the TypeC_2 port can support
up to 9V devices when the 6-pin PCIe power connector is connected.
• The Thunderbolt card is sold separately.