WL-520g Quick Start Guide English Index 1. Package Contents......................................................................2 2. Connecting ADSL Modem and Wireless Router.....................3 1) Cable Connection....................................................................3 2) Status Indicators .....................................................................3 3. Configuring the Wireless Router..............................................4 1) ASUS Wireless Router Wired Connection.........
WL-520g Quick Start Guide 1. Package Contents English • WL-520g wireless router*1 • Power adaptor*1 • External antenna*1 • Utility CD*1 • RJ45 cable*1 • Quick Start Guide*1 Manufacturer Contact Information ASUSTeK COMPUTER INC. (Asia-Pacific) Company address: 15 Li-Te Road, Beitou, Taipei 11259 General (tel): +886-2-2894-3447 Web site address: General (fax): +886-2-2894-7798 General email: www.asus.com.tw info@asus.com.
WL-520g Quick Start Guide 2.
WL-520g Quick Start Guide 3. Configuring the Wireless Router English Note: 1) Before you start, we recommend using a wired connection for initial configuration, which will avoid possible setup problem due to wireless uncertainty. 2) ASUS also provides an EZSetup button for fast wireless configuration. If you prefer EZSetup to arrange for your wireless network configuration, please refer to chapter 6 of WL520g user’s manual included in the support CD.
WL-520g Quick Start Guide English Note: Before rebooting your PC, the ASUS Wireless Router should be switched ON and in ready state. Setting IP Manually If you want to set your IP address manually, the following default settings of the ASUS Wireless Router should be known: • IP address 192.168.1.1 • Subnet Mask 255.255.255.0. If you set your computer’s IP manually, it needs to be on the same segment. For example: • IP address 192.168.1.
WL-520g Quick Start Guide 4) Quick Setup English To start quick setup, click Next to enter the “Quick Setup” page. Follow the instructions to setup the ASUS Wireless Router. Select your time zone or the closest region. Click Next to continue. ASUS wireless router WL520g supports five types of ISP services— cable, ADSL (PPPoE, PPTP, static IP address), and Telstra BigPond.
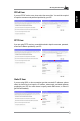
WL-520g Quick Start Guide PPPoE User English If you are PPPoE service user, pleae select the second line. You would be required to input the username and password provided by your ISP. PPTP User If you are using PPTP services, you would be asked to input the username, password, as well as IP address provided by your ISP.
WL-520g Quick Start Guide After setting the connection type, you are to set up your wireless interface,. First, give an SSID (Service Set Identifier), which is a unique identifier attached to packets sent over WLANs. This identifier emulates a password when a wireless device attempts communication on the WLAN. Because an SSID distinguishes WLANs from each other, access points and wireless devices trying to connect to a WLAN must use the same SSID.
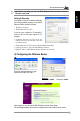
WL-520g Quick Start Guide Select Connect to an existing wireless LAN (Station) when the welcome window appears, then click Next. English ASUS ONE TOUCH WIZARD searches and displays all the available stations as shown in the picture. Select WL520g and press Next to continue. The setup wizard then asks for encryption setup. Set Key Length as 64 bits (10digits) as we have previously set on WL-520g, then select Automatic Generation and input 11111 into the Passphrase box.
WL-520g Quick Start Guide For non-ASUS wireless adaptor users, you can set up the wireless connection between your computer and the wireless router with Windows® Zero-Configure function. Right click the Network Neighbour on the desktop of your client and click Property, then in the Network Connection window, double-click Wireless Network Connection icon, a window with all available stations appears. Select WL520g and click Connect. The connection process would take about several seconds.
WL-520g Schnellstarthilfe Inhalt 1. Paketinhalt................................................................................12 2. Verbindung des ADSL-Modems und Wireless Routers........13 1) Kabelverbindung....................................................................13 Deutsch 2) Statusanzeigen......................................................................13 3. Wireless Router-Konfiguration...............................................14 1) Verbinden des ASUS Wireless Routers............
WL-520g Schnellstarthilfe 1. Paketinhalt • WL-520g Wireless Router*1 • Netzteil*1 • externe Antenne*1 • CD mit Treibern und Hilfsprogrammen*1 Deutsch • RJ45-Kabel*1 • Schnellstarthilfe*1 Kontaktinformationen des Herstellers ASUSTeK COMPUTER INC. (Südostasien) Adresse: 15 Li-Te Road, Beitou, Taipeh11259 Tel. (allg.): +886-2-2894-3447 Website: www.asus.com.tw Fax (allg.): +886-2-2894-7798 eMail: info@asus.com.
WL-520g Schnellstarthilfe 2.
WL-520g Schnellstarthilfe 3. Wireless Router-Konfiguration Hinweis: 1) Für die erste Konfiguration empfehlen wir, eine Kabelverbindung zu verwenden, um Einstellungsprobleme durch eine instabile kabellose Verbindung zu umgehen 2) ASUS bietet Ihnen die EZSetup-Schaltfläche für eine schnelle kabellose Konfiguration. Wenn Sie EZSetup für die Konfiguration Ihres kabellosen Netzwerks verwenden möchten, beziehen Sie sich bitte auf Kapitel 6 des WL550gE Benutzerhandbuchs auf der Support-CD.
WL-520g Schnellstarthilfe 2) Einstellen der IP-Adresse für Kabel- und kabellose Verbindung Automatische IP-Einstellung Deutsch Der kabellose ASUS Router enthält einen DHCP-Server, also ist es die einfachste Methode, Ihren Computer neu zu starten, um Ihren PC einzustellen und seine IPAdresse automatisch zu beziehen. So erhält der kabellose ASUS Router die korrekte IP-Adresse, Gateway und DNS (DomainName Systemserver).
WL-520g Schnellstarthilfe 3) Konfiguration des Wireless Routers 1 2 Deutsch Geben Sie die folgende Adresse in Ihren Webbrowser ein: http://192.168.1.1 Standard Benutzername: admin Passwort: admin 3 Nach dem Login sehen Sie die ASUS Wireless Router Homepage. Die Homepage zeigt direkte Links, um die Hauptfunktionen des Routers zu konfigurieren. 4) Schnelleinstellung Um die Schnelleinstellung zu starten, klicken Sie Next (Weiter), um zur Quick Setup-Seite zu gelangen.
WL-520g Schnellstarthilfe Kabelverbindung Deutsch Falls Sie eine Kabelverbindung verwenden, oder Ihr ISP Ihnen automatisch eine IPAdresse zuweist, wählen Sie bitte Cable Modem or other connection that gets IP automatically (Kabelmodem oder andere Verbindung mit automatischer IP-Adresse). Falls Sie einen Kabelservice in Anspruch nehmen, hat Ihnen Ihr ISP evtl. Hostnamen, MAC-Adresse und Heartbeat-Server zur Verfügung gestellt.
WL-520g Schnellstarthilfe PPTP Falls Sie einen PPTP-Service verwenden, werden Sie aufgefordert, die von Ihrem ISP zur Verfügung gestellten Benutzernamen, Passwort und IP-Adresse einzugeben. herk036@adsl-comfort Deutsch Benutzer mit statischer IP-Adresse Falls Sie ADSL oder eine andere Verbindungsart mit statischen IP-Adressen verwenden, wählen Sie bitte die vierte Option und geben Sie die von Ihrem ISP zur Verfügung gestellte IP-Adresse, Subnetz-Maske, und Standardgateway ein.
WL-520g Schnellstarthilfe 3 Falls Sie Ihr kabelloses Netzwerk mit einer Sicherheitseinstellung schützen wollen, wählen Sie eine der Sicherheitsstufen (Mittel oder Hoch) im Security Level-Menü; danach müssen Sie die WEP-Schlüssel in den folgenden Fenstern festlegen. Medium (Mittel): Nur Benutzer mit dem gleichen WEP-Schlüssel können sich mit diesem Access Point verbinden und Daten mit 64bits-oder 128bits-WEPVerschlüsselung übertragen.
WL-520g Schnellstarthilfe Deutsch 6 Wählen Sie Connect to an existing wireless LAN (Station) (mit bereits existierender LAN-Station verbinden) sobald das Willkommen-Fenster erscheint, und klicken Sie Next (Weiter). 7 Der ASUS ONE TOUCH WIZARD sucht nach verfügbaren Stationen und zeigt die Ergebnisse in einer Liste, wie in der Darstellung gezeigt. Wählen Sie WL550gE, und klicken Sie Next (Weiter). 8 Dann werden Sie nach den Verschlüsselungseinstellungen gefragt.
5 Benutzer von kabellosen Adaptern anderer Hersteller können die kabellose Verbindung zwischen ihrem Computer dem Wireless Router mit der Windows® Zero-ConfigureFunktion herstellen. Rechtsklicken Sie das Network Neighbour-Symbol auf dem Desktop Ihres Clients, und klicken Sie dann auf Property (Eigenschaften). Klicken Sie im Fenster "Network Connection" doppelt auf das Wireless Network ConnectionSymbol, und es öffnet sich ein Fenster mit allen zur Verfügung stehenden Routern.
Guida all’avviamento rapido WL-520gE Indice 1. Contenuto della confezione....................................................23 2. Collegamento del modem ADSL e del Router Wireless.......24 1) Connessione cavo.................................................................24 2) Indicatori Stato . ....................................................................24 3. Configurazione del Router Wireless ASUS............................25 1) Connessione al Router Wireless ASUS..............................
Guida all’avviamento rapido WL-520gE 1. Contenuto della confezione • 1 router wireless WL-520g • 1 adattatore di alimentazione • 1 antenna esterna • 1 CD utilità • 1 cavo RJ45 Italiano • 1 guida rapida Info contatto produttore ASUSTeK COMPUTER INC. (Asia-Pacifico) Indirizzo società: 15 Li-Te Road, Beitou, Taipei 11259 Generale (tel): +886-2-2894-3447 Indirizzo sito web: www.asus.com.tw Generale (fax): +886-2-2894-7798 Email: info@asus.com.
Guida all’avviamento rapido WL-520gE 2.
Guida all’avviamento rapido WL-520gE 3. Configurazione del Router Wireless ASUS Il Router Wireless ASUS può essere configurato per essere utilizzato in vari scenari. Alcune delle impostazioni predefinite di fabbrica possono essere già adatte per il vostro utilizzo; tuttavia, altre potrebbero richiedere delle modifiche. Prima di utilizzare il Router Wireless ASUS, dovete verificare le impostazioni di base per assicurarsi che possa funzionare nel vostro ambiente.
Guida all’avviamento rapido WL-520gE 2) Impostazione dell’ indirizzo IP per la connessione Cablata o Wireless Ottieni IP Automaticamente Il Router Wireless ASUS incorpora un server DHCP che è il modo più semplice per impostare il PC in modo tale che possa ottenere il suo indirizzo IP automaticamente e riavviare il computer. In questo modo possono essere ottenuti correttamente dal Router Wireless ASUS l’indirizzo IP, il gateway e il DNS (Domain Name System Server).
Guida all’avviamento rapido WL-520gE 3) Configurazione del Router Wireless 1 2 Inserire il seguente indirizzo nel web browser: http://192.168.1.1 Italiano 3 Predefiniti Nome utente: admin Password: admin A registrazione avvenuta, viene visualizzata la home page del Router Wireless ASUS. La homepage visualizza collegamenti rapidi per la configurazione delle funzionalità principali del router.
Guida all’avviamento rapido WL-520gE Utenti via Cavo Se si ricevono i servizi via Cavo o altri ISP che assegnano gli indirizzi IP automaticamente, selezionare Cable Modem or other connection that gets IP automatically (Modem via cavo o altra connessione che ottiene l’indirizzo IP automaticamente).
Guida all’avviamento rapido WL-520gE Utenti PPTP Se si usano i servizi PPTP, sarà richiesto di inserire il nome utente, password forniti e l’indirizzo IP forniti dal proprio ISP. Utenti IP statico Se si usa la connessione ADSL o altri tipi di connessione che usano indirizzi IP statici, selezionare la quarta riga; quindi indirizzo IP, Subnet mask e Gateway predefinito forniti dal proprio ISP. Si può scegliere di specificare alcuni server DNS, oppure selezionare di ottenere automaticamente il DNS.
Guida all’avviamento rapido WL-520gE 3 Se si vogliono applicare soluzioni di protezione alla WLAN, selezionare un livello appropriato (medio o alto) nel menu Scurity Level (Livello di protezione); poi specificare le chiavi WEP nei capi che seguono. Medium (Medio): solo gli utenti con la stessa chiave WEP possono collegarsi a questo punto d’accesso e trasmettere dati usando una chiave di codifica WEP 64 bit o 128 bit.
Guida all’avviamento rapido WL-520gE Quando appare la finestra di benvenuto, selezionare Connect to an existing wireless LAN (Station) (Connetti ad una WLAN (Stazione) esistente), e poi fare clic su Next (Avanti). 7 A S U S O N E TO U C H W I Z A R D cerca e visualizza tutte le stazioni disponibili, come mostrato n e l l ’ illustrazione. Selezionare WL520g e premere Next (Avanti) per continuare. 8 La procedura guidata d’impostazione chiederà d’impostare la codifica.
Guida all’avviamento rapido WL-520gE 5 Utenti con scheda wireless diversa da ASUS: impostare la connessione wireless tra il computer ed il router wireless usando la funzione Windows® Zero-Configure.
Guía de Instalación Rápida para WL-520g Índice 1. Contenido del paquete............................................................34 2. Conectando el Modem ADSL y el Enrutador Inalámbrico ..35 1) Conexión de los cables..........................................................35 2) Indicadores de estado ..........................................................35 3. Configurando el Enrutador Inalámbrico.................................36 1) Conectando en Enrutador Inalámbrico ASUS.......................
Guía de Instalación Rápida para WL-520g 1. Contenido del Paquete • Enrutador inalámbrico WL-550gE*1 • Adaptador de corriente*1 • Antena externa*1 • CD de utilidades*1 • Cable RJ45*1 • Guía Rápida*1 Información de Contacto del Fabricante ASUSTeK COMPUTER INC. (Asia-Pacífico) Dirección: 15 Li-Te Road, Beitou, Taipei 11259 General (tel): +886-2-2894-3447 Página Web: General (fax):+886-2-2894-7798 www.asus.com.tw Correo electrónico: info@asus.com.
Guía de Instalación Rápida para WL-520g 2.
Guía de Instalación Rápida para WL-520g 3. Configurando el Enrutador Inalámbrico Notas: 1) Antes de comenzar, recomendamos que utilice la conexión por cable para una configuración inicial y así evitar posibles problemas de configuración provocados por la conexión inalámbrica. 2) ASUS también incluye un botón llamado EZSetup para una configuración inalámbrica rápida.
Guía de Instalación Rápida para WL-520g Nota: Antes de reiniciar el PC el Enrutador inalámbrico ASUS deberá estar encendido y en modo Preparado. Estableciendo la IP manualmente Si desea establecer la dirección de IP de forma manual, los ajustes por defecto del Enrutador inalámbrico ASUS deberán ser tenidos en cuenta: • Dirección de IP 192.168.1.1 • Máscara de Subred 255.255.255.0. Si desea establecer la dirección de IP manuálmente, necesitará que esté en el mismo segmento.
Guía de Instalación Rápida para WL-520g 4) Configuración rápida Para iniciar la configuración rápida, haga clic en Next (Siguiente) para acceder a la página de Quick Setup. Siga las instrucciones para configurar el enrutador inalámbrico ASUS. 1 Seleccione la zona horaria o la región más cercana. Haga clic en Next (Siguiente) para continuar. Nota: El enrutador inalámbrico ASUS WL550gE soporta cinco tipos de servicios de ISP— cable, ADSL (PPPoE, PPTP, dirección estática de IP), y Telstra BigPond.
Guía de Instalación Rápida para WL-520g Usuario PPPoE Si utiliza servicios PPPoE, por favor seleccione la segunda opción, Necesitará insertar un nombre de usuario y contraseña que le serán proporcionadas por su ISP. Usuario PPTP Si utiliza servicios PPTP, deberá introducir nombre de usuario, contraseña y dirección de IP proporcionadas por su ISP.
Guía de Instalación Rápida para WL-520g 2 Tras seleccionar el tipo de conexión deberá configurar el interfaz inalámbrico. En primer lugar, indique un SSID (Service Set Identifier - Indicador de Ajustes de Servicio), que es un identificador único adjunto a paquetes enviados a través de Redes inalámbricas. Este identificador emula una contraseña cada vez que un dispositivo inalámbrico intenta establecer comunicaciones con la Red inalámbrica (WLAN).
6 Cuando aparezca la ventana de bienvenida, seleccione Connect to an existing wireless LAN (Station), y haga clic en Next (Siguiente). 7 ASUS ONE TOUCH WIZARD buscará y mostrará todas las estaciones disponibles como se muestra en la ilustración. Seleccione WL550gE y pulse Next (Siguiente) para continuar. 8 El asistente de configuración solicitara establecer la información de seguridad, Seleccione la longitud de la clave a 64 bits (10digits) tal y como ha sido definido en el WL-550gE.
Guía de Instalación Rápida para WL-520g Para usuarios de adaptadores Inalámbricos que no sean ASUS, es posible establecer la conexión inalámbrica entre el ordenador y el enrutador con la función Windows ® Zero-Configure. Haga clic con el botón derecho del ratón en Mis sitios de red en el escritorio del cliente. Luego haga clic en Propiedades, y en la ventana de Conexiones de red, haga doble clic en el icono de Conexión de Red inalámbrica (WLAN). Una ventana aparecerá con todas las estaciones disponibles.
WL-520g Quick Start Guide Содержание 1. Комплектность ............................................................................................ 44 2. Соединение ADSL модема и маршрутизатора....................................... 45 1) Соединения................................................................................................45 2) Индикаторы . ............................................................................................. 45 3. Настройка маршрутизатора........................
WL-520g Quick Start Guide 1. Комплектность • WL-520g беспроводный маршрутизатор*1 • Адартер питания*1 • Внешняя антенна*1 • CD с драйверами и утилитами*1 • Кабель RJ45*1 • Руководство по быстрой установке*1 Контактная информация изготовителя ASUSTeK COMPUTER INC. (Азия-Тихоокеания) Адрес компании:: Телефон: +886-2-2894-3447 15 Li-Te Road, Beitou, Taipei 11259 сайт: www.asus.com.tw Факс: +886-2-2894-7798 email: info@asus.com.
WL-520g Quick Start Guide 2.
WL-520g Quick Start Guide 3. Настройка маршрутизатора Примечание: 1) Перед запуском, для начальной конфигурациимаршрутизатор а, мы рекомендуем вам использовать проводное подключение 2) Также имеется кнопка EZSETUP для быстрой настройки беспроводной сети. Если вы предпочитаете EZSetup, для настройки конфигурации беспроводной сети, пожалуйста обратитесь к 6 главе руководства пользователя WL550gE, на компакт-диске поддержки. Возможна настройка маршрутизатора на использование в различных ситуациях.
WL-520g Quick Start Guide Примечание: Перед перезагрузкой компьютера необходимо включить маршрутизатор и дождаться его перехода в состояние готовности. Установка IP адреса вручную При необходимости установить IP адрес вручную, пользователю необходимо располагать информацией о следующих установках маршрутизатора по умолчанию: • IP адрес 192.168.1.1 • Маска подсети 255.255.255.0. При задании IP адреса компьютера вручную необходимо, чтобы он оказался в том же сегменте. Например: • IP адрес 192.168.1.
WL-520g Quick Start Guide 4) Быстрая установка Для запуска быстрой установки, щелкните Next для перехода на страницу быстрой установки. Следуйте инструкциям для установки маршрутизатора ASUS. Выберите часовой пояс или ближайший регион. Для продолжения нажмите Next. 1 Маршрутизатор поддерживает пять типов подключений: кабель, ADSL (PPPoE, PPTP, статический IP адрес), и Telstra BigPond. Поскольку каждое подключение имеет свои собственные протоколы и стандарты, они потребуются во время установки WL-550gE.
WL-520g Quick Start Guide PPPoE пользователь Если вы используете подключение PPPoE, вам потребуется ввести имя пользователя и пароль, предоставленные вашим провайдером. PPTP пользователь Если вы используете подключение PPTP, вам потребуется ввести имя пользователя, пароль и IP адрес, предоставленные вашим провайдером.
WL-520g Quick Start Guide 2 После установки типа подключения, вы должны установить ваш беспроводный интерфейс. Сначала, присвойте SSID (Идентификатор набора услуг), который является уникальным идентификатором, прилагаемый к пакетам, посылаемым через WLAN. Этот идентификатор эмулирует пароль, когда беспроводное устройство пытается связаться по WLAN. Поскольку SSID определяет конкретный WLAN, точка доступа и беспроводные устройства, пытающиеся подключиться к WLAN должны использовать один и тот же SSID.
WL-520g Quick Start Guide 6 Когда появится окно выберите Connect to an existing wireless LAN (Station), затем нажмите Next. 7 ASUS ONE TOUCH WIZARD ищет и показывает все доступные станции как показано на картинке. Выберите WL550gE и нажмите Next для продолжения. 8 Затем мастер установки попросит установить шифрование. Установите длину ключа 64 бита (10 цифр) как мы до этого установили в WL-550gE, затем выберите автоматическую генерацию и введите ключевое слово 11111.
WL-520g Quick Start Guide 5 Пользователи других беспроводных адаптеров могут установить беспроводное подключение между компьютером и беспроводным маршрутизатором с помощью функции Windows Zero-Configure. Щелкните правой кнопкой на сетевом окружении на рабочем столе вашего клиента и щелкните свойства, затем в окне сетевые соединения, дважды щелкните значок беспроводное соединение, появится окно со всеми доступными AP. Выберите WL550gE и щелкните Connect. 6 Процесс подключения займет несколько секунд.
Guide d’installation rapide WL-520g Table des matières 1. Contenu de la boîte..................................................................54 2. Connecter un modem ADSL et un routeur sans fil...............55 1) Connexion des câbles...........................................................55 2) Témoins d'activité .................................................................55 3. Configurer le routeur sans fil..................................................
Guide d’installation rapide du WL-520g 1. Contenu de la boîte • Routeur sans fil WL-520g*1 • Adaptateur secteur*1 • Antenne extérieure*1 • CD d'utilitaires et de pilotes*1 • Câble RJ45*1 • Guide de démarrage rapide*1 Contacts Constructeur ASUSTeK COMPUTER INC. (Asie-Pacifique) Adresse: 15 Li-Te Road, Beitou, Taipei 11259 Général (tel): +886-2-2894-3447 Site Web: www.asus.com.tw Général (fax):+886-2-2894-7798 Email: info@asus.com.
Guide d’installation rapide WL-520g 2. Connecter un modem ADSL et un routeur sans fil 1) Connexion des câbles 1 Prise secteur murale Modem Alim. Tél. Prise téléphonique murale 2 Prise secteur murale Modem Routeur sans fil ASUS LAN4 Alim. Tél. Alim.
Guide d’installation rapide du WL-520g 3. Configurer le routeur sans fil Note: 1) Avant de commencer, nous vous recommandons d’utiliser la connexion filaire en tant que configuration initiale afin d’éviter les éventuels problèmes de configuration dus aux aléas de la connexion sans fil. 2) ASUS propose également un bouton EZSetup pour une configuration sans fil rapide.
Guide d’installation rapide WL-520g Note: Avant de redémarrer votre ordinateur, le routeur sans fil d’ASUS doit être allumé (position ON) et prêt Définir l’adresse IP manuellement Si vous souhaitez définir votre adresse IP manuellement, les réglages par défaut du routeur sans fil doivent être renseignés (cf. cidessous): • Adresse IP 192.168.1.1 • Masque de sous-réseau 255.255.255.0. Si vous définissez votre adresse IP manuellement, celle-ci doit être sur le même segment IP. Par exemple: • Adresse IP 192.
Guide d’installation rapide du WL-520g 4) Configuration rapide Pour commencer la configuration rapide, cliquez sur Next (Suivant) afin d’accéder à la page Quick Setup. Suivez les instructions pour configurer votre routeur sans fil. Choisissez votre fuseau horaire ou la zone la plus proche. Cliquez sur Next (Suivant) pour continuer. 1 Le routeur sans fil WL520g d’ASUS supporte cinq types de connexion— câble, ADSL (PPPoE, PPTP, adresse IP fixe), et Telstra BigPond.
Guide d’installation rapide WL-520g Connexion PPPoE Si vous utilisez une connexion PPPoE, veuillez sélectionner la seconde ligne. Il vous sera demandé de saisir le nom d'utilisateur et le mot de passe fournis par votre FAI. Connexion PPTP Si vous utilisez une connexion PPTP, il vous sera demandé de saisir le nom d'utilisateur, le mot de passe, ainsi que l'adresse IP fournis par votre FAI.
Guide d’installation rapide du WL-520g 2 Après avoir défini votre type de connexion, vous allez maintenant établir votre interface sans fil. D’abord, attribuez un SSID (Service Set Identifier) qui est un identifiant unique attaché à tous les paquets envoyés par via les WLAN. Cet identifiant émule un mot de passe quand un périphérique sans fil tente de communiquer avec le WLAN.
Guide d’installation rapide WL-520g 6 Sélectionnez Connect to an existing wireless LAN (Station) (Se connecter à une station LAN sans fil existante) quand la fenêtre de bienvenue apparaît, puis cliquez sur Next (Suivant). 7 ASUS ONE TOUCH WIZARD cherche et affiche toutes les stations disponibles comme le montre l'image ci-contre. Sélectionnez WL520g et pressez Next (Suivant) pour continuer. 8 L'assistant de configuration s'enquiert alors de la configuration du cryptage.
Guide d’installation rapide du WL-520g 5 Si vous n'utilisez pas l'adaptateur sans fil d'ASUS, vous pouvez mettre en place la connexion sans fil entre votre ordinateur et le routeur sans fil grâce à la fonction Windows® Zero-Configure. Faites un clic droit sur Network Neighbour (Voisinage réseau) sur le bureau de votre client. Puis cliquez sur Property (Propriétés).
WL-520g Uputstvo Srpski Sadržaj 1. Pakovanje.................................................................................64 2. Povezivanje ADSL modema bežičnog rutera........................65 1) Povezivanje kablova..............................................................65 2) Indikatori stanja ....................................................................65 3. Konfigurisanje bežičnog rutera...............................................
WL-520g Uputstvo 1. Pakovanje Srpski • WL-520g Bežični ruter*1 • Strujni adapter*1 • Eksterna antena*1 • CD sa programskim alatima*1 • RJ45 kabl*1 • Uputstvo*1 Kontakt proizvođača ASUSTeK COMPUTER INC. (Region Azija-Pacifik) Adresa kompanije:15 Li-Te Road, Beitou, Taipei 11259 Opšti (tel): +886-2-2894-3447 Web sajt: Opšti (fax): +886-2-2894-7798 Opšti email: www.asus.com.tw info@asus.com.
WL-520g Uputstvo 2.
WL-520g Uputstvo 3. Konfigurisanje bežičnog rutera Srpski Napomena: 1) Pre nego što započnete proces konfigurisanja, preporučujemo da za inicijalnu konfiguraciju koristite žičnu mrežnu konekciju, kako biste izbegli potencijalne probleme. 2) Ovaj uređaj kompanije ASUS poseduje i EZSetup taster koji omogućava brzu konfiguraciju bežične konekcije.
WL-520g Uputstvo Srpski podesite vaš računar na automatsko dodeljivanje IP adresa, tako da će vaš računar, nakon restartovanja, automatski dobiti IP adresu. Prema tome tačnu IP adresu, gateway, DNS (Domain Name System Server) i sva ostala podešavanja, mogu se dobiti automatski od ASUS bežičnog rutera. Napomena: Pre nego što restartujete sistem, potrebno je da ASUS bežični ruter bude uključen i spreman za rad.
WL-520g Uputstvo Nakon logovanja ugledaćete glavnu stranu ASUS bežičnog rutera. Srpski Glavna strana poseduje linkove na ostale strane koje omogućavaju podešavanje radnih parametara rutera. 4) Brzo podešavanje Da biste pokrenuli brzo podešavanje, kliknite na opciju Next i izaberite stranicu “Quick Setup”. Pratite instrukcije koje su potrebne da biste podesili ASUS bežični ruter. 1 Izaberite vremensku zonu koja je najbliža vašoj. Izaberite Next da biste nastavili.
WL-520g Uputstvo PPPoE Srpski Ukoliko koristite usluge provajdera koji se oslanja na PPPoE servis, molimo vas da izberete drugu liniju. Potrebno je da upišete vaše korisničko ime i lozinku, koje ste dobili od vašeg ISP-a. PPTP Ukoliko koristite usluge provajdera koji se oslanja na PPTP servis, molimo vas da izberete drugu liniju. Potrebno je da upišete vaše korisničko ime i lozinku, koje ste dobili od vašeg ISP-a.
WL-520g Uputstvo Nakon što podesite tip konekcije, potrebno je da podesite i bežični interfejs. Prvo, potrebno je da definišete SSID (Service Set Identi.er), koji predstavlja jedinstvenu identifikaciju paketa koji se šalju putem bežične mreže. Ova vrsta identifikacije predstavlja osnovnu zaštitu podataka na mreži i sprečava pristup ne ovlašćenim WLAN uređajima. 3 Pored toga, ukoliko želite da dodatno zaštitite podatke na mreži, potrebno je da izaberete srednji ili visoki nivo bezbednosti.
WL-520g Uputstvo Izaberite opciju Connect to an existing wirelessLAN (Station), a zatim izaberite opciju Next. Srpski 6 7 ASUS ONE TOUCH WIZARD će pretražiti i prikazati sve raspoložive bazne stanice na koje adapter može da se priključi. Izaberite WL520g i nakon toga opciju Next. 8 Nakon toga potrebno definisati potrebnu enkripciju.
WL-520g Uputstvo Korisnici koji ne koriste ASUS bežične adaptere, bežičnu konekciju između klijenta i rutera možete podesiti pomoću Windows ® Zero-Configure opcije. Desni klik na ikonu Network Neighbouhood, a zatim izaberite Property vašeg adaptera, nakon čega je potrebno da, u prozoru Network Connection, dva puta kliknete na ikonu Wireless Network Connection, što će prizvati prozor u kome možete videti sve raspoložive mrežne konekcije. Izberite WL520g i kliknite na opciju Connect.
WL-520g Průvodce rychlou konfiguraci Obsah 1. Obsah balení............................................................................74 2. Propojení ADSL modemu a bezdrátového routeru...............75 1) Zapojení kabelů.....................................................................75 2) Stavové indikátory ................................................................75 3. Konfigurace bezdrátového routeru.........................................76 Česky 1) Kabelové propojení – nastavení...........
WL-520g Průvodce rychlou konfiguraci 1. Obsah balení • Bezdrátový router WL-520g (dále jen „router“) *1 • Napájecí adaptér*1 • Externí anténa*1 • CD s manuálem*1 Česky • Kabel RJ45*1 • Průvodce pro rychlou konfiguraci*1 Manufacturer Contact Information ASUSTeK COMPUTER INC. (Asia-Pacific) Company address: 15 Li-Te Road, Beitou, Taipei 11259 General (tel): +886-2-2894-3447 Web site address: General (fax): +886-2-2894-7798 General email: www.asus.com.tw info@asus.com.
WL-520g Průvodce rychlou konfiguraci 2. Propojení ADSL modemu a bezdrátového routeru 1) Zapojení kabelů 1 Wall.power.outlet Modem Power Phone 2 Česky Wall telephone outlet Wall.power.outlet Modem ASUS.Wireless.Router LAN4 Power Phone LAN3 LAN2 LAN1 Power WAN WAN Wall telephone outlet 3 2) Stavové indikátory Wall.power.outlet Modem ASUS.Wireless.
WL-520g Průvodce rychlou konfiguraci 3. Konfigurace bezdrátového routeru Poznámka: 1) Doporučujeme začít nastavování s propojeným ethernetovým kabelem, protože bezdrátové spojení nemusí být stoprocentně jisté a spolehlivé.. 2) ASUS obsahuje tlačítko pro rychlou konfiguraci bezdrátového modulu (EZ Setup). Chcete-li ho použít, informace jsou v kapitole 6 uživatelského manuálu k routeru WL520g na přiloženém CD. Česky ASUS bezdrátový router lze nakonfigurovat různými postupy.
WL-520g Průvodce rychlou konfiguraci Poznámka: Při restartu Vašeho počítače musí být router zapnut a připraven. Nastavit IP adresu ručně Pokud chcete IP adresu nastavit ručně, zde jsou výchozí nastavení routeru: • IP adresa 192.168.1.1 • Maska podsítě 255.255.255.0 Adresa počítače musí být ve stejné podsíti jako router. Například: Česky • IP adresa 192.168.1.xxx (xxx je libovolné číslo 2 – 254, žádné dvě zařízení v jedné podsíti však nesmí mít stejné) • Maska podsítě 255.255.255.
WL-520g Průvodce rychlou konfiguraci 4) Rychlé nastavení (odkaz Quick Setup) V rychlém nastavení se pohybujete dopředu klikáním na Next. 1 Vyberte správné časové pásmo. Pokračujte Next. Česky Poznámka: ASUS router WL520g podporuje pět typů ISP služeb – kabelové, ADSL (PPPoE, PPTP, statická IP adresa) a Telstra BigPond. Protože každý způsob připojení má své vlastní protokoly a standardy, jednotlivé postupy nastavení se od sebe liší. Zde vyberte typ připojení. Pokračujte Next.
WL-520g Průvodce rychlou konfiguraci PPPoE User Česky Pokud jste připojeni protokolem PPPoE, zvolte druhý řádek. Dále musíte zadat jméno (username) a heslo (password), které Vám určil poskytovatel internetu. PPTP připojení Pokud jste připojeni protokolem PPPTP, zvolte třetí řádek. Dále musíte zadat jméno (username), heslo (password) a IP adresu, které Vám přidělil poskytovatel internetu.
WL-520g Průvodce rychlou konfiguraci Česky 2 Po výběru typu připojení se pokračuje nastavením bezdrátového rozhraní. Nejprve zadejte SSID (Service Set Identifier), což je jedinečný identifikátor připojovaný k datovým paketům šířených přes WLAN. Při pokusu o komunikaci přes WLAN tento identifikátor emuluje heslo. Protože SSID vzájemně odlišuje jednotlivé WLAN sítě, všechny bezdrátové karty a přístupové body komunikující v jedné WLAN musí používat stejné SSID.
WL-520g Průvodce rychlou konfiguraci Zvolte Připojit k existující bezdrátové LAN (stanici) (Connect to an existing wireless LAN-station), pokračujte Next. Česky 6 7 Průvodce nyní vyhledá a zobrazí dostupné stanice. Vyberte WL520g a pokračujte Next. 8 Nyní je nutno nastavit šifrování stejně jako v routeru. V našem příkladu byla délka klíče 64 bitů (10 číslic), můžeme použít automatické generování klíče z fráze (Automatic Generation), fráze byla 11111.
WL-520g Průvodce rychlou konfiguraci Česky 5 Nainstalované karty jiných výrobců je možno nastavit např. přes Ovládací panely -> Síťová připojení -> Bezdrátové připojení k síti. Zobrazí se okno se seznamem dostupných bezdrátových sítí. Vyberte WL520g a klikněte na Připojit. 6 Proces navazování spojení trvá několik sekund. 7 Zobrazí se okno s výzvou k zadání klíče. Zadejte 10-bitový klíč, jenž byl dříve vygenerován v routeru, klikněte na Connect.
WL-520g Ghid de instalare rapida Index 1. Continutul pachetului..............................................................84 2. Conectare ADSL Modem si Wireless Router . ......................85 1) Conectarea Cablurilor............................................................85 2) Indicatori de stare .................................................................85 3. Configurare Router Wireless . ...............................................86 1) Conectare ASUS Wireless Router ..................
WL-520g Ghid de instalare rapida 1. Continut pachet • WL-520g wireless router*1 • Transformator*1 • Antena externa*1 • CD Utilitati*1 • Cablu RJ45 *1 • Ghid de instalare rapida*1 Română Informatii de contact ale Producatorului ASUSTeK COMPUTER INC. (Asia-Pacific) Adresa companiei: 15 Li-Te Road, Beitou, Taipei 11259 Telefon global: +886-2-2894-3447 Adresă website : Fax global: +886-2-2894-7798 Email global: www.asus.com.tw info@asus.com.
WL-520g Ghid de instalare rapida 2.
WL-520g Ghid de instalare rapida 3. Configurarea Routerului Wireless Nota: 1) Inainte de a incepe, va recomandam sa folositi o conectare cablata pentru configurarea initiala, fapt ce va evita posibilele probleme cauzate de legatura wireless. 2) ASUS ofera un buton EZSetup pentru o configurare wireless rapida. Daca optati pentru folosirea butonului EZSetup in configurarea retelei wireless, atunci va rugam sa consultati capitolul 6 din manualul WL520g de pe CD.
WL-520g Ghid de instalare rapida Nota: Inainte de restartarea computerului, Routerul Wireless ASUS trebuie sa fie pornit. Setarea manuala a adreselor IP Daca doriti setarea manuala a adeselor IP, setarile prestabilite ale Routerului Wireless ASUS sunt urmatoarele Română • IP address 192.168.1.1 • Subnet Mask 255.255.255.0. Daca setati manual adesa IP a computerului dvs, ea trebuie sa fie in acelasi segment. De exemplu: • IP address 192.168.1.
WL-520g Ghid de instalare rapida 4) Setare rapida Pentru a porni setarea rapida, apasati “Next” pentru a intra pe pagina “Quick Setup”, Urmati instructiunile pentru a setarea Routerului Wireless ASUS. 1 Selectati zona si timpul. Apasati “ Next” pentru a continua Routerul Wireless ASUS WL520g suporta cinci tipuri de servicii ISP: cablu, ADSL (PPPoE, PPTP, adresa IP statica) si Telstra BigPond.
WL-520g Ghid de instalare rapida Utilizatorii de conexiune PPPoE Daca sunteti utilizatori de conexiune PPPoE, va rugam sa selectati a doua optiune. Trebuie sa introduceti usename si parola stabilita de ISP-ul vostru. Utilizatorii de conexiune PPTP Română Daca sunteti utilizatori de conexiune PPTP, va trebui sa introduceti valorile furnizate de ISP-ul vostru pentru username, parola si adresa IP.
WL-520g Ghid de instalare rapida 2 Dupa ce ati ales tipul de conexiune, urmeaza sa setati interfata wireless. Mai intai alegeti un SSID (Service Set Identifier), care reprezinta un identificator unic atasat pachetelor trimise prin WLAN. Acest identificator emuleaza o parola atunci cand un dispozitiv wireless incearca sa comunice in WLAN.
WL-520g Ghid de instalare rapida Selectati Connect to an existing wirelessLAN (Station) cand apare fereastra de pornire a sistemului de operare Windows, apoi apasati Next. 7 ASUS ONE TOUCH WIZARD va cauta si va afisa toate statiile disponibile precum in fotografia alaturata. Alegeti WL520g si apasati Next 8 Următorul pas al programului de setare este stabilirea parametrilor de criptare.
WL-520g Ghid de instalare rapida Pentru adaptoarele wireless care nu sunt ASUS, puteti seta conexiunea dintre computerul vostru si routerul wireless cu functia Windows® Zero-Configure. Apasati click dreapta pe iconita Network Neighbour si alegeti Property. Apoi, in fereastra Network Connection apasati dublu click pe iconita Wireless Network Connection si va apare o fereastra cu statiile disponibile. Alegeti WL520g si apasati Connect. 6 Procesul de conectare poate dura cateva secunde.
WL-520g Telepítési Útmutató Tartalomjegyzék 1. Csomag tartalma......................................................................94 2. A Wireless Router és az ADSL modem összekötése............95 1) Kábelek elrendezése.............................................................95 2) Állapotjelző LEDek ...............................................................95 3. A Wireless Router beállítása...................................................96 1) ASUS Wireless Router vezetékes kapcsolat..........
WL-520g Telepítési Útmutató 1. Csomag tartalma • WL-520g wireless router*1 • Külső tápegység*1 • Külső antenna*1 • Támogató CD*1 • RJ45 kábel*1 • Telepítési útmutató*1 Kontakt információk Magyar ASUSTeK COMPUTER INC. (Asia-Pacific) Company address: 15 Li-Te Road, Beitou, Taipei 11259 General (tel): +886-2-2894-3447 Web site address: General (fax): +886-2-2894-7798 General email: www.asus.com.tw info@asus.com.
WL-520g Telepítési Útmutató 2.
WL-520g Telepítési Útmutató 3. A Wireless Router beállítása Megjegyzés: A vezeték nélküli kapcsolat lehetséges problémáit elkerülendő javasoljuk, hogy a router legelső beállításához vezetékes kapcsolatot használjon. A vezeték nélküli hálózat gyors beállításához használhatja a routeren található EZSetup gombot is. Az EZSetup használatához kérjük, olvassa el a támogató CD-n lévő Kézikönyv 6. fejezetét. Az ASUS Wireless Router beállításait rugalmasan a felhasználási környezethez lehet igazítani.
WL-520g Telepítési Útmutató Megjegyzés: A számítógép újraindítása előtt ellenőrizze, hogy a router be van kapcsolva és készen áll. IP cím megadása kézzel A számítógép IP címét kézzel is megadhatja. Az ehhez szükséges információk (az ASUS Wireless Router alapbeállításai): • IP cím: 192.168.1.1 • Alhálózati maszk: 255.255.255.0. A számítógép kézzel beállított IP címének ezen az alhálózaton kell lennie. Példa: • IP cím: 192.168.1.
WL-520g Telepítési Útmutató 4) Quick Setup [Gyors konfigurálás] A “Quick Setup” indításához kattitson a főoldalon a “Next ” gombra. Az ASUS Wireless Router gyors beállításához kövesse a képernyőn megjelenő utasításokat. 1 Válassza ki az Önnek megfelelő helyi időzónát. Kattintson a “Next” gombra a folytatáshoz. Az ASUS Wireless Router WL520g ötféle ISP (internetszolgáltató) típust támogat — kábel, ADSL (PPPoE, PPTP, statikus IP cím), és Telstra BigPond.
WL-520g Telepítési Útmutató PPPoE internetkapcsolat Ha Ön PPPoE típusú ADSL internetkapcsolattal rendelkezik, válassza a második, PPPoE opciót, majd adja meg a szolgáltatótól kapott bejelentkezési nevet és jelszót. PPTP User Ha Ön PPTP típusú ADSL internetkapcsolattal rendelkezik, válassza a második, PPTP opciót, majd adja meg a szolgáltatótól kapott bejelentkezési nevet, jelszót és IP címet.
WL-520g Telepítési Útmutató 2 Az internetkapcsolat megadása után állítsa be a wireless kapcsolatot. Először adja meg a kapcsolat SSID-et (Service Set Identifier), ami a hálózat egyedi azonosítója (neve). Ez az azonosító jeszóként is funkcionál, amikor egy eszköz megpróbál a WLAN hálózathoz csatlakozni. Mivel az SSID a WLAN-okat különbözteti meg egymástól, a WLAN tagjainál ugyanazt az SSID-et kell beállítani. 3 Az adatátvitel védelméhez válaszhatja a Medium és High Security Level-t [Biztonsági szint].
WL-520g Telepítési Útmutató 6 Az üdvözlőképernyőn válassza a "Select Connect to an existing wireless LAN (Station)" [Csatlakozás egy már létező WLAN hálózathoz] menüpontot, majd kattintson a "Next" gombra. 7 Az ASUS ONE TOUCH WIZARD megkeresi és megjeleníti az elérhető hálózatokat. Válassza a megfelelő SSIDvel rendelkező hálózatot (a példában WL520g), majd kattintson a "Next" gombra a folytatáshoz. 8 A beállítási varázslóban adja meg a Magyar titkosítás módját.
WL-520g Telepítési Útmutató 5 Ha nem ASUS wireless vezérlőt használ, akkor a Windows ® Zero-Configure funkciójával állíthatja be a számítógépe és a router közti wireless kapcsolatot. Klikkeljen az egér jobb gombjával az Asztalon található Hálózati helyek ikonra, majd kattintson a a Tulajdonságok menüpontra. A megjelenő Hálózati kapcsolatok ablakban kattintson kétszer a Wireless Network Connection [Vezeték nélküli hálózati kapcsolat] ikonra.
WL-520g Guia de Iniciação Rápida Índice 1. Conteúdos do Pacote............................................................104 2. Ligar o Modem ADSL e o Router Wireless (Sem Fios).......105 1) Conexão do Cabo................................................................105 2) Indicadores de Estado ........................................................105 3. Configurar o Router Wireless (Sem Fios)............................106 1) Conexão com Fios do Router Wireless ASUS.....................
WL-520g Guia de Iniciação Rápida 1. Conteúdos do Pacote • Router Wireless WL-520g*1 • Adaptador de Energia*1 • Antena Externa*1 • CD de Utilitários*1 • Cabo RJ45*1 • Guia de Iniciação Rápida*1 Contactos do Fabricante ASUSTeK COMPUTER INC. (Ásia-Pacifico) Endereço da Companhia:15 Li-Te Road, Beitou, Taipei 11259 Geral (tel): +886-2-2894-3447 Endereço da Página Web: www.asus.com.tw Geral (fax): +886-2-2894-7798 E-mail Geral: info@asus.com.
WL-520g Guia de Iniciação Rápida 2.
WL-520g Guia de Iniciação Rápida 3. Configurar o Router Wireless (Sem Fios) Nota: 1 ) A n t e s d e c o m e ç a r , R e c o m e n d a m o s q u e a c o n f i g u r a ç ã o inicial seja feita utilizando uma ligação com fios para evitar possíveis problemas devido à instabilidade da ligação sem fios. 2) A ASUS fornece um utilitário chamado EZSetup para uma rápida configuração sem fios.
WL-520g Guia de Iniciação Rápida simples é configurar o seu PC para receber o seu endereço de IP automaticamente e reiniciar o seu computador. Os endereços de IP correctos, gateway, DNS (Domain Name System Server) podem ser obtidos a partir do Router Wireless ASUS. Nota: Antes de Reiniciar o seu PC, o Router Wireless ASUS tem que estar ligado e pronto.
WL-520g Guia de Iniciação Rápida Após feito o início de sessão, verá a página principal do Router Wireless ASUS. Esta página mostra os links que lhe permitem configurar as funcionalidades principais do router. 4) Configuração rápida Para iniciar a configuração rápida, clique em Next (Seguinte) para aceder à página “Quick Setup” (Configuração rápida). Siga as instruções para config urar o router sem fios da ASUS. 1 Seleccione o seu fuso horário e clique em Next (Seguinte).
WL-520g Guia de Iniciação Rápida Utilizador de serviços PPPoE Se utiliza um serviço PPPoE, seleccione a segunda linha. Terá que introduzir o nome de utilizador e password fornecidos pelo seu ISP. Utilizador de serviços PPTP Se estiver a usar serviços PPTP, ir-lhe-a ser pedido que introduza o nome de utilizador, password, e também o endereço de IP fornecido pelo seu ISP.
WL-520g Guia de Iniciação Rápida 2 Depois de escolher o tipo de ligação terá que configurar a sua interface wireless. Primeiro, atribua um SSID (Service Set Identifier), que é um identificador único relacionado aos pacotes enviados pelas WLANs. Este identificador emula uma password quando um dispositivo wireless tenta comunicar na WLAN. Como o SSID distingue as WLANs, os pontos de acesso e dispositivos wireless que tentam conectar a uma WLAN não deverão ter o mesmo SSID.
WL-520g Guia de Iniciação Rápida 6 Seleccione o botão de opção Connect o an existing wireless LAN (Station) Ligar a uma LAN sem fios existente Estação)) e clique em Next (Seguinte) ara continuar. 7 O One Touch Wizard procura e apresenta os pontos de acesso disponíveis na lista Available N e t w o r k s (Re d e s d i s p o n í v e i s ) . Seleccione o WL-520g e prima Next (Seguinte) para continuar. 8 O assistente de configuração ir-lhe-á perguntar o tipo de encriptação.
WL-520g Guia de Iniciação Rápida 5 Para os utilizadores de adaptadores Wireless não-ASUS, pode configurar a conexão sem fios entre o seu computador e o Router Wireless com a função Windows ® Zero-Configure.
WL-520g przewodnik użytkownika Index 1. Zawartość opakowania..........................................................114 2. Przygotowanie routera do pracy..........................................115 1) Podłączanie okablowania.................................................... 115 2) Diody LED............................................................................ 115 3. Konfiguracja routera..............................................................116 1) Konfiguracja połączenia Ethernet..........
WL-520g przewodnik użytkownika 1. Zawartość opakowania • Bezprzewodowy router WL-520g*1 • Zasilacz*1 • Antena zewnętrzna*1 • CD-ROM*1 • kabel sieciowy RJ45*1 • przewodnik użytkownika*1 Informacje i telefony kontaktowe ASUSTeK COMPUTER INC. (Asia-Pacific) Company address: 15 Li-Te Road, Beitou, Taipei 11259 General (tel): +886-2-2894-3447 Web site address: General (fax): +886-2-2894-7798 General email: www.asus.com.tw info@asus.com.
WL-520g przewodnik użytkownika 2.
WL-520g przewodnik użytkownika 3. Konfiguracja routera Uwaga: 1) Zanim zaczniesz korzystać z urządzenia zalecamy przeprowadzić jego finalną konfigurację przy pomocy połączenia kablowego, które jest bardziej stabilne niż połączenie bezprzewodowe. 2) ASUS umożliwia szybką konfigurację połączenia bezprzewodowego za pomocą kreatora EZSetup.
WL-520g przewodnik użytkownika Uwaga: Zanim restartujesz komputer, router ASUS powinien być włączony i gotowy do pracy. Konfiguruj adres IP ręcznie Jeśli chcesz skonfigurować ustawienia sieciowe TCP/IP ręcznie, powinieneś znać następujące ustawienia sieciowe routera: • Adres IP 192.168.1.1 • Maska podsieci 255.255.255.0. Komputer PC powinien znajdować się w tej samej podsieci co router, przykładowo: • Adres IP 192.168.1.
WL-520g przewodnik użytkownika 4) Szybki start Aby rozpocząć szybką konfigurację, i zmienić ustawienia routera ASUS kliknij Next. Postępuj zgodnie ze wskazówkami. 1 Wybierz strefę czasową w której się znajdujesz. Kliknij Next, aby kontynuować. Router ASUS obsługuje pięć typów połączeń internetowych – cable, ADSL (PPPoE, PPTP, statyczny adres IP) oraz Telstra BigPond.
WL-520g przewodnik użytkownika Połączenie PPPoE Jeśli używasz połączenia PPPoE, wybierz opcję „ADSL connection that requires user name and password. It is known as PPPoE”. Wymagane będzie podanie nazwy użytkownika i hasła, które otrzymałeś od swojego dostawy Internetu (ISP). Połączenie PPTP Jeśli używasz połączenia PPTP, wymagane będzie podanie nazwy użytkownika i hasła oraz adresu IP, które otrzymałeś od swojego dostawy Internetu (ISP).
WL-520g przewodnik użytkownika 2 Po wybraniu typu połączenia, możesz skonfigurować sieć bezprzewodową. Najpierw podaj nazwę sieci (SSID), która jest unikalnym identyfikatorem, dołączanym do pakietów wędrujących w eterze. Ten identyfikator jest swojego rodzaju hasłem wymaganym, gdy dane urządzenie próbuje podłączyć się do sieci. Ponieważ identyfikator SSID jest unikalny, urządzenia bezprzewodowe próbujące nawiązać kontakt z daną siecią muszą posługiwać się tym samym znacznikiem SSID.
WL-520g przewodnik użytkownika 6 Wybierz “Connect to an existing wireless LAN (Station)” w oknie powitalnym, a następnie kliknij Next. 7 Oprogramowanie ASUS One Touch Wizard wyszuka, a następnie wyświetli wszystkie dostępne urządzenia bezprzewodowe. Wybierz router WL520g i kliknij Next, aby kontynuować. 8 Następnie Kreator wyświetli ustawienia szyfrowania. Wybierz długość klucza - 64 bity (10 cyfr) - taką samą jaką wpisałeś w routerze WL-520g.
WL-520g przewodnik użytkownika 5 W przypadku innych kart bezprzewodowych, do konfiguracji połączenia możesz użyć kreatora dostępnego w systemie Windows. Kliknij prawym przyciskiem myszy na ikonie ”Moje miejsca sieciowe” znajdującej się na Pulpicie i wybierz „Właściwości”. Po otwarciu okna „Połączenia sieciowe” kliknij dwukrotnie na ikonie „Połączenie sieci bezprzewodowej”. System wyświetli dostępne sieci bezprzewodowe. Wybierz sieć WL520g, a następnie kliknij „Połącz”.
WL-520g Draadloze router Snelle startgids Nederlands Inhoudsopgave 1. Inhoud van de verpakking.....................................................124 2. De ADSL-modem en de draadloze router aansluiten....................125 1) Kabelverbinding...................................................................125 2) Indicatoren..........................................................................125 3. De draadloze router configureren. ..............................................
WL-520g Draadloze router Snelle startgids Nederlands 1. Inhoud van de verpakking • WL-520g Draadloze router*1 • Voedingsapparaat*1 • Cd met stuurprogramma en hulpprogramma*1 • RJ45-kabel*1 • Snelle-startgids*1 Adresgegegevens van de fabrikant ASUSTeK COMPUTER INC. (Azië-Stille Oceaan) Bedrijfsadres: 15 Li-Te Road, Beitou, Taipei 11259 Algemeen (tel): +886-2-2894-3447 Web site address: Algemeen (fax): +886-2-2894-7798 Algemeen email: www.asus.com.tw info@asus.com.
WL-520g Draadloze router Snelle startgids Nederlands 2.
WL-520g Draadloze router Snelle startgids Nederlands 3. De draadloze router configureren Note: 1) Voordat u begint, adviseren we u te zorgen voor een bedrade verbinding voor de configuratie. U vermijdt dan mogelijke installatieproblemen door een onzekere draadloze verbinding. 2) ASUS biedt de EZSetup-knop voor een snelle draadloze configuratie. Wilt u EZSetup gebruiken voor de draadloze netwerkconfiguratie, lees dan hoofdstuk 6 van de handleiding op de meegeleverde cd voor meer informatie.
WL-520g Draadloze router Snelle startgids Nederlands Opmerking: Voordat u de computer herstart, moet de ASUS draadloze router ingeschakeld zijn en gereed staan. IP handmatig instellen Wilt u het IP-adres handmatig instellen, dan moet u de volgende standaardinstellingen van de ASUS Draadloze router kennen: • IP-adres 192.168.1.1 • Subnetmasker 255.255.255.0 Stelt u het IP-adres van de computer handmatig in, dan moet het op hetzelfde segment zijn. Bijvoorbeeld: • IP-adres 192.168.1.
WL-520g Draadloze router Snelle startgids Nederlands 4) Snelle instelling Om de quick setup te starten, klik u op Next (Volgende)om naar de pagina “Quick Setup” te gaan. Volg de instructies om de ASUS draadloze router in te stellen. 1 Selecteer de tijdzone en klik op Next (Volgende). De ASUS draadloze router WL520g ondersteunt vijf soorten ISP-diensten — kabel, ADSL (PPPoE, PPTP, statisch IP-adres) en Telstra BigPond. Elke dienst heeft zijn eigen protocollen en standaarden.
WL-520g Draadloze router Snelle startgids Nederlands PPPoE-gebruiker Gebruikt u een PPPoE-dienst, selecteer dan de tweede regel. Het kan nodig zijn dat u hier uw gebruikersnaam en wachtwoord opgeeft, zoals u die hebt ontvangen van uw ISP. PPTP-gebruiker Gebruikt u een PPTP-dienst, dan wordt er gevraagd om uw gebruikernaam, wachtwoord en het IP-adres dat u van uw ISP hebt ontvangen, op te geven.
WL-520g Draadloze router Snelle startgids Nederlands 2 Nadat u het verbindingstype hebt opgegeven, kunt u de draadloze interface instellen. Geef eerst een SSID (Service Set Identifier) op. Dit is een unieke ID die is gekoppeld aan pakketten die via het WLAN worden verstuurd. Deze ID emuleert een wachtwoord als een draadloos apparaat probeert te communiceren via het WLAN.
WL-520g Draadloze router Snelle startgids Selecteer Connect to an existing wireless LAN (Station) (Verbinden met een bestaand draadloos LAN (station)) als het welkomstscherm verschijnt en klik op Next (Volgende). Nederlands 6 7 De ASUS ONE TOUCH WIZARD zoekt en toont alle beschikbare stations, zoals weergegeven in de afbeelding. Selecteer WL520g en druk op Next (Volgende) om verder te gaan. 8 De instellingswizard vraagt nu de coderingsinstelling.
WL-520g Draadloze router Snelle startgids Nederlands 5 Gebruikt u een draadloze adapter van een ander merk dan ASUS, dan kunt u een draadloze verbinding maken tussen uw computer en de draadloze router met de zero-configuratiefunctie van Windows® . Klik met de rechtermuisknop op Network Neighbourhood (Netwerkomgeving) op het bureaublad van de client en kies Property (Eigenschappen).