
User Manual


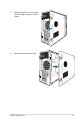


Table Of Contents
- Safety information
- Chapter 1: Product Introduction
- Chapter 2: Hardware Setup
- Chapter 3: Motherboard Information
- Chapter 4: BIOS Setup
- 4.1 Managing and updating your BIOS
- 4.2 BIOS setup program
- 4.3 Main menu
- 4.4 Advanced menu
- 4.4.1 CPU Configuration
- 4.4.2 Power & Performance
- 4.4.3 Server ME Configuration
- 4.4.4 System Event Log
- 4.4.5 Trusted Computing
- 4.4.6 Redfish Host Interface Settings
- 4.4.7 Onboard LAN Configuration
- 4.4.8 Serial Port Console Redirection
- 4.4.9 Intel TXT Information
- 4.4.10 SIO Configuration
- 4.4.11 PCI Subsystem Settings
- 4.4.12 USB Configuration
- 4.4.13 Network Stack Configuration
- 4.4.14 CSM (Compatibility Support Module)
- 4.4.15 NVMe Configuration
- 4.4.16 APM Configuration
- 4.4.17 Third-party UEFI driver configurations
- 4.5 Chipset menu
- 4.6 Security menu
- 4.7 Boot menu
- 4.8 Monitor menu
- 4.9 Tool menu
- 4.10 Event Logs menu
- 4.11 Server Mgmt menu
- 4.12 Exit menu
- Chapter 5: RAID Configuration
- Appendix

Chapter 2: Hardware Setup
2-2
2.1 Chassis cover
2.1.1 Removing the side cover
• Ensure that you unplug the power cord before removing the side cover.
• Takeextracarewhenremovingthesidecover.Keepyourngersfromcomponents
inside the chassis that can cause injury, such as the CPU fan, rear fan, and other
sharp-edged parts.
• The images of the system shown in this section are for reference purposes only and
may not exactly match the model you purchase.
To remove the side cover:
1. Remove the two screws that secure the
side cover.
2. Press the side cover locks outward.
Screws
MIC IN
REAR C/SUB
LINE OUT
LINE IN
KY
DVI
VGA OUT
HDMI
Display/Port
TYPE C
10
SPDIF OUT
2.5G
Side cover locks
HDMI