Primera edición Abril de 2021 Copyright © 2021 ASUSTeK COMPUTER INC. Todos los derechos reservados. Ninguna parte de este manual, incluyendo los productos y el software descritos en éste, podrá ser reproducida, transmitida, transcrita, almacenada en un sistema de recuperación o traducida a cualquier idioma de cualquier forma o modo, a excepción de la documentación conservada por el comprador por propósitos de copia de seguridad, sin el permiso explícito por escrito de ASUSTeK COMPUTER INC. (“ASUS”).
Contenido Avisos .......................................................................................................... iv Información de seguridad............................................................................ v Limpieza y mantenimiento.......................................................................... vi Takeback Services......................................................................................
Avisos Declaración de la Comisión Federal de Comunicaciones (FCC, Federal Communications Commission) Este dispositivo cumple la Parte 15 de las Reglas de la FCC. El funcionamiento se encuentra sujeto a las siguientes dos condiciones: • Este dispositivo no puede causar interferencias perjudiciales, y • Este dispositivo debe aceptar cualquier interferencia recibida, incluida la interferencia que pueda causar un funcionamiento no deseado.
Cet appareil numérique de la classe B respecte toutes les exigences du Réglement sur le matériel brouiller du Canada. Información de seguridad • Antes de instalar el monitor, lea atentamente toda la documentación incluida en el paquete. • Para evitar incendios o descargas eléctricas, no exponga el monitor a la lluvia ni a la humedad. • No abra la carcasa del monitor. En el interior del mismo hay componentes con voltaje alto y peligroso que puede provocar graves daños personales.
• Si tiene problemas técnicos con el monitor, póngase en contacto con un profesional cualificado o con su distribuidor. • Ajustar el control de volumen o el ecualizador en una configuración distinta de la posición central puede aumentar la tensión de salida de los audífonos/ auriculares y, por lo tanto, el nivel de presión de sonido. • El adaptador sólo se utiliza con este monitor, no lo utilice con otros fines.
Convenciones utilizadas en esta guía ADVERTENCIA: información para evitar daños personales al intentar completar una tarea. PRECAUCIÓN: información para evitar daños en los componentes al intentar completar una tarea. IMPORTANTE: información que DEBE seguir para completar una tarea. NOTA: sugerencias e información adicional que ayudan a completar una tarea. Dónde encontrar más información Consulte las siguientes fuentes para obtener información adicional y las actualizaciones del software. 1.
viii
1.1 ¡Bienvenido! ¡Gracias por adquirir el monitor LCD ASUS®! El último monitor LCD de pantalla ancha de ASUS proporciona una imagen más amplia, brillante y clara además de incluir funciones que mejoran su experiencia visual. ¡Con estas funciones, disfrutará de la comodidad y la experiencia visual agradable que proporciona el monitor! 1.
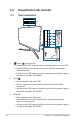
1.3 Presentación del monitor 1.3.1 Vista frontal/lateral 6 1 2 3 4 5 1. Botón ( 5 direcciones) • Activa el menú OSD. Activa el elemento seleccionado en el menú OSD. • Aumenta/disminuye los valores o mueve su selección arriba/ abajo/ izquierda/derecha. • Activa el menú OSD cuando el monitor se posiciona en modo en espera o muestra el mensaje “SIN SEÑAL”. 2. Botón • Sale del elemento del menú OSD. • Activa o desactiva la función Bloqueo de teclas al pulsar durante 5 segundos.
4. Botón • Valor predeterminado: GameVisual. • Para cambiar la función del acceso directo, vaya al menú Acceso directo > Acceso directo 2. • Activa el menú OSD cuando el monitor se posiciona en modo en espera o muestra el mensaje “SIN SEÑAL”. 5. Botón de encendido/Indicador de encendido • Permite encender o apagar el monitor. • En la tabla siguiente encontrará la definición del color del indicador de alimentación. 6.
7. Puerto de envío USB 3.0. Este puerto sirve para realizar una conexión con un cable de envío USB. La conexión habilita los puertos USB en el monitor. 8. Puerto USB de recepción (puerto rojo) con NVIDIA Reflex Latency Analyzer. Este puerto es para la conexión de dispositivos USB, como un teclado/ratón USB, una unidad flash USB, etc. Este puerto está destinado específicamente a la conexión de un ratón con cable o inalámbrico para habilitar NVIDIA Reflex Latency Analyzer. 9. Puertos USB 3.
Menú principal de GamePlus GamePlus — Punto de mira GamePlus — Temporizador GamePlus GamePlus GamePlus GamePlus — Contador de FPS GamePlus FPS Punto de mira (Modo de prácticas) Temporizador Cronómetro FPS Contador de FPS Alineación de pantallas NEXT 1.3.4 BACK/EXIT NEXT BACK/EXIT NEXT BACK/EXIT NEXT BACK/EXIT Función GameVisual La función GameVisual ayuda a elegir entre diversos modos de imagen de manera cómoda. Para activar GameVisual: 1.
1.3.5 • En el Modo Carrera, la(s) siguiente(s) función(es) no son configurables por el usuario: Saturación de seis ejes. • En el Modo sRGB, el usuario no puede configurar la siguiente función(es): Temp del color, Brillo, Contraste, Gamma, Saturación de seis ejes. • En el Modo Escenario/Cine, la(s) siguiente(s) función(es) no son configurables por el usuario: Gamma, Realce de oscuros. G-SYNC HDR El monitor admite el formato HDR.
Monitor LCD ASUS serie PG279QM 1-7
1-8 Capítulo 1: Presentación del producto
2.1 Ensamblar el brazo y la base del monitor 1. Inserte la base en el brazo. 2. Fije la base al brazo apretando el tornillo incluido. Recomendamos que coloque un paño suave sobre la mesa donde apoyará el monitor con el fin de no dañar el monitor. Tamaño de los tornillos de la base: M6 x 15 mm. 2.2 Gestión del cableado Puede organizar los cables con ayuda de la tapa del puerto de entrada/salida.
2.3 Ajustar el monitor • Para conseguir la mejor visualización posible, es recomendable mirar a toda la superficie del monitor y, a continuación, ajustarlo con el ángulo que le resulte más cómodo. • Sujete la base para impedir que el monitor se caiga cuando cambie su ángulo. • El ángulo de ajuste recomendado es de +20˚ a -5˚ (para inclinación)/de +25˚ a -25˚ (para balanceo)/ +100 mm (para ajuste de la altura).
2.4 Extraer el brazo (para montaje de pared VESA) El brazo extraíble de este monitor está especialmente diseñado para un montaje de pared VESA. Para extraer el brazo: 1. Coloque la parte frontal del monitor boca abajo en una mesa. 2. Utilice un destornillador para quitar las cubiertas sobre las que se une el monitor al brazo. 3. Afloje los cuatro tornillos de la parte posterior del monitor y quite el brazo/la base.
2.5 Conectar los cables Conecte los cables siguiendo estas instrucciones: Solo para tareas de mantenimiento • • Para conectar el cable de alimentación: a. Conecte el adaptador de corriente de forma segura a la entrada DC IN del monitor. b. Conecte un extremo del cable de alimentación al adaptador de corriente, y el otro extremo a una toma de corriente eléctrica. Para conectar el cable DisplayPort/HDMI: a.
Monitor LCD ASUS serie PG279QM 2-5
2-6 Capítulo 2: Configuración
3.1 Menú en pantalla (OSD) 3.1.1 Cómo reconfigurar Modo G-SYNC HDR ap. DisplayPort Modo Carrera ® G-SYNC Processor ® G-SYNC Processor 2560x1440@240 Hz Analyzer Inactive ROG Swift 240Hz PG279QM NVIDIA Reflex Latency Analyzer Juegos Imagen Color Selección de entrada Acceso directo Efecto de iluminación Config. Sistema BACK MOVE/ENTER ( EXIT 1. Pulse el botón 2. Mueva el botón ( ) arriba/abajo para desplazarse por las funciones. Resalte la función que desee y pulse el botón ( ) para activarla.
3.1.2 1. Introducción a la función OSD G-SYNC® Processor Modo G-SYNC HDR ap. DisplayPort Modo Carrera ® G-SYNC Processor ® G-SYNC Processor 2560x1440@240 Hz Analyzer Inactive ROG Swift 240Hz PG279QM NVIDIA Reflex Latency Analyzer Juegos Imagen Color Selección de entrada Acceso directo Efecto de iluminación Config. Sistema MOVE/ENTER • BACK EXIT NVIDIA Reflex Latency Analyzer Debe colocar el “Rectángulo de monitorización” donde haya un cambio de luminancia casi inmediato.
* Monitoring Rectangle Preset: permite ajustar la ubicación predefinida por defecto del rectángulo de monitorización. * Monitoring Rectangle Location: permite ajustar manualmente la ubicación del rectángulo de monitorización utilizando el botón ( 5 direcciones). * Monitoring Rectangle Size: permite ajustar manualmente el tamaño del rectángulo de monitorización utilizando el botón 5 direcciones).
• GamePlus: Consulte 1.3.3 Función GamePlus para más información. • GameVisual: Consulte 1.3.4 Función GameVisual para más información. • Realce de oscuros: la mejora de colores oscuros ajusta la curva gamma del monitor para enriquecer los tonos oscuros de una imagen, por lo que resulta mucho más sencillo ver las escenas y los objetos oscuros. 3. Imagen Modo G-SYNC DisplayPort HDR ap.
Consulte lo siguiente para aliviar la tensión ocular: • 4. • Quienes pasan muchas horas trabajando delante de la pantalla deben alejarse de ella en ciertos momentos. Se recomienda realizar pequeños descansos (de al menos 5 min) después de estar una hora trabajando de forma continuada en el ordenador. Resulta más eficaz realizar descansos cortos y frecuentes que hacer un único descanso largo.
• 5. HDMI SDR YCbCr sRGB Gamma: la opción "ENCENDER" hace que se aplique la curva de gama sRGB y la opción "APAGAR" hace que se aplique la curva de gama BT.1886, y coincide con las visualizaciones de masterización de los estudios de cine. Selección de entrada En esta función, puede seleccionar la fuente de entrada que desea y activar o desactivar la función de cambio automático de entrada. Modo G-SYNC HDR ap.
7. Efecto de iluminación Modo G-SYNC HDR ap. DisplayPort Modo Carrera ® G-SYNC Processor G-SYNC Processor Aura Sync Juegos Aura RGB ® 2560x1440@240 Hz Analyzer Inactive ROG Swift 240Hz PG279QM Imagen Color Selección de entrada Acceso directo Efecto de iluminación Config. Sistema BACK MOVE/ENTER EXIT • Aura Sync: Le permite activar o desactivar la función Aura Sync que sincroniza el efecto de luz Aura RGB entre todos los dispositivos compatibles.
• Brillo SDR automático: sincroniza el brillo de la pantalla con los cambios en la luz ambiental. Dado que HDR10 es un estándar absoluto, en el que el contenido define el nivel de nits absoluto, el modo Brillo SDR automático no está disponible en el modo HDR. • Mensaje de advertencia (HDR): le permite activar o desactivar el mensaje de advertencia en Modo HDR. • ECO Mode: reduce el consumo de energía. • Suspensión profunda DisplayPort: el puerto DisplayPort se posiciona en suspensión profunda.
3.2 Aura Armoury Crate es un programa de software que controla los LED de color en los dispositivos compatibles, como monitores, placas base, tarjetas gráficas, ordenadores de escritorio, etc. Aura le permite ajustar el color de los LED RGB en estos dispositivos y seleccionar diferentes efectos de luz. También puede corregir o ajustar el color de los LED calibrándolos. Para activar Aura: 1. Seleccione ENCENDER para activar la función Aura Sync en el menú OSD. 2. Conecte el puerto de envío USB 3.
3.3 3-10 Resumen de especificaciones Tipo de panel LCD TFT Tamaño del panel Pantalla ancha de 27" (16:9, 68,5 cm) Resolución máxima 2560 x 1440 Densidad de píxeles 0,2331 mm x 0,2331 mm Brillo (típ.) 350 cd/m2 Relación de contraste (típ.) 1000:1 Ángulo de visión (H/V) CR>10 178˚/178˚ Colores de visualización 16,7 millones Tiempo de respuesta 1 ms (Gris a gris) Selección de temperatura de color 8 temperaturas de color Entrada analógica No Entrada digital DisplayPort v1.
Varios idiomas 20 idiomas: inglés, francés, alemán, italiano, español, holandés, portugués, ruso, checo, croata, polaco, rumano, húngaro, turco, chino simplificado, chino tradicional, japonés, coreano, tailandés, indonesio.
3.4 Dimensiones del contorno ASUS PG279QM Outline Dimension *Unit: mm(inch) Pivot: +90 Degree 90 20 5 133.98 [5.3] 175.43 [6.9] 8.48 [0.3] 167.83 [6.6] 306.86 [12.1] 613.7 [24.2] 596.74 [23.5]-Active Area 560.48 [22.1] 7.95 [0.3] 22.63 [0.9] 335.66 [13.2]- Active area 367.21 [14.5] 140.02 [5.5] 254.96 [10.0] 25 507.22 [20.0] 88.72 [3.5] 22.26 [0.9] 31.71 [1.2] Swivel: +/-25 Degree 231.44 [9.1] 100 [3.9] 396.52 [15.6] 140.02 [5.5] 25 84.01 [3.3] 117 [4.6] 100 [3.
3.5 Solucionar problemas (preguntas más frecuentes) Problema Solución posible El indicador LED de alimentación no se ENCIENDE • Pulse el botón de encendido para comprobar si el monitor está en modo ENCENDIDO. • Compruebe si el cable de alimentación está correctamente conectado al monitor y a la toma de corriente. El LED de alimentación se ilumina en blanco pero no se muestra ninguna imagen en la pantalla • Compruebe si el monitor y el equipo se encuentran en el modo ENCENDIDO.
Cuando ejecute el NVIDI Reflex Latency • Esto significa que se detectan los clics del ratón, pero que no hay ningún Analyzer, aparecerá "XXXX" en la esquina cambio significativo asociado en el brillo superior izquierda cada vez que haga clic del rectángulo de monitorización. Le en el ratón y el rectángulo esté sobre el recomendamos que reduzca el tamaño fogonazo. del rectángulo para ajustar mejor el fogonazo o aumentar la sensibilidad de la monitorización.
3.6 Modos de funcionamiento soportados Entrada HDMI Frecuencia de Resolución 640 x 480 800 x 600 1024 x 768 1920 x 1080 P 1920 x 1080 P 1920 x 1080 P 1280 x 720 P 1280 x 720 P 720 x 480 P 720 x 576 P 640 x 480 P 1920 x 1080 P Velocidad de fotogramas 60Hz 60Hz 60Hz 60Hz 50Hz 24Hz 60Hz 50Hz 60Hz 50Hz 60Hz 120Hz Observación 2560 x 1440 60Hz Solo compatible cuando el formato de color es RGB/ YUV444 en una profundidad de color de 8 bits/12 bits y YUV422 en una profundidad de color de 12 bits.
Entrada DisplayPort Frecuencia de Resolución 640 x 480 800 x 600 1024 x 768 2560 x 1440 2560 x 1440 2560 x 1440 2560 x 1440 Velocidad de fotogramas 60Hz 60Hz 60Hz 60Hz 100Hz 120Hz 144Hz Observación 2560 x 1440 200Hz Solo compatible cuando el formato de color es RGB/ YUV444 en una profundidad de color de 8 bits y YUV422 en una profundidad de color de 8 bits.
Monitor LCD ASUS serie PG279QM 3-17