
User’s Manual


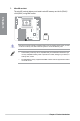
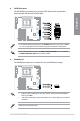


Table Of Contents
- Safety information
- Chapter 1: Product Introduction
- Chapter 2: Basic Installation
- 2.1 Building your PC system
- 2.1.1 Installing the CPU and heatsink
- 2.1.2 DIMM installation
- 2.1.3 M.2 installation
- 2.1.4 Additional cooling kit installation
- 2.1.5 Motherboard installation
- 2.1.6 ATX power connection
- 2.1.7 SATA device connection
- 2.1.8 SlimSAS connection
- 2.1.9 Front I/O connector
- 2.1.10 Expansion card installation
- 2.1.11 M.2 Wi-Fi module and antenna installation
- 2.2 BIOS update utility
- 2.3 Motherboard rear and audio connections
- 2.4 Starting up for the first time
- 2.5 Turning off the computer
- 2.1 Building your PC system
- Chapter 3: BIOS Support
- Appendix

1-10
Chapter 1: Product Introduction
Chapter 1
5. Power connectors
These Power connectors allow you to connect your motherboard to a power supply.
The power supply plugs are designed to fit in only one orientation, find the proper
orientation and push down firmly until the power supply plugs are fully inserted.
The recommended installation for a single and for double PSUs will differ, please refer to
the ATX power connection section for more information.
• We recommend that you use a PSU with a higher power output when configuring a
system with more power-consuming devices. The system may become unstable or
may not boot up if the power is inadequate.
• If you want to use two or more high-end PCI Express x16 cards, use an appropriate
PSU which can supply the required power to ensure the system stability.
The PCIE_8P(1)_PWR provides additional power for your PCIe X16 slots.