
User’s Manual


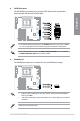


Table Of Contents
- Safety information
- Chapter 1: Product Introduction
- Chapter 2: Basic Installation
- 2.1 Building your PC system
- 2.1.1 Installing the CPU and heatsink
- 2.1.2 DIMM installation
- 2.1.3 M.2 installation
- 2.1.4 Additional cooling kit installation
- 2.1.5 Motherboard installation
- 2.1.6 ATX power connection
- 2.1.7 SATA device connection
- 2.1.8 SlimSAS connection
- 2.1.9 Front I/O connector
- 2.1.10 Expansion card installation
- 2.1.11 M.2 Wi-Fi module and antenna installation
- 2.2 BIOS update utility
- 2.3 Motherboard rear and audio connections
- 2.4 Starting up for the first time
- 2.5 Turning off the computer
- 2.1 Building your PC system
- Chapter 3: BIOS Support
- Appendix

Pro WS W790E-SAGE SE
1-9
Chapter 1
Header Max. Current Max. Power Default Speed Shared Control
CPU_FAN 3A 36W Q-Fan Controlled A
CPU_OPT 3A 36W Q-Fan Controlled A
CHA_FAN1 3A 36W Q-Fan Controlled -
CHA_FAN2 3A 36W Q-Fan Controlled -
CHA_FAN3 3A 36W Q-Fan Controlled -
CHA_FAN4 3A 36W Q-Fan Controlled -
CHA_FAN5 3A 36W Q-Fan Controlled -
W_PUMP+ 3A 36W Full Speed -
4. Fan and Pump headers
The Fan and Pump headers allow you to connect fans or pumps to cool the system.
• DO NOT forget to connect the fan cables to the fan headers. Insufficient air flow
inside the system may damage the motherboard components. These are not
jumpers! Do not place jumper caps on the fan headers!
• Ensure the cable is fully inserted into the header.
For water cooling kits, connect the pump connector to the W_PUMP+ header.