
Manual


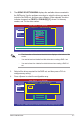


Table Of Contents
- Contents
- Chapter 1: Product introduction
- Chapter 2: Hardware information
- Chapter 3: Powering up
- Chapter 4: BIOS setup
- Chapter 5: RAID configuration
- Chapter 6: Driver installation
- Appendix: Reference information
- 2.1 Before you proceed
- 2.2 Motherboard overview
- 2.3 Central Processing Unit (CPU)
- 2.4 System memory
- 2.5 Expansion slots
- 2.6 Jumpers
- 2.7 Connectors
- A.1 P8B-M block diagram
- A.2 P8B-MX block diagram

ASUS P8B-M series 5-9
8. Select
Units
from the
Virtual Drive
sub-menu, and then press <Enter>.
9. Select the units for virtual drive size from the menu, and then press <Enter>.
Management Menu
Congure
Initialize
Objects
Rebuild
Check Consistency
PORT #
DNLIN A00-00
DNLIN A00-01
0
1
LSI Software RAID Conguration Utility Ver C.05 Sep 17, 2010
BIOS Version A.10.09231523R
Easy Conguration - ARRAY SELECTION MENU
Virtual Drive(s) Congured
LD RAID Size #Stripes StripSz Status
0 1 148.580GB 2 64 KB ONLINE
Virtual Drive 0
RAID = 1
Units= MB
Size = 152146MB
DWC = Off
RA = On
Accept
SPAN = NO
Select Units For VD Size
Use Cursor Keys To Navigate Between Items And Press Enter To Select An Option
Select Units For VD Size
MB
GB
TB
10. When creating a
RAID 1
or a
RAID 10
set, select
DWC
from the
Virtual
Drive
menu, and then press <Enter>.
When creating a
RAID 0
set, proceed to step 12.
11. Select
On
to enable the
Disk Write Cache
setting, and then press <Enter>.
Enabling DWC can improve the performance, but with the risk of data loss.
Management Menu
Congure
Initialize
Objects
Rebuild
Check Consistency
PORT #
DNLIN A00-00
DNLIN A00-01
0
1
Easy Conguration - ARRAY SELECTION MENU
LSI Software RAID Conguration Utility Ver C.05 Sep 17, 2010
BIOS Version A.10.09231523R
Virtual Drive(s) Congured
LD RAID Size #Stripes StripSz Status
0 1 148.580GB 2 64 KB ONLINE
Virtual Drive 0
RAID = 1
Units= MB
Size = 152146MB
DWC = Off
RA = On
Accept
SPAN = NO
Disk Write Cache Setting Of VD
Change DWC
Off
On
Use Cursor Keys To Navigate Between Items And Press Enter To Select An Option