
Motherboard Owner's Manual

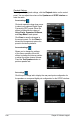


Table Of Contents
- Notices
- Safety information
- About this guide
- P5N-T Deluxe specifications summary
- Product introduction
- 1.1 Welcome!
- 1.2 Package contents
- 1.3 Special features
- 1.3.1 Product highlights
- 1.3.2 ASUS AI Lifestyle unique features 
- 1.3.3 ASUS Intelligent Performance and Overclocking features
- Hardware information
- 2.1 Before you proceed
- 2.2 Motherboard overview
- 2.2.1 Placement direction
- 2.2.2 Screw holes
- 2.2.3 Motherboard layout
- 2.2.4 Layout contents
- 2.3 Central Processing Unit (CPU)
- 2.3.1 Installing the CPU
- 2.3.2 Installing the CPU heatsink and fan
- 2.3.3 Uninstalling the CPU heatsink and fan
- 2.4 System memory
- 2.4.1 Overview
- 2.4.2 Memory configurations
- 2.4.3 Installing a DIMM
- 2.4.4 Removing a DIMM
- 2.5 Expansion slots
- 2.5.1 Installing an expansion card
- 2.5.2 Configuring an expansion card
- 2.5.3 Interrupt assignments
- 2.5.4 PCI slot
- 2.5.5 PCI Express x1 slots
- 2.5.6 PCI Express 2.0 x16 slots
- 2.6 Jumper
- 2.7 Connectors
- 2.7.1 Rear panel connectors
- 2.7.2 Internal connectors
- 2.7.3 Installing the optional fans
- Powering up
- 3.1 Starting up for the first time
- 3.2 Turning off the computer
- 3.2.1 Using the OS shut down function
- 3.2.2 Using the dual function power switch
- BIOS setup
- 4.1 Managing and updating your BIOS
- 4.1.1 ASUS Update utility
- 4.1.2 Creating a bootable floppy disk
- 4.1.3 ASUS EZ Flash 2 utility
- 4.1.4 Updating the BIOS
- 4.1.5 Saving the current BIOS file
- 4.2 BIOS setup program
- 4.2.1 BIOS menu screen
- 4.2.2 Menu bar
- 4.2.3 Legend bar
- 4.2.4 Menu items
- 4.2.5 Sub-menu items
- 4.2.6 Configuration fields
- 4.2.7 Pop-up window
- 4.2.8 General help
- 4.3 Main menu
- 4.3.1 System Time [xx:xx:xx]
- 4.3.2 System Date [Day xx/xx/xxxx]
- 4.3.3 Language [English]
- 4.3.4 Legacy Diskette A [1.44M, 3.5 in.]
- 4.3.5 Primary IDE Master/Slave
- 4.3.6 SATA1/2/3/4/5/6
- 4.3.7 HDD SMART Monitoring [Disabled]
- 4.3.8 Installed Memory [xxx MB]
- 4.3.9 Usable Memory [XXX MB]
- 4.4 Extreme Tweaker menu
- 4.4.1 AI Tuning [Auto]
- 4.4.2 Overclocking
- 4.4.3 Over Voltage
- 4.4.4 NVIDIA GPU Ex [Disabled]
- 4.4.5 SLI-Ready Memory [Disabled]
- 4.4.6 SLI-Ready Memory CPUOC [CPUOC 0%]
- 4.5 Advanced menu
- 4.5.1 AI NET2
- 4.5.2 PCIPnP
- 4.5.3 Onboard Device Configuration
- 4.6 Power menu
- 4.6.1 ACPI Suspend Type [S1&S3]
- 4.6.2 ACPI APIC Support [Enabled]
- 4.6.3 APM Configuration
- 4.6.4 Hardware Monitor
- 4.7 Boot menu
- 4.7.1 Boot Device Priority
- 4.7.2 Removable Drives
- 4.7.3 Hard Disk Drives
- 4.7.4 CDROM Drives
- 4.7.5 Boot Settings Configuration
- 4.7.6 Security
- 4.8 Tools menu
- 4.8.1 ASUS O.C. Profile
- 4.8.2 ASUS EZ Flash 2
- 4.9 Exit menu
- Software support
- 5.1 Installing an operating system
- 5.2 Support DVD information
- 5.2.1 Running the support DVD
- 5.2.2 Drivers menu
- 5.2.3 Utilities menu
- 5.2.4 Make disk menu
- 5.2.5 Manual menu
- 5.2.6 ASUS Contact information
- 5.2.7 Other information
- 5.3 Software information
- 5.3.1 ASUS MyLogo3™
- 5.3.2 AI NET2
- 5.3.3 ASUS PC Probe II
- 5.3.4 ASUS AI Suite
- 5.3.5 ASUS EPU Utility -- AI Gear 3
- 5.3.6 ASUS AI Nap
- 5.3.7 ASUS Q-Fan 2
- 5.3.8 ASUS AI Booster
- 5.3.9 ASUS AI Direct Link
- 5.3.10 AI Audio 2 (SoundMAX® High Definition Audio utility)
- 5.4 RAID configurations
- 5.4.1 RAID definitions
- 5.4.2 NVIDIA® RAID configurations
- 5.5 Creating a RAID driver disk
- 5.5.1 Creating a RAID driver disk without entering the OS
- 5.5.2 Creating a RAID/SATA driver disk in Windows®
- NVIDIA® SLI™ technology support
- 6.1 Overview
- Requirements
- 6.2 Graphics card setup
- 6.2.1 Installing three SLI-ready graphics cards
- 6.2.2 Installing two SLI-ready graphics cards
- 6.2.3 Installing the device drivers
- 6.2.4 Enabling the NVIDIA® SLI™ technology in Windows®
- CPU features
- A.1 Intel® EM64T
- A.2 Enhanced Intel SpeedStep® Technology (EIST)
- A.2.1 System requirements
- A.2.2 Using the EIST
- A.3 Intel® Hyper-Threading Technology
- 2.1 Before you proceed
- 2.2 Motherboard overview
- 2.3 Central Processing Unit (CPU)
- 2.4 System memory
- 2.5 Expansion slots
- 2.6 Jumper
- 2.7 Connectors

ASUS P5N-T Deluxe
5-29
More Settings
Click for the further congurations.
Equalizer
Allows you to
congure and
customize all
the DSP presets
frequencies.
Recording Settings
To change the recording
settings, click the
Recording
button on the control
panel. You can adjust the speaker delay of
Microphone
or
Line In
by moving
the slider rightward or leftward.
Port settings
Click the tab to display the rear
panel ports for Microphone or
Line In.
ANDREA settings
Allows you to select an
enhanced microphone input
features, including
No Filtering
,
Speakerphone
, V
oice Recording
,
and
Directional Beam
.
Record testing
Click the tab to perform test
recording and play the test sample
through the speakers or the SPDIF
interface.