
User Guide


ASUS P4V8X-MX Motherboard 2-5
2.1.4 Using ASUS EZ Flash to update the BIOS
The ASUS EZ Flash feature allows you to easily update the BIOS without
having to go through the long process of booting from a floppy disk and
using a DOS-based utility. The EZ Flash is built-in the BIOS LPC chip so
it is accessible by simply pressing <Alt> + <F2> during the Power-On Self
Tests (POST).
To update the BIOS using ASUS EZ Flash:
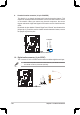
1. Visit the system builder website to download the latest BIOS file for your
motherboard and rename it to
P4V8X-MX.ROM
. Save the BIOS file to a floppy disk.
2. Reboot the system.
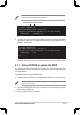
3. To launch EZ Flash, press <Alt> + <F2> during POST to display the following.
4. Insert the floppy disk that contains the BIOS file. If the
P4V8X-MX.ROM
file
is found in the floppy disk, EZ Flash performs the BIOS update process and
automatically reboots the system when done.
DO NOT shut down or reset the system while updating the BIOS! Doing so can
cause system boot failure!
User recovery requested. Starting BIOS recovery...
Checking for floppy...
Floppy found!
Reading file “p4v8x-mx.rom”. Completed.
Start flashing...
Flashed successfully. Rebooting.
User recovery requested. Starting BIOS recovery...
Checking for floppy...
• If there is no floppy disk in the drive, the error message “Floppy not found!” appears.
• If the correct BIOS file is not found in the floppy disk, the error message
“P4V8X-MX.ROM not found!” is displayed.