
Laptop User Manual


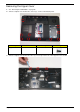


Table Of Contents
- System Specifications
- System Utilities
- Machine Disassembly and Replacement
- Disassembly Requirements
- External Module Disassembly Process
- Main Unit Disassembly Process
- LCD Module Disassembly Process
- LCD Module Reassembly Procedure
- Main Module Reassembly Procedure
- Replacing the CPU
- Replacing the CPU Fan
- Replacing the Thermal Module
- Replacing the Mainboard
- Replacing the TouchPad Bracket
- Replacing the Left Speaker Module
- Replacing the Power Board
- Replacing the Upper Cover
- Replacing the LCD Module
- Replacing the Keyboard
- Replacing the Switch Cover
- Replacing the Hard Disk Drive Module
- Replacing the WLAN Module
- Replacing the DIMM Modules
- Replacing the ODD Module
- Replacing the Lower Covers
- Replacing the SD Dummy Card
- Replacing the Battery
- Troubleshooting
- Jumper and Connector Locations
- FRU (Field Replaceable Unit) List
- Model Definition and Configuration
- Test Compatible Components
- Online Support Information
- Index

70 Chapter 3
Removing the Left Speaker Module
1. See “Removing the Upper Cover” on page 65.
2. Locate the Left Speaker Module on the Upper Cover as shown.
3. Remove the Speaker cable from the cable channel. Ensure that the cable is free from all cable clips.
4. Remove the single securing screw from the Left Speaker Module.
Step Size Quantity Screw Type
Left Speaker
Module
M2*3 1