
User`s guide


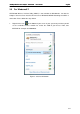


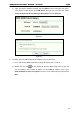


Table Of Contents
- APPPCI300_ug_ES.pdf
- Capítulo 1. Introducción
- Capítulo2. Guía de Instalación
- Capítulo 3. Guía de configuración
- 3.1 Current Status
- 3.2 Profile Management
- 3.4 Windows® Vista
- 3.5 Windows® 7
- Capítulo 4. Configuración WPS
- Apéndice A: Especificaciones
- Apéndice B: Glosario
- APPPCI300_ug_EN.pdf
- APPPCI300_ug_FR.pdf
- APPPCI300_ug_DE.pdf
- APPPCI300_ug_IT.pdf
- 2.1 Panoramica del prodotto
- 2.2 Caratteristiche
- 2.1 Installazione hardware
- 2.2 Installazione Software
- 2.2.1 Per Windows® XP
- 3.2.1 Aggiungere o modificare un profilo di configurazione
- 3.2.2 Rimuovere un profilo
- 3.2.3 Attivare un altro Profilo
- 3.2.4 Esportare un profilo
- 3.2.5 Importare un profilo
- 3.2.6 Scansione Reti Disponibili
- 3.2.7 Auto Profile Selection Management
- 3.3.1 Verifica Informazioni Driver
- 3.3.2 Verifica Informazioni Statistiche Ricevute e Trasmesse
- 2.2.1 Per Windows® XP
- 3.4 Per Windows® Vista
- 3.5 Per Windows® 7
- 4.1 Modalità di configurazione tasto (PBC)
- 4.2 Modalità PIN
- APPPCI300_ug_PT.pdf
- 1. Introdução
- 2. Guia de Instalação
- 3. Guia de Configuração
- 3.1 Current Status
- 3.2 Profile Management
- 3.4 Para Windows® Vista
- 3.5 Para Windows® 7
- 4 Configuração WPS
- Apêndice A: Especificações
- Apêndice B: Glossário

300Mbps Wireless N PCI Adapter – APPPCI300 User’s Guide English
Figure 4-7
4.2 PIN method
There are two ways to configure the WPS by PIN method:
1) Enter a PIN into your AP device.
2) Enter the PIN from your AP device.
Following are the detailed configuration procedure of each way.
4.2.1 Enter a PIN into your AP device
1. Double click the icon on the desktop to open the WPS Utility and then you can see the
welcome screen shown as Figure 4-5 Click Next to continue. Figure 4-8 will appear. Select
the second option, and you will see the PIN value of the adapter which is randomly
generated. Click Next.
69