
Instructions / Assembly


4
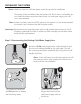
Hold the system with the filter label side facing you. Look
on top of the cap to make sure the arrow is pointing
towards your right. That arrow indicates the water flow
direction
Screw the bracket to the top of the system cap with the front
end facing the same side as the filter label. Please use the
front holes for the two screw holes on the backside.
Connect one end of the 1st water
supply line to the side of the cap that
indicate “IN” and connect the other
end of the same water supply line to
the cold water valve.
Connect one end of the 2nd water
supply line to the side of the cap that
indicate “OUT” and connect the other
end of the same water supply line to
the sink faucet cold water input.
With the appropriate nails or hanger, mount the system to
the wall. Make sure to mount the system close enough to
connect to both the cold water valve and connector to the
faucet. Leave minimum 6 inch of space underneath the filter
for filter change.
4
5
6
7
Step 2: Mounting the Bracket
Step 3: Connecting The System