CS-2500 Water Filtration System INSTALLATION INSTRUCTION & OWNER’S MANUAL Ver 1.
Thank you for choosing APEC reverse osmosis systems. You now own the finest water filter in America. Please read and become familiar with instructions and parts needed before proceeding with the installation. BEFORE INSTALLATION: Inspect the system: Please take the system and all the components out of the box. Inspect the system and all the connection fittings carefully, make sure nothing is damaged during shipping.
Components included with the system: Make sure you have all these parts before starting installation.
INSTALLING THE SYSTEM Space: Make sure there is sufficient space under the counter for installation The system is best installed under the kitchen sink. But if that is not feasible you can install the system anywhere where there is a cold water supply with sufficient water pressure. Note: System is primary used as a POU (point of use) system. It is not recommended to connect it on a location that has multiple outlets.
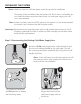
Step 2: Mounting the Bracket 4 Hold the system with the filter label side facing you. Look on top of the cap to make sure the arrow is pointing towards your right. That arrow indicates the water flow direction Screw the bracket to the top of the system cap with the front end facing the same side as the filter label. Please use the front holes for the two screw holes on the backside. 5 With the appropriate nails or hanger, mount the system to the wall.
Step 4: System Start-Up 9 8 Turn on feed water: Slowly, turn on your Cold water supply. Turn counter-clockwise to allow the raw water to enter the system. Check for leaks! 10 Turn on the cold water faucet and let it flush the new system for up to 5 minutes.
SYSTEM MAINTENANCE The system requires very little maintenance. Just change the filter cartridges regularly as indicated on the filter label (Replacement time may vary based on the condition of source water). Keep the system indoors away from extreme heat or cold temperatures, and run the system within its reasonable output capacity (i.e. allow the system to rest at least a few hours a day).
4 Hold on to the new filter with the label side facing you and align the two teeth indent to the two teeth on the cap. After the filter and the cap is align, gently push up and turn Clockwise until it locks in place. Gently pull down to make sure the filter is secure in place. Turn on feed water: Slowly, turn on your Cold water supply. Turn counter-clockwise to allow the raw water to enter the system.
LIMITED PRODUCT WARRANTY Scope APEC takes pride in selling a superb line of products, including this water filtration system (“Product”). As such, APEC expressly warrants to the original purchaser that, for a period of one (1) year from the date of purchase, the Product will be reasonably free of defects in materials and workmanship.
CONDITIONS THAT RENDER THIS LIMITED PRODUCT WARRANTY VOID THIS LIMITED PRODUCT WARRANTY SHALL BE VOID IF: 1. The Product is not operated in compliance with normal municipal water conditions for which the particular model of this Product is intended. 2. The person seeking to invoke the warranty is not the original purchaser. That is, this Limited Product Warranty only extends to original purchasers. 3. The is purchased used. That is, this Limited Product Warranty only covers new products. 4.
Advanced Purification Engineering Corp. 1320 S Johnson Drive City of Industry, CA 91745 For questions or comments please visit our website at: FreeDrinkingWater.com For technical support contact us at: Techsupport@freedrinkingwater.