
Specifications


Configuration and Firmware Update
51
NI Connection and Firmware Updating
2. Verify that both the System number corresponds to the System value previously assigned
within the Device Addressing tab and that zero (0) is entered into the Device field.
3. Click the Get IP Information button to temporarily configure the on-board Master for DHCP
usage and then read the IP Address obtained from the DHCP Server.
4. Click the Specify IP Address radio button from the IP Address section. With this action, all IP
fields become editable.
5. Veri fy t ha t NetLinx appears in the Host Name field (if not, then enter it in at this time).
6. Enter the IP Address, Subnet Mask, and Gateway information into their respective fields.
7. Click the Set IP Information button to cause the on-board Master to retain this new
IP Address (pre-obtained from the System Administrator).
8. Click OK to accept the change to the new IP/DNS information.
9. Click the Reboot Master button and select Ye s to close the Network Addresses dialog.
10. Click Reboot (from the Tools > Reboot the Master Controller dialog) and wait for the System
Master to reboot and retain the newly obtained DHCP Address. The STATUS and OUTPUT
LEDs should begin to alternately blink during the incorporation. Wait until the STATUS LED
is the only LED to blink.
11. Press Done once until the Master Reboot Status field reads *Reboot of System Complete*.
12. Complete the communication process by continuing on to the Communicating with the NI
Device via an IP section on page 51.
Communicating with the NI Device via an IP
Whether the on-board Master’s IP Address was Static Set (Set IP Info) or Dynamically obtained
(Get IP Info), use the IP Address information from the Network Addresses dialog to establish
communication via the Ethernet-connected Integrated Controller.
1. Launch NetLinx Studio 2.4 (default location is Start > Programs > AMX Control Disc >
NetLinx Studio 2 > NetLinx Studio 2).
2. Obtain the IP Address of the Master from your System Administrator or if you still do not have
an IP Address:
Follow the steps outlined in either the Obtaining the Master’s IP Address (using
DHCP) section on page 49 or Assigning a Static IP to the NetLinx Master section on
page 50.
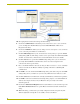
3. Select Settings > Master Communication Settings from the Main menu to open the Master
Communication Settings dialog (FIG. 38).
4. Click the Communications Settings button to open the Communications Settings dialog.
The system value must correspond to the Device Address previously entered in the
Device Addressing tab. Refer to the Setting the System Value section on page 44 for
more detailed instructions on setting a system value.
Verify that these IP values are also entered into the related fields within either the
IP Settings section of the System Connection page (on the touch panel) or within the
Address field on the web browser.