
User`s guide


Hardware
393
IMPORTANT:
[For S model, D model server 1 and E model]
When PROC1 is Enable, set to Valid(Enable) for at least 1 core or
more cores of the PROC1.
When PROC1 is Disable and PROC3 is Enable, set to Valid
(Enable) for at least 1 core or more cores of the PROC3.
It is possible to confirm whether if the PROC is Enable by Fault
Information(Enable/Disable) on the Server Web Console.
Check the status of PROC1 or PROC3 before setting core status.
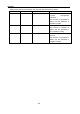
Fault Information (Enable/Disable Component)
Setting Name
O Enabled O Disabled Proc1
O Enabled O Disabled Proc3
[For D model server 2]
When PROC5 is Enable, set to Valid(Enable) for at least 1 core or
more cores of the PROC5.
When PROC5 is Disable and PROC7 is Enable, set to Valid
(Enable) for at least 1 core or more cores of the PROC7.
It is possible to confirm whether if the PROC is Enable by Fault
Information(Enable/Disable) on the Server Web Console.
Check the status of PROC5 or PROC7 before setting core status.
Fault Information (Enable/Disable Component)
Setting Name
O Enabled O Disabled Proc5
O Enabled O Disabled Proc7
[Common]
When setting the processor(PROC) Enable/Disable, refer to
“Enable/Disable Component” on Server Web Console.
IMPORTANT:
Cores may not be recognized after releasing, replacing or
removing & inserting PROC or PMM.
Check cores by pressing “Clear All” of “Fault Information” on the
Server Web Console. Refer the section 2.10 for “Fault
Information”.
When replacing PROC or changing the number of cores, press
“Clear All” and set “Enable” for the cores.
After pressing “Clear All”, core count might be 10. If so, set
Enable/Disable of the core properly. Then after the power on, the
setting will be available.
For Example) If cores of PROC2 are not recognized
1) Check the cores on Server Web Console 1
2) The cores are recognized again by doing “CoreStatus” of
“CoreStatus”.Then set “Enable” for the cores of PROC2.
3) Power on the server