
Owner's Manual


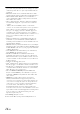


Table Of Contents
- Quick Reference Guide
- Table of Contents
- Parts & Controls
- Getting Started
- About Dual Screen
- User Registration
- HD Radio / RBDS Operation
- MP3 / WMA / AAC Operation
- DVD Operation
- Pandora Internet Radio
- iPod / iPhone Operation
- USB Device Operation
- HDMI Device
- Hands-Free Phone Control
- SiriusXM Satellite Radio Operation
- Installation
- Connections
- Specs
- Owners Manual
- Reset
- Table of Contents
- Supplied Accessories
- Parts & Controls
- Operating Instructions
- Features
- Getting Started
- Accessory List
- Location of Controls
- Turning Power On or Off
- Turning the System On
- Initial System Start-Up
- Inserting/Ejecting a Disc
- Adjusting the Screen Viewing Angle
- Adjusting the Volume
- Lowering Volume Quickly
- Common Operations
- Using My Favorites
- User Registration
- Setting My Favorites
- Easy Sound Setup mode/BASS ENGINE SQ mode
- Access to iDataLink Mode
- Applying TuneIt
- Settings When Switching Users
- How to Input Characters and Numbers (Keypad)
- Top banner and Bottom banner Fade Out Setting
- Switching Sources
- Rear Entertainment Function
- Switching the Dual Screen Display
- Touch operation
- Selecting an Item in a List
- About the Indicator Display
- Radio/HD RadioTM/RBDS
- Listening to the Radio
- Presetting Stations Manually
- Presetting Stations Automatically
- Tuning to Preset Stations
- Forced Analog Mode
- Receiving a Multicast (HD Radio mode only)
- PTY (Program Type) Tuning (Analog Broadcasts only)
- Displaying Radio Text
- Storing the tag information (HD Radio mode only)
- About the Feature Logos
- CD/MP3/WMA/AAC
- DVD
- Playing a Disc
- Stopping Playback (PRE STOP)
- Stopping Playback
- Fast-forwarding/Fast-reversing
- Finding the Beginnings of Chapters/Tracks/Files
- Playing Still Frames (Pausing)
- Forward frame-by-frame Playback
- Slow Motion Playback
- Selecting Folders
- Repeat Playback
- Searching by Title Number
- Searching Directly by Chapter Number
- Searching for a Desired Video File
- Switching the Angle
- Switching the Audio Tracks
- Switching the Subtitles (Subtitle Language)
- About DivX®
- Setup
- Setup Operation
- General Setup
- Sound Setup
- Sound Setup Operation
- Setting the Balance/Fader/Subwoofer
- Setting the MX (Media Xpander)
- Equalizer Presets
- Adjusting the Parametric Equalizer Curve (Parametric EQ)
- Adjusting the Time Correction (Time Correction)
- Adjusting the Crossover Settings (X-Over)
- Setting Defeat
- Volume Setting
- Setting the Volume for Each Source
- About Time Correction
- About the Crossover
- Source Setup
- Bluetooth Setup
- Bluetooth Setup Operation
- Setting Hands-free Connection of iDataLink
- Bluetooth Setting
- Displaying Bluetooth Information
- Registering the Bluetooth Device
- Automatic Connection setting
- Setting the Passcode
- Changing the Character Code of the Phone Book
- Selecting the Output Speaker
- Adjusting the Caller Volume
- Adjusting the Microphone Level
- Adjusting the Ring Tone Volume
- Deleting All the Histories
- Camera Setup
- Bluetooth Operation
- Setup Before Using
- Hands-Free Phone Control
- Bluetooth Audio
- Playing the iDataLink- Bluetooth Audio
- Auxiliary Device (Optional)
- Camera Operation (Optional)
- SiriusXM Satellite Radio Operation (Optional)
- Receiving Channels with the SiriusXM Tuner
- Tuning Channels by Category
- Changing the Display
- Checking the SiriusXM Radio ID Number
- Storing Channel Presets
- Tuning Channels using Presets
- Tune Start Function
- Tune Scan Function
- Search Function
- Selecting the Channel directly
- Storing the desired Song/Artist
- Receiving and Tuning to an Alert
- Replay Function
- Parental Lock Function
- Using Jump Memory and Jump Recall function
- Storing the Tag information
- Playing the iDataLink SiriusXM
- Flash Memory (Optional)
- iPod/iPhone (Optional)
- HDMI Device (Optional)
- Pandora internet radio (optional)
- Information
- Installation and Connections
- Troubleshooting
- Error Messages
- Specs
- Installation Instructions
- Navigation Quick Reference Guide
- Navigation User Manual
- Scan of CD-ROM
- Warranty

10-EN
NOTICE
Product Cleaning
Use a soft dry cloth for periodic cleaning of the product. For more
severe stains, please dampen the cloth with water only. Anything
else has the chance of dissolving the paint or damaging the plastic.
Temperature
Be sure the temperature inside the vehicle is between +45°C
(+113°F) and 0°C (+32°F) before turning your unit on.
Moisture Condensation
You may notice the disc playback sound wavering due to
condensation. If this happens, remove the disc from the player and
wait about an hour for the moisture to evaporate.
Damaged Disc
Do not attempt to play cracked, warped, or damaged discs. Playing
a bad disc could severely damage the playback mechanism.
Maintenance
If you have problems, do not attempt to repair the unit yourself.
Return it to your Alpine dealer or the nearest Alpine Service
Station for servicing.
Never Attempt the Following
Do not grip or pull out the disc while it is being pulled back into the
player by the automatic reloading mechanism.
Do not attempt to insert a disc into the unit when the unit power is
off.
Inserting Discs
Your player accepts only one disc at a time for playback. Do not
attempt to load more than one disc.
Make sure the label side is facing up when you insert the disc.
“Disc error” will be displayed on your player if you insert a disc
incorrectly. If “Disc error” continues to be displayed even though
the disc has been inserted correctly, push the RESET switch with a
pointed object such as a ballpoint pen.
Playing a disc while driving on a very bumpy road may result in
skips, but this will not scratch the disc or damage the player.
Irregular Shaped Discs
Be sure to use round shaped discs only for this unit and never use
any special shaped discs.
Use of special shaped discs may cause damage to the mechanism.
New Discs
To prevent the disc from jamming, “Disc error” is displayed if discs
with irregular surfaces are inserted or if discs are inserted
incorrectly. When a new disc is ejected immediately after initial
loading, use your finger to feel around the inside of the center hole
and outside edge of the disc. If you feel any small bumps or
irregularities, this could inhibit proper loading of the disc. To
remove the bumps, rub the inside edge of the hole and outside edge
of the disc with a ballpoint pen or other such instrument, then insert
the disc again.
Installation Location
Make sure the X009 will not be installed in a location subjected to:
• Direct sun and heat
• High humidity and water
• Excessive dust
• Excessive vibrations
Correct Handling
Do not drop the disc while handling. Hold the disc so you will not
leave fingerprints on the surface. Do not affix tape, paper, or
gummed labels to the disc. Do not write on the disc.
Disc Cleaning
Fingerprints, dust, or soil on the surface of the disc could cause the
DVD player to skip. For routine cleaning, wipe the playing surface
with a clean, soft cloth from the center of the disc to the outer edge.
If the surface is heavily soiled, dampen a clean, soft cloth in a
solution of mild neutral detergent before cleaning the disc.
Center Hole
Bumps
Center Hole
New Disc
Outside
(Bumps)
CORRECT
INCORRECT CORRECT