
Owner's Manual


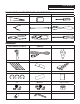


Table Of Contents
- Installation Manual
- Introduction
- Note
- To Ensure Safe Use, Always Follow These Precautions
- Tools Possibly Required (This Will Vary Depending On The Vehicle)
- Accessory List
- Factory Unit Disassembly Process (2007-2010 Only)
- Factory Unit Disassembly Process (2011-2018 Only)
- Glove Box Removal
- Removing B-Pillar Panel
- Removing Rear Right Side Panel
- Spare Tire and Wheel Removal
- Camera & Light Extension Cable Installation
- Bracket Installation
- Wiring Diagram: OEM Head Unit With SGS-CH01 (Sold Seperately)
- Wiring Diagram: OEM Head Unit With ALP-HRN-CAMCH (Sold Seperately)
- Wiring Diagram: Alpine Head Unit Using Direct Connection
- Wiring Diagram: Alpine Head Unit With SGS-CH01 (Sold Separately)
- Wiring Diagram: OEM Head Unit With SGS-CH01 & KCX-C2600B (Sold Separately)
- Wiring Diagram: OEM Head Unit With ALP-HRN-CAMCH & KCX-C2600B (Sold Separately)
- Troubleshooting
- Quick Installation Manual

Jeep Wrangler
HCE-RCAM-WRA 8/16
Spare Tire and Wheel Removal
1 Using 19mm socket, extract the lug nuts.
3 Using panel removing tools, unclip and remove wire
cover on the rear gate.
4 Using panel removing tools, unclip and remove vent
cover on the rear gate.
Camera & Light Extension Cable Installation
1 Route the wires:
A. Start from the head unit harness
B. Behind the glove box
C. Down the passenger kick panel
D. Door sill
E. Along the rear right side panel
F. Along the rear door handle cable
A
B
C D
E