
Instructions / Assembly

INSTRUCTIONS FOR INSTALLATION AND MAINTENANCE
Alpine Industries Models 423-1 and 423-2 Stainless Steel Soap Dispensers
Installation
1. Locate position on wall where the dispenser is to be located. Locate the dispenser so that the spout will
be over the lavatory. Allow a minimum of 5" (125mm) clearance between the top of the dispenser and
the bottom of any projection to provide enough space to fill the dispenser.
2. Mount the wall plate in a vertical position with the wide part of the "V" at top. Place screws in the three
holes of the wall plate. The surface on which the unit is to be mounted determines the type of screws
required for best installation. Use toggle bolts or expansion bolts for plaster or hollow walls. For tile and
marble walls, use fiber plugs.
3. Open the filler door on top of the tank by using the special key supplied.
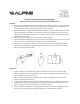
4. Insert screwdriver through the filler door from in front of the tank (image A). Loosen the screw inside the
tank (do not remove) and slide dispenser into the "V" wall plate (image B and C).
5. Tighten the screw securely. The dispenser locks into place when the point of locking screw is lodged
under the lug of the wall plate. Leakage is prevented by the washer under the screw head - therefore
make sure this screw is tightened well.
Maintenance
1. To fill the dispenser open the filler door and fill the dispenser with soap. Corrosion resistant valve
dispenses liquid soaps, lotions and detergents. Avoid using very thick liquids. To prevent corrosion use
only chloride-free, pH-neutral liquid soaps.
2. Wipe the outside of the unit daily, including the spout using a damp cloth. Use only water-soluble
cleaners. Never use abrasive cleaners.
3. If brown deposits appear around the filler door or valve the dispenser as described above. It is not rust
4. Periodically clean the inside of the dispenser by flushing it with warm water mixed with soap from the
dispenser trough the filler door and valve. Never use abrasive cleaners.
5. If the soap valve fails to operate the problem may be caused by dried soap or dirt clogging the spout or
the soap valve. Flush the dispenser as described above. Do not disassemble the soap valve.