
User's Manual


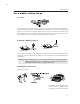

Table Of Contents
- Before operating the transceiver
- Attention
- _
- New and Innovative Features
- Standard Accessories
- _
- For a base station set up
- For a mobile station set up
- Location
- _
- Installing a Mobile Antenna
- Installing the Transceiver
- Front Panel
- External power control function
- Power supply voltage display function
- Part Names and Functions
- Front Panel
- Rear Panel
- Display
- Microphone EMS-53 (Standard)
- _
- Turning the unit on and off
- Switching the MAIN band
- Audio Volume level setting
- Changing frequency by channel step
- Changing frequency by 1 MHz step
- Setting the channel step
- Shift Direction and Offset frequency setting
- Memory Mode
- Recalling a memory channel
- Memory channel deleting
- Programmable data in the memory channel
- Channel name (Alphanumeric) registration function
- CALL mode
- To recall a CALL channel
- To receive signals
- Monitor function
- Reverse function
- To transmit
- Selecting transmission power

8
Initial Installation
NOTE: By using the optional separation kit EDS-9, you can use the front panel and the main unit in
separate positions. The instruction manual for remote placement is provided with the EDS-9.
Front Panel
The main unit can be set with either side facing up. This can facilitate your ability to hear the
speaker clearly. Position the front panel as you prefer.
1. Slide the front panel while keeping the tab pressed.
2. Turn the front panel, being careful to keep the cable free from kinks.
3. Match the catch in the main unit with the slot in the front panel and fit the front
panel into the main unit.
4. Slide the front panel until it locks securily in place.
Main unit
Front panel
Tab
Slot
Catch