L 76481FL IT Istruzioni per l’uso
www.aeg.com INDICE 1. 2. 3. 4. 5. 6. 7. 8. 9. 10. 11. 12. 13. INFORMAZIONI PER LA SICUREZZA . . . . . . . . . . . . . . . . . . . . . . . . . . . . . . . . . . . . . . . . . . . . 3 ISTRUZIONI DI SICUREZZA . . . . . . . . . . . . . . . . . . . . . . . . . . . . . . . . . . . . . . . . . . . . . . . . . . . . 4 DATI TECNICI . . . . . . . . . . . . . . . . . . . . . . . . . . . . . . . . . . . . . . . . . . . . . . . . . . . . . . . . . . . . . . 6 DESCRIZIONE DEL PRODOTTO . . . . . . . . . . . . . . . .
ITALIANO 3 1. INFORMAZIONI PER LA SICUREZZA Leggere attentamente le istruzioni fornite prima di installare e utilizzare l'apparecchiatura. Il produttore non è responsabile se un'installazione ed un uso non corretto dell'apparecchiatura provocano lesioni e danni. Tenere sempre le istruzioni a portata di mano in caso di necessità durante l'utilizzo. 1.1 Sicurezza dei bambini e delle persone vulnerabili AVVERTENZA! Rischio di soffocamento, lesioni o invalidità permanente.
www.aeg.com 1.2 Avvertenze di sicurezza generali • Prima di eseguire qualunque intervento di manutenzione, spegnere l'apparecchiatura ed estrarre la spina dalla presa. • Non apportare modifiche alle specifiche di questa apparecchiatura. • Rispettare il volume massimo di 8 kg per il carico (fare riferimento al capitolo "Tabella programmi").
ITALIANO Collegamento elettrico AVVERTENZA! Rischio di incendio e scossa elettrica. • L'apparecchiatura deve disporre di una messa a terra. • Verificare che i dati elettrici riportati sulla targhetta del modello corrispondano a quelli dell'impianto. In caso contrario, contattare un elettricista. • Utilizzare sempre una presa elettrica con contatto di protezione correttamente installata. • Non utilizzare prese multiple e prolunghe. • Accertarsi di non danneggiare la spina e il cavo.
www.aeg.com • Rimuovere il blocco porta per evitare che bambini e animali domestici ri- mangano chiusi all’interno dell’apparecchiatura. 3.
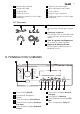
ITALIANO 3 Pannello dei comandi 8 Tubo di scarico dell'acqua 4 Maniglia dell'oblò 5 Targhetta dati 9 Valvola di ingresso dell'acqua 10 Cavo elettrico 6 Pompa di scarico 11 Dispositivi per il trasporto 7 Piedini per mettere a livello l’appa- 12 Piedini per mettere a livello l’appa- recchiatura 7 recchiatura 4.1 Accessori 1 1 Chiave 2 4 Per rimuovere i bulloni per il trasporto. 2 Coperture in plastica Per chiudere i fori sul retro del mobile una volta tolti i bulloni per il trasporto.
www.aeg.com 5.1 Tasto On/Off 1 Premere questo tasto per attivare e disattivare l'apparecchiatura. Un segnale acustico si attiva quando l'apparecchiatura è accesa. La funzione AUTO Stand-by disattiva automaticamente l'apparecchiatura per ridurre il consumo di energia quando: • Non si usa l'apparecchio da 5 minuti prima di premere il tasto 4 . – Tutte le impostazioni vengono annullate. – Premere il tasto 1 per riaccendere l'apparecchiatura.
ITALIANO D 9 • Durata del programma All'avvio del programma, la durata diminuisce a intervalli di 1 minuto. • Partenza ritardata Quando si preme il tasto partenza ritardata, il display mostra l’ora della partenza ritardata. • Codici di allarme In caso di malfunzionamento dell'apparecchiatura, il display mostra i codici di allarme. Fare riferimento al capitolo 'Risoluzione dei problemi'.
www.aeg.com tura non scarica l’acqua al termine del programma. La fase di centrifuga è spenta. La funzione "Anti-piega" è attiva. 5.10 Tasto Temperatura 10 Premere il tasto 10 per modificare la temperatura predefinita. -- = acqua fredda 5.11 Funzione Segnali acustici I segnali acustici si attivano quando: • Si accende l'apparecchiatura. • Si spegne l'apparecchiatura. • Si premono i pulsanti. • Il programma è terminato. • L'apparecchiatura presenta un problema.
ITALIANO 11 6. PROGRAMMI Temperatura del programma Tipo di carico Ciclo peso massimo di ca- descrizione rico Funzioni Cotoni Cotone 95° - A freddo Bianchi e cotone colorato con capi normalmente sporchi. max. 8 kg Lavaggio Risciacqui Centrifuga lunga RIDUZIONE CENTRIFUGA NO CENT. FINALE MACCHIE EXTRA RISCIACQUO RISPARMIO TEMPO1) Cotoni + Prelavaggio Cotone + Prelavaggio 95° - A freddo Bianchi e cotone colorato con capi molto sporchi. max.
www.aeg.com Temperatura del programma Tipo di carico Ciclo peso massimo di ca- descrizione rico Funzioni Delicati Delicati 40° - A freddo Tessuti delicati come Lavaggio acrilici, viscosa e po- Risciacqui liestere, normalmen- Centrifuga breve te sporchi. max. 4 kg RIDUZIONE CENTRIFUGA NO CENT. FINALE MACCHIE EXTRA RISCIACQUO RISPARMIO TEMPO1) Lana lavabile a mac- Lavaggio china.
ITALIANO 13 Temperatura del programma Tipo di carico Ciclo peso massimo di ca- descrizione rico Funzioni Super Eco5) A freddo Tessuti misti (capi in cotone e sintetici). max. 3 kg Lavaggio Risciacqui Centrifuga breve RIDUZIONE CENTRIFUGA NO CENT. FINALE EXTRA RISCIACQUO Cotoni Eco Bianchi e cotone colorato con capi normalmente sporchi. max. 8 kg Lavaggio Risciacqui Centrifuga lunga RIDUZIONE CENTRIFUGA NO CENT.
www.aeg.com Programma1) Antipiega Vaporizzazione antipiega Questo programma contribuisce ad evitare pieghe sui tessuti. Tipo di carico Carico massimo Capi in cotone e sintetici. fino a 1.5 Kg Il vapore può essere usato per capi asciutti, lavati od usati una sola volta. Questi programmi possono ridurre le pieghe e gli odori e rendere il bucato più gradevole. Non usare detergenti. Se necessario, togliere le macchie lavando o usando smacchiatori.
ITALIANO Programmi 15 Carico (Kg) Consumo di energia elettrica (kWh) Consumo d'acqua (litri) Durata indicativa del programma (minuti) Umidità residua (%)1) Cotone 60°C 8 1.6 72 168 52 Cotone 40°C 8 1.0 72 164 52 Sintetici 40°C 4 0.6 50 110 35 Delicati 40°C 4 0.7 60 91 35 Programma lana/lavaggio a mano 30°C 2 0.35 57 58 30 Programmi cotone standard Cotone standard 60°C 8 0.89 58 225 52 Cotone standard 60°C 4 0.75 45 170 52 Cotone standard 40°C 4 0.
www.aeg.com 9.1 Carico della biancheria 1. 2. Aprire l'oblò dell'apparecchiatura. Introdurre la biancheria nel cesto, un capo alla volta. Scuotere i capi prima di introdurli nell’apparecchiatura. Accertarsi di non mettere troppa biancheria nel cesto. 3. Chiudere l'oblò. Assicurarsi che non vi sia della biancheria tra la guarnizione e l'oblò. Vi è il rischio di perdite d’acqua o danni alla biancheria. 9.
ITALIANO 17 Inserto per detersivo liquido o in polvere Ruotarlo (verso l’alto o il basso) nella posizione corretta per utilizzare il detersivo liquido o in polvere. Osservare sempre le istruzioni riportate sulle confezioni dei detersivi. Controllare la posizione dell’inserto 1. Estrarre il contenitore del detersivo fino all'arresto. 2. Abbassare la levetta per estrarre il contenitore. 3. Per utilizzare il detersivo in polvere, ruotare l’inserto verso l’alto. 4.
www.aeg.com L'apparecchiatura non scarica l'acqua. 9.3 Impostazione ed avvio di un programma 1. Ruotare il selettore sul programma La spia del programma corrispondente si accende. 2. La spia del tasto 4 lampeggia ed è di colore rosso. 3. Il display mostra la temperatura predefinita e la velocità di centrifuga. Per modificare la temperatura e/o la velocità di centrifuga, premere i relativi tasti. 4. Impostare le funzioni disponibili.
ITALIANO 2. 3. Aprire l'oblò dell'apparecchiatura. Chiudere l'oblò dell'apparecchiatura e premere il tasto 4 . Il programma o la partenza ritardata prosegue. Se la temperatura e il livello dell'acqua nel cesto sono troppo alti, il simbolo di blocco dell'oblò resta acceso e non è possibile aprirlo. Per aprire l'oblò procedere come segue: 1. Spegnere l'apparecchiatura. 2. Attendere alcuni minuti. 3. Accertarsi che non vi sia acqua nel cesto.
www.aeg.com • Non lavare a macchina: – Capi senza senz'orlo o strappati – Reggiseni con ferretto. – Usare una retina per lavare i piccoli capi. • Un carico molto ridotto può causare problemi di equilibrio durante la fase di centrifuga. In tal caso, sistemare manualmente i capi nella vasca e riavviare la fase di centrifuga. • Usare i prodotti adatti al tipo e colore di tessuto, la temperatura del programma e il livello di sporco. • Se si usano dei detersivi liquidi, non impostare la fase di prelavaggio.
ITALIANO Utilizzare un prodotto apposito per lavabiancherie. Osservare le istruzioni riportate sulle confezioni dei produttori. Farlo separatamente dal lavaggio. 11.2 Pulizia esterna Pulire l'apparecchiatura esclusivamente con acqua tiepida saponata. Asciugare perfettamente tutte le superfici. ATTENZIONE Non utilizzare alcol, solventi o prodotti chimici. 21 nel cesto. Eseguire regolarmente una pulizia di mantenimento. A tal fine: • Togliere la biancheria dal cesto.
www.aeg.com 3. 4. 5. 6. Rimuovere la parte superiore dello scomparto per additivi liquidi. Lavare tutte le parti con acqua. Pulire il vano del contenitore con uno spazzolino. Reinserire il contenitore nel vano. AVVERTENZA! 1. Scollegare la spina dalla presa di corrente. 2. Non togliere il filtro durante il funzionamento dell'apparecchiatura. Non pulire la pompa di scarico se l'acqua presente nell'apparecchiatura è calda. L'acqua deve essere fredda per pulire la pompa di scarico. 11.
ITALIANO 3. 4. 5. 1 6. 23 Sistemare un contenitore sotto il vano della pompa di scarico per raccogliere l'acqua che fuoriesce. Premere le due leve e tirare in avanti il condotto di scarico per permettere all’acqua di fuoriuscire. Quando il contenitore è pieno d’acqua, rimettere il condotto di scarico in posizione e svuotare il contenitore. Ripetere i passaggi 4 e 5 finché non fuoriesce più acqua della pompa di scarico. Tirare il condotto di scarico e ruotare il filtro per rimuoverlo. 2 2 1 11.
www.aeg.com Per pulire i filtri d'ingresso dell'acqua: Chiudere il rubinetto dell'acqua. Rimuovere il tubo di carico dell'acqua dal rubinetto. 3. Pulire il filtro nel tubo di carico dell'acqua con uno spazzolino duro. 1. 2. 4. 5. 6. 7. 20° Togliere il tubo di carico dell'acqua situato dietro l'apparecchiatura. Pulire il filtro nella valvola con uno spazzolino duro o un asciugamano. Rimontare il tubo di carico dell'acqua. Assicurarsi che gli attacchi siano ben chiusi per impedire perdite.
ITALIANO 25 AVVERTENZA! Accertarsi che la temperatura sia superiore a 0°C prima di utilizzare nuovamente l'apparecchiatura. Il produttore declina ogni responsabilità per danni causati da basse temperature. 12. RISOLUZIONE DEI PROBLEMI L'apparecchiatura non si avvia o si blocca durante il funzionamento. Cercare dapprima di risolvere il problema (fare riferimento alla tabella). Se ciò non è possibile, contattare l’assistenza tecnica.
www.aeg.com Problema Possibile causa Possibile soluzione È stato selezionato un programma di lavaggio senza fase di scarico. Impostare il programma di scarico. La funzione Antipiega è attiva. Impostare il programma di scarico. Il coperchio dell'apparecchiatura è aperto o non è chiuso correttamente. Chiudere il coperchio correttamente. Il dispositivo antiallagamento è attivo. • Scollegare l’apparecchiatura. • Chiudere il rubinetto dell'acqua. • Contattare il centro di assistenza.
ITALIANO 27 Problema Possibile causa Possibile soluzione Non è possibile aprire il coperchio dell'apparecchiatura. Il programma di lavaggio è in corso. Lasciar terminare il programma di lavaggio. C'è dell'acqua nel cesto. Impostare il programma di scarico o di centrifuga. L'apparecchiatura emette un rumore anomalo. Livellamento errato dell’apparecchiatura. Regolare il livellamento dell’apparecchiatura. Fare riferimento alla sezione "Installazione".
www.aeg.com 13.2 Disimballaggio 1. Utilizzare i guanti. Togliere la pellicola esterna. Se necessario, servirsi di un taglierino. 2. Togliere la parte superiore del cartone. Togliere i materiali di imballaggio in polistirolo. 3. 4. Togliere la pellicola interna. 5. Aprire l'oblò. Rimuovere il polistirolo dalla guarnizione dell'oblò e tutti i pezzi dal cesto.
ITALIANO 29 6. Appoggiare sul pavimento, dietro l'apparecchiatura, uno degli elementi di imballaggio in polistirolo. Sistemare il lato posteriore dell’apparecchiatura sul polistirolo, facendo attenzione. Assicurarsi di non danneggiare i tubi. 7. Togliere la protezione di polistirolo dal fondo. Sollevare l’apparecchiatura in posizione verticale. 8. 1 2 9. Staccare il cavo di alimentazione e il tubo di scarico dagli appositi supporti. 10. Togliere i tre bulloni.
www.aeg.com 12. Inserire i tappi di plastica nei fori. I tappi sono disponibili nel sacchetto del libretto di istruzioni. AVVERTENZA! Prima di installare l'apparecchiatura, rimuovere tutto il materiale di imballaggio e i bulloni per il trasporto. Consigliamo di conservare l'imballaggio e i bulloni per il trasporto per quando si sposta l'apparecchiatura. 13.3 Posizionamento e livellamento x4 • Installare l'apparecchiatura su un pavimento piano e solido.
ITALIANO 31 13.4 Tubo di carico dell'acqua • Collegare il tubo all'apparecchiatura. Ruotare il tubo di carico solo a sinistra o a destra. Allentare il dado ad anello per sistemarlo nella posizione corretta. 20 O 45 O • Collegare il tubo di carico dell'acqua a un rubinetto dell'acqua fredda con filettatura 3/4". ATTENZIONE Accertarsi che non vi siano perdite negli attacchi. Non usare una prolunga se il tubo di carico dell'acqua è troppo corto.
www.aeg.com Con la guida del tubo di plastica. • Sul bordo di un lavandino. • Accertarsi che la guida in plastica non si muova durante lo scarico dell'apparecchiatura. Collegare la guida al rubinetto dell'acqua o la parete. • A un tubo fisso dotato di sfiato. Fare riferimento all'immagine. Direttamente all'interno di una conduttura di scarico a un'altezza non inferiore ai 60 cm e non superiore ai 100 cm.
ITALIANO È possibile prolungare il tubo di scarico fino a un massimo di 400 cm. Contattare il centro assistenza per l'altro tubo di scarico e la prolunga. 14. CONSIDERAZIONI AMBIENTALI Riciclare i materiali con il simbolo . Buttare l'imballaggio negli appositi contenitori per il riciclaggio. Aiutare a proteggere l’ambiente e la salute umana e a riciclare rifiuti derivanti da apparecchiature elettriche ed elettroniche.
www.aeg.
ITALIANO 35
132923471-A-022013 www.aeg.