EE3003011 EE3003021 EE3003031 DE Benutzerinformation
www.aeg.com INHALT 1. 2. 3. 4. 5. 6. 7. 8. 9. 10. 11. SICHERHEITSINFORMATIONEN . . . . . . . . . . . . . . . . . . . . . . . . . . . . . . . . . . . . . . . . . . . . . . . 3 SICHERHEITSHINWEISE . . . . . . . . . . . . . . . . . . . . . . . . . . . . . . . . . . . . . . . . . . . . . . . . . . . . . . 4 GERÄTEBESCHREIBUNG . . . . . . . . . . . . . . . . . . . . . . . . . . . . . . . . . . . . . . . . . . . . . . . . . . . . . 7 VOR DER ERSTEN INBETRIEBNAHME . . . . . . . . . . . . . . . . . . . . . . .
DEUTSCH 3 1. SICHERHEITSINFORMATIONEN Lesen Sie vor der Montage und Verwendung des Geräts sorgfältig die mitgelieferte Anleitung. Der Hersteller haftet nicht für Verletzungen oder Schäden, die durch eine fehlerhafte Montage entstehen. Bewahren Sie die Anleitung zum Nachschlagen auf. 1.1 Sicherheit von Kindern und schutzbedürftigen Personen WARNUNG! Es besteht Erstickungsgefahr, das Risiko von Verletzungen oder permanenten Behinderungen.
www.aeg.com • Benutzen Sie zum Reinigen des Geräts keinen Dampfreiniger. • Unterbrechen Sie vor Wartungsarbeiten die Stromversorgung. • Benutzen Sie keine Scheuermittel oder Metallschwämmchen zum Reinigen der Ofenglastür; sie können die Glasfläche verkratzen und zum Zersplittern der Scheibe führen. • Ziehen Sie die Einhängegitter erst vorne und dann hinten von der Seitenwand weg und nehmen Sie sie heraus. Führen Sie zum Einsetzen der Einhängegitter die obigen Schritte in umgekehrter Reihenfolge durch.
DEUTSCH • • • • • • • den Sie sich zum Austausch des beschädigten Netzkabels an den Kundendienst oder einen Elektriker. Achten Sie darauf, dass das Netzkabel die Gerätetür nicht berührt, insbesondere wenn die Tür heiß ist. Alle Teile, die gegen direktes Berühren schützen sowie die isolierten Teile müssen so befestigt werden, dass sie nicht ohne Werkzeug entfernt werden können. Stecken Sie den Netzstecker erst nach Abschluss der Montage in die Steckdose.
www.aeg.com • Verwenden Sie für feuchte Kuchen eine tiefe Brat- und Fettpfanne. Fruchtsäfte verursachen bleibende Flecken. • Reinigen Sie die katalytische Emailbeschichtung (falls vorhanden) nicht mit Reinigungsmitteln. 2.3 Reinigung und Pflege 2.4 Innenbeleuchtung WARNUNG! Risiko von Verletzungen, Brand oder Beschädigungen am Gerät. • Schalten Sie vor Reinigungsarbeiten immer das Gerät aus und ziehen Sie den Netzstecker aus der Steckdose. • Vergewissern Sie sich, dass das Gerät abgekühlt ist.
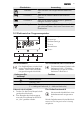
DEUTSCH 7 3. GERÄTEBESCHREIBUNG 3.
www.aeg.com 4.2 Einstellen der Uhrzeit Sie müssen die Uhrzeit einstellen, bevor Sie den Backofen benutzen können. Nach dem elektrischen Anschluss des Geräts oder nach einem Stromausfall blinkt die Uhranzeige. Stellen Sie die Uhrzeit mit den Tasten + oder - ein. Nach etwa 5 Sekunden hört die Anzeige auf zu blinken und zeigt die eingestellte Uhrzeit an. Wenn Sie die Uhrzeit ändern, dürfen Sie nicht gleichzeitig die Funktion Dauer oder Ende einstellen. 5.
DEUTSCH Ofenfunktion 9 Anwendung Auftauen Zum Auftauen von tiefgefrorenen Lebensmitteln. Grillstufe 1 Zum Grillen flacher Lebensmittel und zum Toasten. Grillstufe 2 Zum Grillen flacher Lebensmittel in größeren Mengen und zum Toasten. Heißluftgrillen Zum Braten größerer Fleischstücke oder Geflügel auf einer Ebene. Auch zum Gratinieren und Überbacken. 5.
www.aeg.com So schalten Sie die Ankochautomatik ein: 1. Drehen Sie den Kochzonen-Einstellknopf so weit wie möglich im Uhrzeigersinn (über die höchste Kochstufe hinweg). 2. Stellen Sie gleich danach die gewünschte Kochstufe ein. 3. Zum Ausschalten der Funktion muss der Einstellknopf in die Stellung „Aus“ gedreht werden. 6. UHRFUNKTIONEN Uhrfunktion Uhrzeit Anwendung Zum Anzeigen, Einstellen oder Ändern der Uhrzeit. Kurzzeit-Wecker Zum Einstellen einer Countdownzeit.
DEUTSCH 11 7. VERWENDUNG DES ZUBEHÖRS WARNUNG! Siehe Sicherheitshinweise. 7.1 Einsetzen des Backofenzubehörs Das tiefe Blech und der Kombirost haben Seitenränder. Durch die Seitenränder und die Form der Führungsstäbe wird das Kippen des Kochgeschirrs verhindert. Tiefes Blech und Kombirost zusammen einsetzen Legen Sie den Kombirost auf das tiefe Blech. Schieben Sie das tiefe Blech zwischen die Führungsstäbe einer der Einschubebenen. 8. ZUSATZFUNKTIONEN 8.
www.aeg.com Koch stufe Verwendung: Dauer Tipps 1 Zum Warmhalten von bereits gekochten Gerichten. Nach Bedarf Legen Sie einen Deckel auf das Kochgeschirr. 1-2 Für Hollandaisesauce, zum Schmelzen von Butter, Schokolade und Gelatine. 5 - 25 Min. Zwischendurch umrühren. 1-2 Zum Stocken von lockeren Omeletts und gebackenen Eiern. 10 - 40 Min. Mit Deckel garen. 2-3 Köcheln von Reis und Milchgerichten, Erhitzen von Fertiggerichten. 25 - 50 Min.
DEUTSCH sind, hebt sich die Verformung wieder auf. Hinweise zu den Backtabellen • Der Hersteller empfiehlt bei der ersten Zubreitung die niedrigere Temperatur einzustellen. • Finden Sie für ein spezielles Rezept keine konkreten Angaben, orientieren Sie sich an einem ähnlichen Rezept. • Sie können die Backzeit um 10 - 15 Minuten verlängern, wenn Kuchen auf mehreren Ebenen gebacken werden. 13 • Höhenunterschiede bei Kuchen und Gebäck können zu Beginn zu unterschiedlicher Bräunung führen.
www.aeg.com Backergebnis Der Kuchen ist nach der eingestellten Zeit nicht fertig gebacken. Mögliche Ursache Abhilfe Die Backofentemperatur ist zu niedrig. Stellen Sie beim nächsten Kuchen eine etwas höhere Backofentemperatur ein. 9.5 Backen auf einer Einschubebene: Backen in Formen Backware Backofenfunktion Einschubebene Temperatur (°C) Dauer (Min.
DEUTSCH 15 Kuchen/Gebäck/Brot auf Backblechen Backware Backofenfunktion Einschubebene Temperatur (°C) Dauer (Min.) Hefezopf/Hefekranz Ober-/Unterhitze 3 170 - 190 30 - 40 Christstollen Ober-/Unterhitze 2 160 - 180 1) 50 - 70 Brot (Roggenbrot): 1. Erster Teil des Backvorgangs. 2. Zweiter Teil des Backvorgangs.
www.aeg.com Plätzchen Backofenfunktion Einschubebene Temperatur (°C) Dauer (Min.
DEUTSCH 17 Aufläufe und Überbackenes Backofenfunktion Einschubebene Temperatur (°C) Dauer (Min.
www.aeg.com Heißluft mit Ringheizkörper Backware Einschubebene Temperatur (°C) Dauer (Min.
DEUTSCH Einschubebene Temperatur in °C Zeit (Min.) Flammkuchen (Pizza-ähnliches Gericht aus dem Elsass) Backware 2 230 - 2501) 12 - 20 Piroggen (Russische Version der Calzone) 2 180 - 200 1) 15 - 25 19 1) Backofen vorheizen. 2) Tiefes Blech benutzen. 9.8 Braten • Benutzen Sie zum Braten hitzebeständiges Geschirr (beachten Sie die Angaben des Herstellers).
www.aeg.com Schweinefleisch Menge Backofenfunktion Einschubebene Temperatur in °C Zeit (Min.) Schulter/Nacken/Schinkenstück 1 - 1,5 kg Heißluftgrillen 1 160 - 180 90 - 120 Kotelett/Spare Ribs 1 - 1,5 kg Heißluftgrillen 1 170 - 180 60 - 90 Hackbraten 750 g - 1 kg Heißluftgrillen 1 160 - 170 50 - 60 Schweinshaxe (vorgegart) 750 g - 1 kg Heißluftgrillen 1 150 - 170 90 - 120 Fleischart Kalbfleisch Fleischart Menge Backofenfunktion Einschubebene Temperatur in °C Zeit (Min.
DEUTSCH 21 Geflügel Fleischart Menge Backofenfunktion Einschubebene Temperatur in °C Zeit (Min.
www.aeg.com Grillgut Einschubebene Temperatur 3/4 210 - 230 Fisch, ganz, 500 - 1000 g Zeit (Min.) Erste Seite Zweite Seite 15 - 30 15 - 30 Grillstufe 2 Grillgut Einschubebene Burgers/Frikadellen Zeit (Min.) Erste Seite Zweite Seite 4 8 - 10 6-8 Schweinefilet 4 10 - 12 6 - 10 Würstchen 4 10 - 12 6-8 Filet/Kalbssteaks 4 7 - 10 6-8 Toast /Toast 1) 5 1-3 1-3 Überbackener Toast 4 6-8 - 1) Backofen vorheizen. 9.
DEUTSCH Convenience-Lebensmittel (Fertiggerichte) Einschubebene Temperatur (°C) Zeit (Min.) 2 190 - 210 20 - 30 Hähnchenflügel 23 Gefrorene Fertiggerichte Backofenfunktionen Einschubebene Temperatur (°C) Zeit (Min.
www.aeg.com Speise Sahne, 2 x 200 g Torte, 1400 g Auftauzeit (Min.) Zusätzliche Auftauzeit (Min.) Bemerkung 80 - 100 10 - 15 Sahne lässt sich auch mit noch leicht gefrorenen Stellen gut aufschlagen. 60 60 9.13 Einkochen Hinweise: • Verwenden Sie nur handelsübliche Einweckgläser gleicher Größe. • Verwenden Sie keine Gläser mit Schraub- oder Bajonettdeckeln oder Metalldosen. • Verwenden Sie für diese Funktion die erste Einschubebene von unten.
DEUTSCH 25 Öffnen Sie die Gerätetür und lassen Sie das Gerät abkühlen. Danach das Dörrgut fertig dörren. 9.14 Dörren - Heißluft mit Ringheizkörper Backbleche mit Backpapier abdecken. Für ein optimales Ergebnis, schalten Sie das Gerät nach der Hälfte der Zeit aus. Gemüse Einschubebene 1 Ebene 2 Ebenen Temperatur (°C) Dauer (Std.
www.aeg.com 10.1 Einhängegitter Abnehmen der Einhängegitter Die Einhängegitter können zur Reinigung der Seitenwände entfernt werden. 1. Ziehen Sie das Einhängegitter vorne von der Seitenwand weg. 2. Ziehen Sie das Einhängegitter hinten von der Seitenwand weg und nehmen Sie es heraus. 2 1 Einsetzen der Einhängegitter Führen Sie zum Einsetzen der Einhängegitter die obigen Schritte in umgekehrter Reihenfolge durch. Gilt für Auszüge: Die Haltestifte der Auszüge müssen nach vorne zeigen. 10.
DEUTSCH WARNUNG! Schalten Sie das Gerät aus, bevor Sie das Heizelement herunterklappen. Achten Sie darauf, dass das Gerät abgekühlt ist. Es besteht Verbrennungsgefahr. Abklappen des Heizelements Entfernen Sie die Einhängegitter. 1. 27 2. Fassen Sie das Heizelement mit beiden Händen an der Vorderseite. 3. Ziehen Sie es gegen die Federkraft nach vorne und auf beiden Seiten aus der Halterung heraus. 4. Das Heizelement klappt nach unten. Die Backofendecke kann jetzt gereinigt werden.
www.aeg.com 6. 2 7. B Fassen Sie die Türabdeckung (B) an der Türoberkante an beiden Seiten an und drücken Sie sie nach innen, um den Kippverschluss zu lösen. Ziehen Sie die Türabdeckung nach vorne, um sie abzunehmen. 1 8. 9. Einbauen der Backofentür und der Glasscheiben Nach der Reinigung müssen die Backofentür und die Glasscheiben wieder Fassen Sie die Glasscheiben der Tür nacheinander am oberen Rand an und ziehen Sie sie nach oben aus der Führung.
DEUTSCH Wenn Sie das Problem nicht selbst lösen können, wenden Sie sich an Ihren Fachhändler oder Kundendienst. Die vom Kundendienst benötigten Daten finden Sie auf dem Typenschild. Das Typenschild befindet sich am Frontrahmen des Garraums. Wir empfehlen, dass Sie folgende Daten hier notieren: Modell (MOD.) ......................................... Produktnummer (PNC) ......................................... Seriennummer (S.N.) ......................................... 12.
www.aeg.
DEUTSCH 31
892956972-A-462012 www.aeg.