C67600M Induktions-Glaskeramik-Kochfeld Induction Glass Ceramic Cooking Surface Glasskeramisk induksjonsplatetopp Placa vitrocerámica de cocción por inducción Montage- und Gebrauchsanweisung Installation and Operating Instructions Monterings- og bruksanvisning Instrucciones para el montaje y para el uso
Dear Customer, Please read this user information carefully. Above all, please take note of the “Safety” section on the first few pages. Please keep this user information for later reference. Pass it on to any subsequent owner of the appliance. The warning triangle and/or specific words (Warning!, Caution!, Important!) are used to highlight instructions that are important for your safety or for the function of the appliance. It is imperative that these instructions are observed. 0 1.
Contents CONTENTS Operating Instructions . . . . . . . . . . . . . . . . . . . . . . . . . . . . . . . . . . . . 31 Safety . . . . . . . . . . . . . . . . . . . . . . . . . . . . . . . . . . . . . . . . . . . . . . . . . . . . . . . . 31 Disposal . . . . . . . . . . . . . . . . . . . . . . . . . . . . . . . . . . . . . . . . . . . . . . . . . . . . . . 33 Appliance Description . . . . . . . . . . . . . . . . . . . . . . . . . . . . . . . . . . . . . . . . . . Features of the hob . . . . . . . . . . . . .
Contents What to do if ... . . . . . . . . . . . . . . . . . . . . . . . . . . . . . . . . . . . . . . . . . . . . . . . 48 Installation Instructions . . . . . . . . . . . . . . . . . . . . . . . . . . . . . . . . . . . Technical Data . . . . . . . . . . . . . . . . . . . . . . . . . . . . . . . . . . . . . . . . . . . . . . . . . Regulations, Standards, Directives . . . . . . . . . . . . . . . . . . . . . . . . . . . . . . . . . Safety Instructions for the Installer . . . . . . . . . . . . . . . . . . .
Operating Instructions OPERATING INSTRUCTIONS 1 Safety The safety aspects of this appliance comply with the accepted technical standards and the German Appliance Safety Law. However, we also consider it our obligation as a manufacturer to make you aware of the following safety information. Electrical Safety • The new appliance may only be installed and connected up by qualified personnel, according to the manufacturers instructions and to the relevant country standards.
Operating Instructions Special Notes on Induction Cooking Zones • Scientific investigations have shown that an influence on or endangering of patients with implanted heart pace makers by AEG induction cooking zones are normally not to be expected. The distance between the trunk and the cooking zone should however never be less than 30 cm! • Electromagnetic fields can influence electronic circuits and interfere with transistor radios. • Do not put magnetically rechargable objects (e.g.
Operating Instructions • If sugar or a preparation with sugar comes into contact with the hot cooking zone and melts there it must be cleaned off immediately with a scraper while it is still hot. If it cools, damage to the surface may occur on removal. • Keep all items and materials that can melt away from the glass ceramic surface, e.g. plastics, aluminium foil, or oven foils. If something of this nature should melt onto the glass ceramic surface, it must also be removed immediately using the scraper.
Operating Instructions Appliance Description Function and the Way the Induction Cooking Zone Works A copper wire induction coil is beneath the glass ceramic cooking surface. This generates electromagnetic fields, which act directly on the base of the pots and pans and not, as with other heating up methods, first heat up the glass ceramic. This means that the base of the pan is immediately heated up, which saves time and energy.
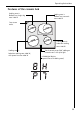
Operating Instructions Features of the ceramic hob Cooking zone 2: Radiant heat single ring zone 1200 W Cooking zone 3: Radiant heat casserole zone 2400 W Oven steam outlet Cooking zone 4: Induction cooking zone 1400 W Cooking zone 1: Induction cooking zone 2200 W; with power function 3000 W Touch control sensor field "adding on casserole zone" with pilot light 4-fold digital display (separate for each cooking zone) 35
Operating Instructions The Digital Displays Digits 1 to 9 and four different letters can appear in the display. • The digits show the cooking stage set. 1 = the lowest capacity 9 = the highest capacity % = intermediate stage (= 6,5) • The letters indicate the functions: 1 f = Error Display flashes if the cooking zone is switched on F = – no pan is on the cooking zone or F = – an unsuitable pot or pan is being used.
Operating Instructions Suitable Kitchenware for Induction Cooking Zones Pots and Pans • In principle all pots and pans with magnetic bases are suitable. These are steel, steel-enamel as well as cast-iron pots and pans. • High grade steel pans with a mixed metal base (sandwich base, e.g. Tefal with an aluminium/copper base) are suitable for induction only if the manufacturer has expressly marked them as such. In that case they have a ferromagnetic percentage in the base.
Operating Instructions Pan Size Up to a certain limit the induction cooking zone adapts itself to the size of the pan base diameter. However, the pan base diameter must be of a minimum size, depending on the size of the cooking zone.
Operating Instructions Pots and pans for rapid-glowing standard cooking zones • On principle all pots and pans with level bases are suitable for radiant heat cooking zones. You can recognise good quality pans by the base of the pan, and not from the material from which the pan is made. • The base should be as thick and flat as possible. Rough bases (e.g. cast iron pots) scratch the hob surfaces when they are slid about.
Operating Instructions Using the Cooking Zones Cooking Zone Switches With the cooking zone switches you have a choice of setting the heating capacity to 14 steps (with intermediate settings) 1 = the lowest capacity 9 = the highest capacity A = Automatic P = power function You can select intermediate settings in the ranges 2 to 7. In the digital display these are marked with a top left dot.
Operating Instructions Switching the Casserole Zone On and Off To switch the casserole zone on and off place your finger flatly on the touch control sensor field "adding on casserole zone", until the pilot light lights up or goes out. Cooking without the Automatic Feature 0 1. For heating up/browning, select a high power. 2. As soon as steam starts to form or the oil is hot, turn back to the heat setting necessary for further cooking. 3. To stop cooking, turn back to the zero position.
Operating Instructions Cooking with Automatic Heating Up This automatic feature operates at its full capacity (9) for a given time and then automatically switches down to the set further cooking stage. The duration of the automatic heating up boost depends on the selected further cooking stage. 0 1. Turn the cooking zone switch to the right to the stop A. In the cooking stage display of the cooker A lights up for a moment, then the display changes to 9. A appears in the digital display of the cooking zone.
Operating Instructions The digital display changes to the relevant digit as soon as the selected further cooking stage is active 1 to 8 (in the example 6). Usage, Tables, Tips Tips on Cooking with or without the Automatic Feature We recommend the automatic heating up feature for: • dishes that are put on cold, heated up with a high capacity and do not have to be supervised constantly during the further cooking stage. • for dishes put into a hot pan.
Operating Instructions Tables Note: The figures given in the following tables are for guidance. The switch setting required for cooking depends on the quality of the pots and on the type and quantity of the foodstuffs. Reference values for setting the cooking zones Switch setting Suitable for 9 or P Heating Up Heating up large quantities of water, cooking pasta 7-9 Heavy Browning Deep-frying pommes frites, browning meat, e.g. goulash, Frying, e.g.
Operating Instructions Application Examples for the Automatic Heating Up Feature Application examples Cooking processes Switch setting Duration Notes/tips Steaks Heavy browning A7 to A8 per pan 8-20 min. Turn occasionally Schnitzel Rissoles Fried eggs Grilled Sausages Roasting A6 to A7 Per pan 10-20 min. Turn occasionally Pancakes, thin pancakes Baking A6 to A7 continuously bake Turn occasionally Soups Boil A3½ to A5½ 40-150 min.
Operating Instructions Cleaning and Care Advantages for Cleaning and Caring for the Induction Cooking Zone 2 The cleaning effort for induction glass ceramic cooking surfaces is considerably less than for cooking surfaces with radiant heating: – The induction cooking zone reacts faster to switching down and off. Boiling over and burning in of dishes is avoided to a large degree.
Operating Instructions Problem Dirt Residues from Food that Has Boiled Over 0 First soften these using a wet cloth and then remove residues using a glass or razor blade scraper. Danger! Take care not hurt yourself! Then clean the cooking surface with the cleaners identified above. Burnt-in sugar, melted plastic you must remove immediately – while it is still warm (not hot) – with a glass scraper otherwise damage can be incurred. Then clean the cooking surface normally.
Operating Instructions 1 Danger! Do not put vinegar, lemons or scale removers on the hob frame, they will make the surface matt. Grains of sand that have fallen on the cooking surface can cause scratches when the pans are slid around. Ensure, therefore, that no grains of sand remain on the cooking surface. Abraded decor In time the decor is abraded by the use of aggressive cleaners and scouring pan bases and dark stains develop.
Installation Instructions INSTALLATION INSTRUCTIONS 1 Important! This appliance must be installed by qualified personnel, according to the manufacturer’s instructions and to the relevant country standards. Please observe this instruction, otherwise the warranty will not cover any damage that may occur.
Installation Instructions Regulations, Standards, Directives This appliance meets the following standards: • EN 60 335-1 and EN 60 335-2-6 in respect of the safety of electrical appliances for household use and similar purposes and • DIN 44546 / 44547 / 44548 in respect of properties of electric cookers for the household. • EN 55014-2 / VDE 0875 part 14-2 • EN 55014 / VDE 0875 part 14/12.
Installation Instructions 1 Safety Instructions for the Installer • This hob must be installed by qualified personnel, according to the manufacturer’s instructions and to the relevant country standards. • In respect of fire protection, this appliance corresponds to type Y (IEC 335-2-6). Only this type of appliance may be installed with a high cupboard or wall on one side. • It is not permitted to fit drawers below the cooking surface.
Service SERVICE In the “What to do, if …” section a number of malfunctions are listed that you can rectify yourself. In the event of a malfunction, look there first. Is it a technical malfunction? Then please contact your customer service centre. (You will find addresses and telephone numbers in the "Customer Service Centres" list.) Always take the time to prepare yourself for the call.
Montage / Installation / Montasje / Montaje 106
107
108
109