AEB 46003 CI DÝJÝTAL UYDU ALICISI Kullanma Kýlavuzu
İÇİNDEKİLER 1. GENEL ÖZELLiKLER ........................................................................................................................................3 2. GÜVENLİK ÖNLEMLERİ...................................................................................................................................4 3. ÖN PANEL VE ARKA PANEL ...........................................................................................................................5 4. BAĞLANTILAR & HAZIRLIK ...........
UTC SAAT FARKI ...............................................................................................................................................18 ZAMAN GÜNCELLEME ......................................................................................................................................18 6.3.5. OSD AYARLARI ........................................................................................................................................18 SAYDAMLIK ............................
1.
2. GÜVENLİK ÖNLEMLERİ • Cihazın altında yer alan ısıtma ya da diğer termik radyasyon da arızaya yol açabilir ya da cihaza zarar verebilir. • Çalışma sırasında ortaya çıkan sıcak hava yeterli hava dolaşımı ile dağıtılmalıdır. Lütfen cihazı kapalı alanlara koymayın ve üzerini kapatmayın. • Lütfen cihazın su ya da nem ile temasından kaçının. Banyo ya da yüzme havuzları yakınında çalıştırmayın. • Yeterli bir hava dolaşımı sağlamaya özen gösterin.
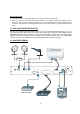
3. ÖN PANEL VE ARKA PANEL ÖN PANEL INFO TV/RADIO BİLGİ TUŞU AÇMA/ KAPAMA TUŞU MENU OK P PROGRAM YUKARI/ AŞAĞI MENÜ TUŞU SES ARTTIRMA/ OK TUŞU TV /RADYO SEÇİM TUŞU ARKA PANEL LNB OUTPUT LNB INPUT TV OUT RS 232 ANT IN TV SCART AC IN RIGHT LNB ÇIKIŞI LNB GİRİŞİ TV ÇIKIŞI ANALOG SES KOAKSİYEL SES ÇIKIŞI ANTEN GİRİŞİ VCR SKART RS 232 YAZILIM GÜNCELLEME TV SKART 35021485 LEFT VCR SCART COAXIAL OUT CVBS BESLEME 220-240V AC, 50Hz VİDEO ÇIKIŞI 4. BAĞLANTILAR & HAZIRLIK 4.1.
Alıcınız çalışıyorsa: Ø Eğer alıcıya başka bir cihaz bağlı değilse TV ekranında alıcınızın çıkışı görülür. Ø Alıcınızın VCR skart soketine DVD, VCD gibi cihazlar ve sesi bağlı ise, bağlı cihaz çalışıyorken skart soketinden PIN 8 sinyali 0 V olarak gönderiliyorsa TV den alıcıya bağlı cihazın ( DVD ,VCD) görüntüsü izlenemez / duyulamaz. Bu durumda görüntü uzaktan kumanda aletindeki “0” (AV) butonuna basılarak izlenir. 4.3.
4.5. UZAKTAN KUMANDA PİLLERİNİN YERLEŞTİRİLMESİ İlk olarak uzaktan kumanda aletinizin arkasındaki pil yuvasının kapağını açınız. 1.5Volt (R03/AAA) lik 2 pili kutuplarına (+/-) dikkat ederek yuvalarına yerleştirip kapağı kapatınız. Kullanım esnasında uzaktan kumanda aletini direkt olarak alıcınızın ön paneline tutunuz. Eğer uzaktan kumanda aletiniz çalışmıyorsa veya istediğiniz komutu yerine getirmiyorsa büyük olasılıkla pillerin ömrü bitmiştir, pilleri yenileriyle değiştiriniz.
5. UZAKTAN KUMANDA FONKSiYONLARI 5.1. UZAKTAN KUMANDA 1. AÇMA / KAPAMA 2. TV / RADYO 3. SESSİZ 4. NÜMERİK TUŞLAR 5. MENÜ 6. AV 7. BİLGİ / YARDIM (?) 8. ÖNCEKİ PROGRAM 9. SONRAKİ PROGRAM 10. SES AZALTMA 11. SES ARTIRMA 12. PROGRAM LİSTESİ (KIRMIZI TUŞ) / ÖNCEKİ SAYFA 13. ALTYAZI (YEŞİL TUŞ) / SONRAKİ SAYFA 14. SES ÇIKIŞI (SARI TUŞ) 15. FAVORİ PROGRAM LİSTESİ (MAVİ TUŞ) 16. SOL YÖN TUŞU 17. SAĞ YÖN TUŞU 18. YUKARI YÖN TUŞU 19. AŞAĞI YÖN TUŞU 20. OK (ONAY) TUŞU 21. ELEKTRONİK PROGRAM REHBERİ (EPG) 22.
menü seçenekleri etkin hale gelir. 5.2. CİHAZI AÇMA / CİHAZI UYUTMA Bağlantıları yaptıktan sonra, alıcı uyku durumundan çıkar. Uyku durumundan çıkıldığında en son izlenen kanal izlenmeye/dinlenmeye başlanır. Uzaktan kumanda üzerindeki “AÇMA / KAPAMA (Standby)” butonuna basıldığında cihaz uyku durumuna geçer. 5.8. SAĞDAKİ /SOLDAKİ SÜTUN “3/4” tuşları ile menüler arasında dolaşılır. “3” yön tuşu soldaki menüleri, “4” tuşla ise sağdaki menüleri aktifleştirilir. 5.9.
5.13. ELEKTRONİK PROGRAM REHBERİ (GUIDE) 5.16. ALTYAZI / SONRAKI SAYFA (YEŞİL BUTON) Uzaktan kumanda aletinde GUIDE butonuna basıldığında 7 gün elektronik program rehberi (EPG menü) ekrana gelir. Bu menüde “3/4” butonlarıyla EPG ‘nin tümünü görebilirsiniz.EPG penceresinde program bilgisini programın başlangıç ve bitiş zamanı, program ismi, kanal numarası, kanal ismi bulunmaktadır. Bu menüde (şimdiki zaman) – (şimdiki zaman+2 saat) zaman aralığını gösteren bir zaman göstergesi vardır.
MENÜ ARAYÜZÜ / İLK KURULUM Eğer dijital uydu alıcısı ilk defa açıldıysa ve içinde herhangi bir kanal kayıtlı değilse “İlk kurulum menüsü” ekrana gelir. Bu menüde “Hoşgeldiniz! Lütfen dil seçiminizi yapınız” mesajı çıkar. “5/6” butonlarıyla istenen dile gelindikten sonra OK butonuna basılarak dil seçimi yapılır. OK butonuna basıldıktan sonra “ Kurulum” menüsü ekrana gelir.Kanal Aranması iki yolla yapılabilir. Kurulumdan “Anten Kurulumu” OK tuşuyla seçiniz.
6. ANA MENÜ MENU butonuna basıldığında eğer hiçbir menü aktif durumda değilse ana menü ekrana gelir.OK tuşunun basılmasıyla menu etkinleşir. 1. Kanal Tablosu 2. Kurulum 3. Cihaz Ayarları 4. Favoriler 5. Kayıt Menüsü 6. Oyunlar 7. CA Sistemi 6.1. KANAL TABLOSU Kanal tablosunda “5/6 ” butonlarına basılarak önceki / sonraki kanala geçilir. LIST (Kırmızı buton) SUBTITLE (Yeşil buton) butonlarıyla önceki / sonraki kanal sayfasına geçilir.
KANALLARA KİLİT EKLENMESİ Ebeveynler tarafından, istenen kanallara kilit eklenebilir. Kanala kilidin eklenebilmesi için ebeveyn kilidi şifresinin bilinmesi gerekir. Fabrika ayarlarında 0000 olan şifre, “Cihaz Ayarları”ndan değiştirilebilir.Kilit eklenecek kanal seçildikten sonra “3/4” butonlarıyla “Kilitle”ye gelinir, OK butonuna basıldığında “Şifreyi Giriniz” başlıklı bir pencere ekrana gelir. Ebeveyn kilidi şifresi girilir, kanal kilitlenmiş olur ve kanalın isminin yanında kilit sembolu görülür.
Uydu İsmi ( Kayıtlı isimler ve diğerleri ): Fabrika ayarlarından kayıtlı olan 28 uydu (Astra, Hotbird, Turksat1b, Turksat1c...) vardır, kullanıcı tarafından 4 uydu daha ( user1, user2...) eklenebilir. OK tuşu basılarak uydu isimleri değiştirilebilir. Bağlantı Şekli : (Standart/ DİSEqC1.2/ USALS:alıcınız ve çanak antenizin bağlantısına göre burasını ayarlamalısınız. DİSEqC1.2Kurulum Menüsü ve USALS Kurulum Menüsü ilerleyen bölümlerde ayrıntılı olarak işlenecekir.
6.2.2. İLK KURULUM İlk Kurulum menüsü kanal tablosunda kayıtlı bulunan bütün kanalları siler. Bu menüyü seçtiğinizde ekranda bir uyarı mesajı belirecektir; “Bütün kanalları silip ilk kuruluma girmek istediğinizden emin misiniz?” sorusuna “EVET” cevabı verilirse bütün kayıtlı kanallar silinir ve “ilk kurulum menüsü” ekrana gelir.İlk Kurulum ile ilgili ayrıntılı bilgi için “MENÜ ARAYÜZÜ / İLK KURULUM” başlığa bakınız. 6.2.3. OTOMATİK ARAMA Kullanıcı bu menüyle uyduların tümünü tarayabilir.
Arama işlemi tamamlandıktan sonra, istenen bilgilerdeki kanal program tablosuna eklenir. Bulunan programların ismi Program1 olarak gösterilir.Frekans değeri değiştirildiğinde sinyal seviyesini ve sinyal gücünü belirten göstergelerde değişiklikler meydana gelir. Uygun değerler seçildiğinde göstergedeki seviyelerin arttığı görülür.Frekans ayarı seçildiğinde pencerenin alt kısmındaki Sinnyal Seviyesi ve Sinyal Kalitesi bulunur. Sinyal Seviyesi çubuğu dijital sinyalin gücünü gösterir.
6.3.1. MENÜ DİLİ Menü Dili “3/4 ” tuşlarıyla seçilir. 6.3.2. TV AYARLARI TV Ayarları penceresinin içinde 2 altbaşlık bulunur. TV TİPİ TV Ayarları menüsünde,“5/6” butonları kullanılarak “TV Tipi” ne gelinip “3/4 ” butonlarıyla 4:3 veya 16:9 formatı seçilir. TV ÇIKIŞI Ayarlar menüsünde “5/6” butonları kullanılarak “TV Çıkışı”na gelinip görüntü kalitesi “3 /4” butonlarıyla RGB veya CVBS olarak seçilir. RGB sinyalinde görüntü kalitesi CVBS görüntü kalitesinden daha iyidir. RF MOD.
TARİH Tarih saat ayarları menüsünde, “5/6” butonları kullanılarak “Tarih”e gelinip “0,1,2…..9” rakamları kullanılarak tarih, gün, ay ve yıl olarak girilir. MENU butonuna basılıp ayarlar menüsüne dönüldüğünde tarih ayarı yapılmış olur. SAAT FARKI Tarih saat ayarları menüsünde, “5/6” butonları kullanılarak “Saat Farkı”na gelinip, “3/4” butonları kullanılarak saat farkı, saat olarak girilir. MENU butonuna basılıp ayarlar menüsüne dönüldüğünde saat farkı ayarı yapılmış olur.
ÇOCUK KİLİDİ Ebeveyn ayarları altmenüsünde, “5/6” butonları kullanılarak “Çocuk Kilidi”ne gelinip “ 3/4 ” butonlarıyla çocuk kilidi ”Açık” veya “Kapalı” olarak seçilebilir. Çocuk kilidi “Açık” olarak seçildiğinde, ön panel butonları şifreyi bilmeyen kullanıcılar tarafından kullanılamaz. Ön panel butonlarını tekrar etkin duruma getirmek için çocuk kilidi “Kapalı” duruma getirilmelidir. MENU ile çıkıldığında değişiklikler kaydedilir.
“Güncellemeye başla” basıldıktan sonra, cihaz bulduğu yazılım sürümünün yeni olup olmadığını kontrol edecektir.Bu işlem biraz uzun sürebileceğinden bunu gösteren bir mesaj görüntülenecektir.Yeni yazılım sürümü bulunursa cihaz otomatik olarak yazılımı yüklemeye başlayacak. Yazılım yükleme işlemi bittiğinde OK tuşuna basıldığında cihaz uyku konumuna geçecektir. Yeni bir yazılım yoksa OK tuşuna basılarak cihaz , Cihaz ayarları menüsüne geri döndürülür.
6.3.8. TURKSAT AYARLARI “Otomatik güncelleme” açık seçildiğinde cihaz her gece kanal bilgilerini kontrol eder. Kanal ağına herhangi bir kanal eklendiğinde veya silindiğinde “Ekle, Sil, Değiştir” menülerinin “Açık” konuma getrilmesiyle cihaz bilgileri otomatik olarak güncellenir. 6.3.9. ÖN PANEL Cihaz ayarları altmenüsünde, “5/ 6” butonları kullanılarak “Ön Panel”e gelip OK butonuna basıldığında, önümüze iki seçenek gelir. Kayan yazı ve kayan yazı hızı.
NOT:Saat güncelleme modunuz otomatik olarak seçili ise, yerel saat yerine uydudan toplanan saat bilgisi aktif olacaktır. Kayıt menüsünde problem yaşamamak için Saat güncelleme modunun Otomatik olarak seçili olduğundan ve tarih saat ayarlarınızın doğru olduğundan emin olunuz 6.6. OYUNLAR Ana Menü’den “3/4” butonunu kullanarak “Oyunlar” belirginleşir, OK tuşu ile etkin hale gelir. BÖCEK Oyun Menüsünden “5/6” tuşlarının vasıtasıyla Böcek oyununu seçiniz ve OK butonu ile onaylayınız.
SOKOBAN Oyun Menüsünden “5/6” tuşlarının vasıtasıyla “Sokoban” oyununu seçiniz ve OK butonu ile onaylayınız. Üç seviyeden( kolay, normal, zor ) birini “5/6” tuşlarıyla seçiniz. OK tuşuyla oyuna başlayabilirsiniz. Oyun “3/4/5/6” KIRMIZI ve MAVİ tuşlarla oynanır. MENU ile oyundan çıkılır. YAKALA Oyun Menüsünden “5/6” tuşlarının vasıtasıyla Yakala oyununu seçiniz ve OK butonu ile onaylayınız. Oynamak istediğiniz üç zorluk derecesinden birini ( kolay, normal, zor ) “5/6” tuşlarıyla seçiniz.
MESAJLAR Eğer kanal şifreliyse ve görüntü ve ses sinyali göndermiyorsa ( kanal bilgi penceresi ekrandan kalktıktan sonra) “ŞİFRELİ KANAL” mesajı ekrana gelir. Eğer alıcıya hiçbir sinyal gelmiyorsa (mesela anten kablosu bağlı değilse), “SİNYAL YOK” mesajı ekrana gelir. Eğer LNB aletinde kısa devre varsa, “LNB çıkışı aşırı yüklendi !!! Lütfen cihazınızın fişini çekiniz…. ” mesajı ekrana gelir.
Kilit eklenmiş kanal izlenmek/dinlenmek istendiğinde, şifrenin sorulduğu bir pencere ekrana gelir. Doğru şifre girildiğinde bu kanal izlenebilir/dinlenebilir: P+, P- butonları kullanılarak şifre girilmeden bir sonraki veya bir önceki kanala geçilebilir. SES KONTROLU Hiçbir menü etkin durumda değilken "V+ / V-" butonlarından birine basıldığında ses seviyesini grafiksel olarak gösteren bir gösterge ekrana gelir. "V+" butonuyla ses artırılır, "V-" butonuyla ses azaltılır.
Program listesindeyken MAVİ tuşun tekrar basılmasıyla favori moda geçilir; favori modunda iken: Ø Ø Ø İstenmeyen kanalların silinmesi (favori listesi menüsünden kanalların silinmesi kanalı sadece favori listesinden çıkarır) Favori listesi isimlerinin değiştirilmesi Kanalların taşınması DiSEqC 1.2 KURULUMU (MOTORLU ÇANAK ANTEN KULLANIMI İÇİN) Diseqc 1.2 ayar menüsüne giriş; Kurulum menüsündeki Anten Kurulumu Menüsünün altmenüsü olan “Bağlantı Şekli” nden yapılır.
Kullanıcı Diseqc 1.2 Menüsünden polarizasyon parametresini değiştirmek istiyorsa Anten Kurulum Menüsündeki polarizasyon “Y/D” seçeneğine ayarlanmalıdır. Girilecek frekans Alt Frekans Bandında ise frekans sınırları 10700 KHz ile 11900 KHz arasında, Üst Frekans Bandında ise frekans sınırları 11550 KHz ile 12750 KHz arasında olmalıdır. Bu sınırlar dışarısında girilen frekans değerleri ekranda bir uyarı mesajının çıkmasına neden olacaktır.DiSEqC 1.
POZİSYONUNU KAYDET İstenilen sinyal kalitesine ulaşıldığı zaman kullanıcı motorun bulunduğu pozisyonu kaydeder. Bu fonksiyon motorun daha sonra tekrar kullanıcı tarafından kaydedilen pozisyona dönmesini mümkün kılar. DOĞU LİMİTİNİ KAYDET Motorun bulunduğu pozisyonu doğu limiti olarak kaydeder. BATI LİMİTİNİ KAYDET Motorun bulunduğu pozisyonu batı limiti olarak kaydeder. REFERANS NOKTASINA DÖN Motoru kendi referans pozisyonuna geri döndürür (0 o) .
UYDUYA DÖN Enlem ve boylam değerlerine girdikten sonra OK tuşuna basınız . Anteniniz vermiş olduğunuz değerlere göre mevcut uyduya yönelecektir. REFERANS NOKTASINA DÖN Eski ayarlara geri dönmek için OK tuşuna basınız. Konumlandırıcı Referans Sıfır Noktasına dönecektir. Not: User 1,2,3,4 (Kullanıcı 1,2,3,4) seçerek yeni uydular belirleyebilirsinz. FREKANS Bu bölüme referans istasyon frekansını girmelisiniz. SEMBOL HIZI Bu bölüme referans istasyon sembol hızını girmelisiniz.
9.
SESİN SAĞ, SOL ve STEREO DURUMU Bağlantı : 2 x RCA (R + L) Çıkış : 2 Vrms / Z = 10 kohm DIJITAL SES Konnektör :1xRCA Çıkış :dijital çıkış (0.
Cihazın Kullanım Ömrü : 10 Yıl TSE Standardı : Yok ÜRETİCİ FİRMA FİRMA ADRES : VESTEL DİJİTAL ÜRETİM SANAYİ A.Ş. : Organize Sanayi3. Bölge Vestel City 45030 TEL MANİSA / TÜRKİYE : 0236 213 06 60 : 0236 213 06 78 FAX VESTEL DAYANIKLI TÜKET. MALLARI PAZARAMA A.Ş.
Cihazýnýzýn kullanma ömrü 10 yýldýr. Kullanma ömrü, üretici ve/veya ithalatçý firmanýn cihazýnýzla ilgili yedek parça temini ve bakým süresini ifade eder. Garanti Süresi : 2 Yýl DAÐITICI FÝRMA: FÝRMA : ELECTROLUX Dayanýklý Tüketim Mamülleri Sanayi ve Ticaret A.Þ. ADRES : Tarlabaþý Cad. No.