LAVATHERM 7071 TK ELECTRONIC Séchoir à condensation Mode d'emploi
Chère cliente, cher client Veuillez lire attentivement la notice d’utilisation dans son intégralité et la conserver pour pouvoir la consulter ultérieurement. Veuillez la transmettre à l’éventuel futur propriétaire de l’appareil. 1 3 2 2 Les symboles suivants sont utilisés dans ce document : Consignes de sécurité Avertissement ! Conseils pour votre sécurité personnelle. Avertissement ! Consignes permettant d’éviter d’endommager l’appareil.
Sommaire Mode d'emploi. . . . . . . . . . . . . . . . . . . . . . . . . . . . . . . . . . . . . . . . . . . . . . 5 Consignes de sécurité . . . . . . . . . . . . . . . . . . . . . . . . . . . . . . . . . . . . . . . . . . . 5 Protection de l’environnement . . . . . . . . . . . . . . . . . . . . . . . . . . . . . . . . . . . 7 Conseils relatifs à l’environnement . . . . . . . . . . . . . . . . . . . . . . . . . . . . . . . 8 Description de l’appareil. . . . . . . . . . . . . . . . . . . . . . . . . .
Nettoyage et entretien . . . . . . . . . . . . . . . . . . . . . . . . . . . . . . . . . . . . . . . . . . Nettoyage des filtres à peluches . . . . . . . . . . . . . . . . . . . . . . . . . . . . . . . . . . . Nettoyez le joint de la porte. . . . . . . . . . . . . . . . . . . . . . . . . . . . . . . . . . . . . . . Vidange du bac à eau condensée . . . . . . . . . . . . . . . . . . . . . . . . . . . . . . . . . . . Nettoyage du condenseur thermique . . . . . . . . . . . . . . . . . . . . . . . . . . . . . .
Mode d'emploi 1 Consignes de sécurité Avant le tout premier séchage • Veuillez observer les ”instructions de montage et de raccordement” • Avant d’utiliser l’appareil, vérifiez qu’il n’a pas été endommagé au cours du transport. Ne branchez en aucun cas un appareil endommagé. En cas de dommages, adressez-vous à votre livreur. Utilisation réglementaire • Le séchoir ne peut être utilisé que pour sécher le linge domestique habituel.
• Nettoyez régulièrement le condenseur thermique. • Pour les colonnes de lavage/séchage : ne posez aucun objet sur le séchoir. Ils pourraient tomber au cours du séchage. • Le cache de l’ampoule incandescente de l’éclairage du tambour doit être soigneusement vissé. Sécurité des enfants • Ne laissez pas les enfants s’approcher des éléments constituant l’emballage. Risque d’asphyxie ! • Le plus souvent, les enfants ne sont pas conscients des dangers qu’ils encourent en présence d’appareils électriques.
Protection de l’environnement 2 2 Elimination du matériel d’emballage Les matériaux d’emballage sont écologiques et recyclables. Les matières plastiques portent un signe distinctif, par ex. >PE<, >PS<, etc. Eliminez les matériaux d’emballage en fonction de leur signe distinctif dans les containeurs prévus à cet effet sur le site de collecte de votre commune. Appareils usagés W 1 Le symbole sur le produit ou son emballage indique que ce produit ne peut être traité comme déchet ménager.
2 Conseils relatifs à l’environnement • Le séchoir rend le linge duveteux et doux. Il est par conséquent inutile d’utiliser un adoucissant lors du lavage.
Description de l’appareil Bandeau de commande Bac-tiroir avec bac à eau condensée Filtre fin (filtre à peluches) Ampoule de l’éclairage intérieur Filtre grossier (filtre à peluches) Filtre microfin (filtre à peluches) Plaque signalétique Porte (butée amovible) Clapet du socle recouvrant le condenseur thermique Pieds de réglage (réglables en hauteur) Fente d’aération Bandeau de commandes Sélecteur de programmes et commutateur de Marche/Arrêt Affichage Touches de fonction Touche MARCHE/PAUSE Ind
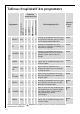
Tableau récapitulatif des programmes G ALARME 6kg • • • • Séchage en profondeur de tissus épais ou à plusieurs couches, par ex. serviettes en éponge, peignoir de bain. mn SEC 6kg • • • • Séchage en profondeur de tissus épais, par ex. serviettes en éponge, essuie-mains en éponge. mn mn SENSIBLE 1) & DOUX 1) TRÈS SEC Programmes À RANGER 6kg • • • • HUMIDE 6kg • • • • Pour les tissus fins qui doivent être repassés, par ex. maillots de corps, chemises en coton.
JEANS LAINE FACILE A REPASSER RAFRAÎCHIR 40 MIN 20 MIN 6kg 1kg 1kg 1kg 1kg • • • • • 1) Les fonctions & DOUX et 2) Selectionnez & DOUX ! • • • • • ¤ DEGRÉ DE SÉCHAGE SENSIBLE 1) G ALARME & DOUX 1) Programmes Charge maximale (poids sec) Fonctions supplémentaires Utilisation/propriétés • Programme spécial pour laver du linge tel que jeans, sweatshirts, etc. composés de textiles de • différentes résistances (par ex. au niveau des ceintures et des cordons).
Avant la première mise en service Première mise en service : sélection de la langue 3 Le réglage en usine de la langue d’affichage s’effectue systématiquement en allemand. Important ! Si, lors de la mise sous tension de l’appareil, le menu de sélection de la langue ne s’affiche pas, cela signifie que l’appareil a déjà été mis sous tension. Dans ce cas, reportez-vous au chapitre “Extras/langue”.
Réglage de l’heure Afin que l’heure du jour et l’heure de fin de programme soient correctement affichées, vérifiez les indicateurs à l’affichage et, le cas échéant, réglez précisément l’heure du jour. Pour ce faire, veuillez vous référer au chapitre "Menu/Heure du jour”. Avant d’effectuer le premier séchage Pour éliminer d’éventuels résidus de fabrication, passez un chiffon humide sur le tambour du séchoir ou procédez à un bref séchage (20 MIN) de torchons humides.
Préparer le linge • Pour éviter que le linge ne forme des boules : fermez les fermetureséclair, boutonnez les garnitures, attachez les bandes déliées (par ex. les attaches de tabliers). • Videz les poches. Enlevez les objets en métal (agrafes de bureau, épingles de sûreté,…). • Retournez les pièces doublées (par ex. retournez les anoracs côté doublure en coton). Ils sécheront d’autant mieux.
Sélectionner la vitesse d’essorage et la prévidange Si vous avez procédé à un 12.45 cycle de préséchage du linge TRES SEC 14.40 dans le lave-linge, vous pou- Fin de cycle à vez alors régler le séchoir sur dýaýa 1200 aýaýaýaýaýaýaýaýa la vitesse d’essorage du préTÜR U/MIN OPTION OK ZEIT PORTE T/MIN. OPTIONS OK TEMPS séchage. La durée du programme sera d’autant plus courte que la vitesse d’essorage est rapide. 1. Appuyez sur la touche T/MIN.
ú 3 Menu Les fonctions spéciales reprises sous le vocable Menu sont affichées en permanence, comme par ex. l’heure, la langue, etc. (référez-vous au chapitre "Menu”), jusqu’à ce que vous les modifiez ou les désactivez. Seules les options pouvant être associées au programme sélectionné précédemment seront toujours affichées à l’écran. Doux, Alarme, Sensible 1. Appuyez plusieurs fois sur la touche OPTIONS, jusqu’à ce que le symbole souhaité clignote, par ex.
Degré de séchage 1. Appuyez plusieurs fois sur la touche OPTIONS jusqu’à ce que le symbole ¤ DEGRÉ DE SÉCHAGE clignote. 2. Appuyez sur la touche OK. 3. Appuyez sur la touche OPTIONS. Le symbole correspondant à ¢ PLUS SEC s’affiche avec un trait noir. 3 12.45 TRES SEC Degré de séchage 15.01 mýWýgýSýBýaýaýaýa aýaýa TÜR PORTE U/MIN T/MIN. OPTION OPTIONS OK OK ZEIT TEMPS 4. Pour passer de ¢ PLUS SEC à £ TRES SEC, appuyez une nouvelle fois sur la touche OPTIONS.
3 5. Appuyez sur la 12.45 TRES SEC touche TEMPS si vous ne 19.01 souhaitez pas régler un cycle Fin de cycle à anti-froissage de 60 minutes. dýaýa aýaýaýaýaýaýaýTýa L’écran affiche le symbole TÜR U/MIN OPTION OK ZEIT PORTE T/MIN. OPTIONS OK TEMPS T DÉPART DIFFÉRÉ et le temps résiduel du programme (y compris le nombre d’heures du départ différé). 6. Pour activer la fonction T DÉPART DIFFÉRÉ, appuyez sur la touche MARCHE/PAUSE. À présent, l’écran visualise par ex. "Départ dans 4.00" (=4 heures).
Déroulement du programme L’affichage indique la phase du programme qui vient de se terminer et l’heure de fin de programme. 3 12.45 TRES SEC Séchage dýaýa TÜR PORTE 15.01 aýaýaýaýaýaýaýaýa U/MIN T/MIN. OPTION OK ZEIT Il est possible de modifier OPTIONS OK TEMPS l’heure de fin de programme au cours du cycle de séchage, car le programme s’adapte aux différentes conditions en présence au cours du séchage (par ex. type de linge et quantité de linge chargée).
Fin du séchage/retrait du linge 3 En fin de programme, un signal sonore (dont le volume a été présélectionné) retentit 4 fois et les indicateurs "ANTI-FROISSAGE“ “VIDER LE BAC" et "NETTOYER LES FILTRES“ s’affichent tour à tour. Le cycle de séchage se termine automatiquement par une phase antifroissage de 30 minutes environ. Au cours de cette phase, le tambour tourne par intermittence. Ainsi, le linge ne se tasse pas et ne se froisse pas.
Sélection des Mémoires Exemple : L’espace MÉMOIRE 12.45 TRES SEC 1 du programme doit contenir 15.16 Fin de cycle à l’association de programmes dýaýa aýaýaýSýaýaýaýaýa suivantes : COTON TRÈS SEC TÜR U/MIN OPTION OK ZEIT avec Option SENSIBLE PORTE OPTIONS OK TEMPS T/MIN. 1. Positionnez le sélecteur de programmes sur COTON TRÈS SEC. 2. À l’aide de la touche OPTIONS, réglez la fonction SENSIBLE, puis appuyez sur la touche OK. Un trait noir s’affiche en dessous du symbole SENSIBLE. 3.
Volume son Il vous est possible de régler le volume du signal sonore. 1. Tournez le sélecteur de programmes sur le programme souhaité et appuyez plusieurs fois sur la touche OPTIONS, jusqu’à ce que le symbole ú MENU clignote. 2. Appuyez sur la touche OK. 3. Appuyez plusieurs fois sur la touche OPTIONS jusqu’à ce que l’affichage indique VOLUME SON. 4. Appuyez sur la touche OK. 5. Appuyez plusieurs fois sur la 12.
Langue 1. Tournez le sélecteur de programmes sur le programme souhaité et appuyez plusieurs fois sur la touche OPTIONS, jusqu’à ce que le symbole ú MENU clignote. 2. Appuyez sur la touche OK. 3. Appuyez plusieurs fois sur la 12.45 Language: touche OPTIONS jusqu’à ce que l’écran affiche LANGUE. ENGLISH aýaýa aýaýaýaýBýaýaýaýa 4. Appuyez sur la touche OK. TÜR U/MIN OPTION OK ZEIT PORTE T/MIN. OPTIONS OK TEMPS 5.
Contraste et luminosité 1. Tournez le sélecteur de programmes sur le programme souhaité et appuyez plusieurs fois sur la touche OPTIONS, jusqu’à ce que le symbole ú MENU clignote. 2. Appuyez sur la touche OK. 3. Appuyez plusieurs fois sur la touche OPTIONS jusqu’à ce que l’affichage indique CONTRASTE ou LUMINOSITÉ. 4. Appuyez sur la touche OK. 12.45 Contraste 5. À l’aide de la ƒ………………™………………‡ touche OPTIONS, sélectionaýaýaýaýBýaýaýaýa nez le réglage souhaité.
5. Appuyez sur la touche OPTIONS, pour programmer le réglage souhaité (ACTIF, NON ACTIF). 6. Appuyez sur la touche OK, pour valider votre sélection. L’indicateur de sortie de menu s’affiche. 12.45 Bac plein ACTIF aýaýa TÜR PORTE aýaýaýaýBýaýaýaýa U/MIN T/MIN.
4. Enlevez le filtre fin. 5. Enlevez les peluches du filtre fin, de préférence avec une main humide. 3 Nettoyez l’ensemble de la zone du filtre Il n’est pas nécessaire de nettoyer l’ensemble de la zone du filtre après chaque séchage, mais elle doit être régulièrement contrôlée et, le cas échéant, les peluches enlevées. 6. A cet effet, saisissez le filtre grossier par le haut et tirez-le vers l’avant jusqu’à ce qu’il se détache des deux supports. 7.
Nettoyez le joint de la porte Nettoyez le joint de la porte immédiatement après chaque séchage à l’aide d’un chiffon humide. Vidange du bac à eau condensée 1 Videz le bac à eau condensée après chaque cycle de séchage. Lorsque le bac à eau condensée est plein, le programme en cours s’interrompt automatiquement et l’indicateur VIDER LE BAC s’affiche. Il est nécessaire de vider le bac à eau condensée avant de pouvoir poursuivre le programme.
Nettoyage du condenseur thermique 1 Si l’écran affiche NETTOYER LE CONDENSEUR, il est nécessaire que vous procédiez au nettoyage du condenseur thermique. Attention ! Ne faites pas fonctionner le séchoir avec un condenseur contenant des peluches au risque de l’endommager. Cela augmente par ailleurs la consommation d’électricité. 1. Ouvrez le hublot 2.
8. Replacez le condenseur et verrouillez-le (tournez les deux bagues de sécurité vers le haut jusqu’à ce qu’elles s’encliquètent). 9. Fermez le clapet du socle. 1 Attention ! Ne jamais utiliser le séchoir sans condenseur thermique. Nettoyage du tambour 1 3 Attention ! Ne nettoyez pas le tambour avec des produits abrasifs ou avec une paille de fer. Le calcaire contenu dans l’eau ou les produits de lavage peuvent laisser un dépôt à peine visible à l’intérieur du tambour.
Symptôme Cause possible Solution Branchez l’appareil. Vérifiez le Il est débranché ou le fusible fusible dans le boîtier (installaest défectueux. tion domestique). Le séchoir ne fonctionLe hublot est ouvert. ne pas. Le séchage n’est pas satisfaisant. Fermez le hublot. La touche MARCHE/PAUSE a-t-elle été enclenchée ? Appuyez à nouveau sur la touche MARCHE/PAUSE. Vous n’avez pas sélectionné le programme adéquat.
Symptôme L’écran affiche : ERREUR SELECTION. L’éclairage du tambour ne fonctionne pas. Cause possible La fonction que vous avez sélectionnée ne peut être associée aux autres réglages du programme. Solution Modifiez votre sélection. Positionnez le sélecteur de Le sélecteur de programmes programmes sur ECLAIRAGE ou est positionné sur ARRET. sur n’importe quel programme. L’ampoule incandescente est Remplacez l’ampoule (voir le défectueuse. chapitre suivant).
Caractéristiques techniques 5 Cet appareil est conforme aux directives UE suivantes : – directive 73/23/CEE du 19.02.1973 relative à la basse tension – directive 89/336/CEE du 03.05.1989 relative à la compatibilité électromagnétique (CEM) ainsi qu’à la directive de révision 92/31/CEE – directive 93/68/CEE du 22.07.1993 relative à la certification CE Hauteur x largeur x profondeur 85 x 60 x 60 cm Profondeur hublot ouvert 109 cm Possibilité de réglage de la hauteur 1,5 cm Poids à vide env.
Instructions de montage et de raccordement 1 Consignes de sécurité pour l’installation • Avant de mettre l’appareil en fonctionnement, retirez toutes les protections de transport. Autrement, l’appareil pourrait être endommagé. • Avant de mettre l’appareil en service, assurez-vous que la tension nominale et le type de courant indiqués sur la plaque signalétique correspondent à la tension nominale et au type de courant du lieu de l’installation.
3. Enlevez la gaine plastique avec le rembourrage en polystyrol de l’appareil. Raccordement électrique Les indications relatives au type de courant et au fusible requis se trouvent sur la plaque signalétique. La plaque signalétique se trouve au niveau du hublot (voir chapitre “Description de l’appareil”). Changer la butée du hublot 1 Avertissement ! Le changement de la butée du hublot relève exclusivement de la compétence d’un spécialiste.
5. Dévissez la charnière A de sur le hublot, faites-la tourner de 180 °, replacez-la sur le côté opposé et revissez-la soigneusement. 6. Tournez les caches A et B de 180 ° et replacez-les respectivement sur le côté opposé. 7. Dévissez le cache E de la paroi avant de l’appareil, faites-le tourner de 180 ° et revissez-le sur le côté opposé. 8. Dévissez le verrouillage du hublot, poussez légèrement vers le bas et enlevez-le de la paroi avant de l’appareil. 9. Enlevez le connecteur du verrouillage F du hublot.
Accessoires spéciaux Vous trouverez chez votre distributeur les accessoires spéciaux suivants : Lots de pièces détachées intermédiaires colonne lave-linge/colonne séchoir Ces lots de pièces détachées intermédiaires permettent d’installer le séchoir avec un lave-linge AEG-Electrolux (60cm de large, chargement frontal) de manière à constituer une colonne lave-linge/séchoir. Le lave-linge est placé dessous, le séchoir au-dessus. Il existe deux options : – sans plaque support 916.
Centres de service après vente Servicestellen 5506 Mägenwil/Zürich Industriestrasse 10 9000 St.
Service après-vente En cas de problèmes techniques, vérifiez d’abord s’il ne vous est pas possible de réparer vous-même le dysfonctionnement à l’aide de la notice d’utilisation (chapitre „Que faire, si...“). Si vous ne parvenez pas à réparer le dysfonctionnement, veuillez contacter notre Consumer Services. Pour pouvoir vous dépanner dans les plus brefs délais, nous nécessitons les informations suivantes : – Désignation du modèle – Numéro du produit (PNC) – Numéro de série (S-No.
From the Electrolux Group. The world´s No.1 choice. Le Groupe Electrolux est le premier fabricant mondial d'appareils de cuisine, d'entretien et d'extérieur. Plus de 55 millions de produits du Groupe Electrolux (tels que réfrigérateurs, cuisinières, lave-linge, aspirateurs, tronçonneuses, tondeuses à gazon) sont vendus chaque année pour un montant d'environ 14 milliards de dollars US dans plus de 150 pays à travers le monde. AEG Hausgeräte GmbH Postfach 1036 D-90327 Nürnberg http://www.aeg-electrolux.