FI SV Käyttöohje Keittotaso Bruksanvisning Inbyggnadshäll 2 18 HC411520
www.aeg.com SISÄLTÖ 1. TURVALLISUUSTIEDOT............................................................................................ 3 2. TURVALLISUUSOHJEET........................................................................................... 4 3. LAITTEEN KUVAUS................................................................................................... 7 4. PÄIVITTÄINEN KÄYTTÖ........................................................................................... 7 5.
SUOMI 1. 3 TURVALLISUUSTIEDOT Lue laitteen mukana toimitetut ohjeet ennen laitteen asennusta ja käyttöä. Valmistaja ei ota vastuuta henkilötai omaisuusvahingoista, jotka aiheutuvat laitteen virheellisestä asennuksesta tai käytöstä. Pidä ohjeet aina laitteen mukana tulevia käyttökertoja varten. 1.
www.aeg.com • • • • • • • • • Älä koskaan yritä sammuttaa tulta vedellä, vaan kytke laite pois toiminnasta ja peitä sitten liekit esimerkiksi kannella tai sammutuspeitteellä. Älä säilytä mitään keittotason päällä. Metalliesineitä, kuten veitsiä, haarukoita, lusikoita ja kansia ei saa panna liesitasolle, koska ne voivat kuumentua. Laitteen puhdistuksessa ei saa käyttää painepesuria. Jos keraaminen/lasipinta on vaurioitunut, katkaise virta laitteesta sähköiskuvaaran välttämiseksi.
SUOMI • Tiivistä pinnat tiivisteaineella estääksesi kosteuden aiheuttaman turpoamisen. • Suojaa laitteen alaosa höyryltä ja kosteudelta. • Älä asenna laitetta oven viereen tai ikkunan alapuolelle. Tällöin keittoastioiden putoaminen laitteesta vältetään oven tai ikkunan avaamisen yhteydessä. • Jos laite on asennettu laatikoiden yläpuolelle, varmista, että laitteen alaosan ja ylälaatikon välinen tila on riittävä ilmankierron kannalta. • Laitteen alaosa voi kuumentua.
www.aeg.com • Älä muuta laitteen teknisiä ominaisuuksia. • Varmista, ettei tuuletusaukoissa ole esteitä. • Älä jätä laitetta ilman valvontaa toiminnan aikana. • Kytke keittoalue aina off-asentoon käytön jälkeen. • Älä aseta ruokavälineitä tai kattiloiden kansia keittoalueille. Ne voivat kuumentua. • Älä käytä laitetta märillä käsillä tai kun se on kosketuksissa veteen. • Älä käytä laitetta työtasona tai säilytystasona. • Öljy voi roiskua, kun asetat ruokaaineksia kuumaan öljyyn.
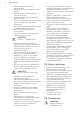
SUOMI • Kysy lisätietoa laitteen oikeaoppisesta hävittämisestä paikalliselta viranomaiselta. • Irrota pistoke pistorasiasta. • Leikkaa johto irti ja hävitä se. • Litistä ulkoiset kaasuputket. 2.7 Huolto • Kun laite on korjattava, ota yhteyttä valtuutettuun huoltopalveluun. • Käytä vain alkuperäisiä varaosia. 3. LAITTEEN KUVAUS 3.1 Keittoalueet 1 Kaksoispoltin 2 Väännin 1 2 3.
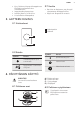
www.aeg.com VAROITUS! Ole erityisen varovainen käyttäessäsi avotulta keittiössä. Valmistaja ei vastaa liekin väärinkäytön aiheuttamista vahingoista. 1. Paina säädin alas ja kierrä sitä vastapäivään kaasunsyötön maksimiasentoon ( ).Liekki syttyy kaksoispolttimen molemmassa polttimen kannessa. Voit sytyttää kaksoispolttimen sisäisen kannen painamalla säätimen alas ja kiertämällä sitä myötäpäivään maksimiasentoon ( ). 2. Pidä säädintä alhaalla korkeintaan 10 sekuntia. Lämpöpari lämpenee tällöin.
SUOMI 5. VIHJEITÄ JA NEUVOJA VAROITUS! Lue turvallisuutta koskevat luvut. HUOMIO! Varmista, että keittoastiat on asetettu polttimen keskelle maksimaalisen vakauden ja pienemmän kaasun kulutuksen saavuttamiseksi. 5.1 Keittoastiat HUOMIO! Älä käytä valurautapannuja, vuolukiveä, saviastioita, grilliä tai paahtolevyjä. VAROITUS! Älä aseta epävakaita tai vaurioituneita keittoastioita polttimen päälle roiskeiden ja henkilövahinkojen välttämiseksi.
www.aeg.com Aseta keittoastian tuet erityisen varovaisesti paikoilleen, jotta keittotasoon ei tulisi vaurioita. 2. Emalipinnassa voi joskus olla karkeita reunoja, pese keittoastian tuet varoen käsin ja kuivaa ne. Poista vaikeat tahrat tarvittaessa puhdistustahnalla. 3. Varmista keittoastian tukien puhdistamisen jälkeen, että ne ovat oikein paikoillaan. 4. Jotta poltin toimisi virheettömästi, alusritilöiden varsiosien on oltava polttimen keskellä. elektrodi.
SUOMI 11 7.1 Käyttöhäiriöt Ongelma Mahdollinen syy Korjaustoimenpide Kipinää ei muodostu, kun yr- Keittotasoa ei ole kytketty ität laukaista kipinäelemensähköverkkoon tai se on liitin. tetty sähköverkkoon virheellisesti. Sulake on palanut. Tarkista, onko keittotaso kytketty oikein sähköverkkoon. Tarkista, onko toimintahäiriön syynä sulake. Jos sulake palaa aina uudelleen, käänny sähköalan ammattilaisen puoleen. Polttimen kupu ja suojus Aseta polttimen kupu ja suoovat virheellisesti paikoillaan.
www.aeg.com 8.2 Kaasuliitäntä VAROITUS! Asennus, liitännät ja huolto on jätettävä hyväksytyn ja asiantuntevan henkilön tehtäväksi, ja ne on suoritettava seuraavien ohjeiden sekä voimassa olevien standardien ja paikallisten määräysten mukaisesti. Varmista, ettei laitetta ole kytketty sähköverkkoon asennuksen aikana. Irrota pistoke tai sulakkeet. Katkaise kaasun syöttöjärjestelmä. Varmista, että rakennuksen kaasun syöttöjärjestelmän ja laitteen välillä on olemassa hana.
SUOMI 8.3 Suuttimien vaihtaminen 1. Irrota keittoastian tuet. 2. Poista polttimen suojukset ja kuvut. 3. Irrota suuttimet ruuviavaimella 7 ja vaihda ne käytössä olevaan kaasutyyppiin sopiviin suuttimiin (katso "Tekniset tiedot" -luvun taulukko). 13 4. Säädä säätöruuvia ohutta ruuvimeisseliä käyttäen (A ulkokannessa ja B sisäkannessa). A B 5. Jos vaihdat: • maakaasusta G20 20 mbar nestekaasuun, kiristä säätöruuvi kokonaan.
www.aeg.com Varmista, että sininen nollajohdin on liitetty kirjaimella "N" merkittyyn liittimeen. Liitä ruskea (tai musta) vaihejohdin kirjaimella "L" merkittyyn liittimeen. Pidä vaihejohdin aina kytkettynä. 8.6 Liitäntäjohto Liitäntäjohto on vaihdettava ainoastaan erikoisjohtoon tai vastaavaan. Kaapelityyppi on: H05V2V2-FT90. 8.7 Asennus ASENNUS TASON PÄÄLLE min. 650mm min. 450mm R 5mm min. 55mm 490+1mm 340+1mm Varmista, että kaapeliosa kestää jännitteen ja käyttölämpötilan.
SUOMI 15 min. 30 mm min. 20 mm 8.8 Useamman kuin yhden keittotason asennus Toimitetut lisävarusteet: tukipalkki, lämmönkestävä silikoni, kumimuotti, tiivistenauha. Käytä ainoastaan erityistä lämmönkestävää silikonia. lasikeraamisen pinnan ulkoista reunaa pitkin. 5. Kiinnitä asennuslevyt löysästi suojakotelon oikeisiin reikiin. 6. Aseta ensimmäinen keittotaso työtason leikkaukseen. Aseta sen jälkeen tukipalkki työtason leikkaukseen. Paina puolet sen leveydestä keittotason alle.
www.aeg.com 8.9 Asennusmahdollisuudet Keittotason alle kiinnitetty paneeli on voitava poistaa helposti mm. korjaustoimenpiteiden tarpeen varalta. Keittiökaluste, jossa on ovi 9. Kiristä kiinnityslevyjen/kiinnikkeiden ruuvit. 10. Tiivistä keittotasojen ja keittotasojen ja työtason väliset aukot silikonilla. 11. Laita silikoniin hiukan saippuavettä. 12. Paina kumimuottia lasikeraamista pintaa vasten voimaa käyttäen ja siirrä sitä hitaasti aukkoa pitkin.
SUOMI Poltin Maakaasu G20/20 mbar Nestekaasu G30/30 mbar Suuttimet Suuttimet 70 46 Kaksoispoltin - sisempi lämpöalue 17 10. ENERGIATEHOKKUUS 10.1 Tuotetiedot standardin EU 66/2014 mukaisesti Mallin tunnus HC411520GB Keittotasotyyppi Kalusteeseen asennettava keittotaso Kaasupolttimien määrä 1 Energiatehokkuus kaasupoltinta kohti (EE gas burner) Keskellä - Kaksoispoltin Kaasutoimisen keittotason energiatehokkuus (EE gas hob) 53,4 % 53.
www.aeg.com INNEHÅLL 1. SÄKERHETSINFORMATION.................................................................................. 19 2. SÄKERHETSFÖRESKRIFTER...................................................................................20 3. PRODUKTBESKRIVNING........................................................................................23 4. DAGLIG ANVÄNDNING.........................................................................................23 5. RÅD OCH TIPS............................
SVENSKA 1. 19 SÄKERHETSINFORMATION Läs noga de bifogade instruktionerna före installation och användning av produkten. Tillverkaren kan inte hållas ansvarig för personskador eller skador på egendom som orsakats av felaktig installation eller användning. Förvara alltid instruktionerna tillsammans med produkten för framtida bruk. 1.
www.aeg.com • • • • • • • • • Försök aldrig att släcka en eld med vatten, men stäng av produkten och täck över flamman, t.ex. med ett lock eller brandfilt. Förvara inte saker på kokytorna. Metallföremål som knivar, gafflar, skedar och lock bör inte placeras på hällens yta eftersom de blir varma. Använd inte ångrengörare vid rengöring av produkten. Om glaskeramikytan / glasytan är sprucken, stäng av produkten för att undvika risken för elektriska stötar.
SVENSKA • Installera inte produkten nära en dörr eller under ett fönster. Detta förhindrar att heta kokkärl faller ned från produkten när dörren eller fönstret är öppet. • Om produkten är installerad ovanför lådor måste utrymmet mellan produktens botten och den övre lådan var tillräckligt så att luft kan cirkulera • Produktens undersida kan bli het. Se till att en icke-brännbar separationspanel monteras under produkten så att man inte kommer åt undersidan. 2.
www.aeg.com • Stäng av kokzonen efter varje användningstillfälle. • Lägg inte bestick eller kastrullock på kokzonerna. De kan bli varma. • Använd inte produkten med våta händer eller när den är i kontakt med vatten. • Använd inte produkten som arbetseller avlastningsyta. • Det kan stänka när du lägger livsmedel i het olja. VARNING! Risk för brand och explosion • Fetter och olja kan frigöra lättantändliga ångor när de värms upp.
SVENSKA • Lägg de externa gasledningarna plant. • Använd endast originaldelar. 2.7 Underhåll • Kontakta en auktoriserad serviceverkstad för reparation av produkten. 3. PRODUKTBESKRIVNING 3.1 Beskrivning av hällen 1 Dubbel brännare 2 Kontrollvred 1 2 3.2 Kontrollvredet Symbol Symbol Beskrivning Beskrivning minimal gastillförsel ingen gastillförsel / Avläge intern krona tändposition / maximal gastillförsel dubbelkrona 4. DAGLIG ANVÄNDNING VARNING! Se säkerhetsavsnitten. 4.
www.aeg.com A) B) C) D) Brännarlock Brännarkrona Tändlåga Termoelement 4.2 Tändning av brännare Tänd alltid brännaren innan du ställer kokkärlet på den. VARNING! Var mycket försiktig när du använder öppen eld i en köksmiljö. Tillverkaren påtar sig inget ansvar för felaktig användning av öppen eld. 1. Tryck på gaskontrollvredet och vrid det medsols till maximal gastillförselposition ( ).Lågan kommer att tändas på den dubbla brännarens två kronor.
SVENSKA När den dubbla brännarens galler sätts tillbaka, kontrollera att gallrets ihåliga del passas ihop med referensmarkeringen på den platta som sitter fast i glaset. 5. RÅD OCH TIPS VARNING! Se säkerhetsavsnitten. FÖRSIKTIGHET! Kontrollera att kokkärlen ställs mitt på brännaren för att få maximal stabilitet och lägre gasförbrukning. 5.1 Kokkärl FÖRSIKTIGHET! Använd inte gjutjärnspannor, kokkärl i stengods, grill- eller stekfat.
www.aeg.com VARNING! Använd inte knivar, skrapor eller liknande instrument för att rengöra glasytan eller mellan kanterna på brännarna och ramen (i tillämpliga fall). • Diska rostfria delar med vatten, och torka sedan med en mjuk duk. 6.2 Kokkärlsstöd Kokkärlsstöden tål inte maskindisk. De måste diskas för hand. 1. Avlägsna kokkärlsstöden för att enkelt rengöra hällen. Var försiktigt när du sätter tillbaka kokkärlsstöden för att undvika att hällens ovansida skadas. 2.
SVENSKA 27 7.1 Om produkten inte fungerar... Problem Möjlig orsak Lösning Det finns ingen gnista när du Hällen är inte ansluten till Kontrollera att hällen är korförsöker aktivera gnistgener- strömförsörjningen eller den rekt ansluten till strömföratorn. är ansluten på fel sätt. sörjningen. En säkring har utlösts. Kontrollera om säkringen är orsaken till felet. Om säkringen går gång på gång, tala med en kvalificerad elektriker. Brännarlock och krona sitter fel.
www.aeg.com eller avaktivera säkringarna. Koppla från gastillförseln. Det måste finnas en stoppkran mellan husets och produktens gastillförsel. Inställningarna för den här produkten finns på typskylten. De nuvarande inställningarna för gastypen och gastrycket anges på en klisteretikett. Välj fasta anslutningar eller använd ett flexibelt rör i rostfritt stål i enlighet med gällande regelverk.
SVENSKA 29 A B 5. Om du byter • från naturgas G20 20 mbar till flytande gas ska du dra åt justeringsskruven helt och hållet. • från flytande gas till naturgas G20 20 mbar ska du lossa justeringsskruven cirka 1/4 varv . VARNING! Kontrollera att lågan inte släcks när du snabbt vrider vredet från max-läget till minimiläget. 8.5 Elektrisk anslutning 4. Sätt tillbaka delarna i omvänd ordning. 5.
www.aeg.com 8.6 Nätkabel För att byta anslutningskabeln används endast specialkabeln eller motsvarande. Kabeltypen är: H05V2V2-FT90. Kontrollera att kabeln är anpassad till spänningen och arbetstemperaturen. 8.7 Montering INSTALLATION PÅ BÄNKEN min. 650mm min. 450mm R 5mm min. 55mm 490+1mm 340+1mm Den gul/gröna jordledningen måste vara cirka 2 cm längre än den bruna (eller svarta) fasledningen.
SVENSKA 31 min. 30 mm min. 20 mm 8.8 Installation av mer än en häll Medföljande tillbehör: anslutningslist, värmebeständigt silikon, gummistycke, tätningslist. Använd bara särskilt värmebeständigt silikon. 5. Skruva löst i fixeringsplattornas skruvar i de rätta hålen i skyddshöljet. 6. Sätt först in hällen i utstansningen i bänkskivan. Sätt sedan in anslutningslisten i bänkskivans utstansning. Tryck in halva dess bredd under hällen.
www.aeg.com 8.9 Alternativ för inbyggnad Panelen som installeras under hällen måste enkelt kunna tas bort för att möjliggöra åtkomst för tekniska arbeten. Köksenhet med dörr 9. Dra åt fixeringsplattornas/ fasthållningsgreppens skruvar. 10. Täta mellanrummen mellan hällarna och bänkskivan med silikon. 11. Häll lite vatten med handdiskmedel på silikonet. 12. Tryck gummistycket med viss kraft emot glaskeramiken och rör den långsamt över ytan.
SVENSKA 33 Gasbrännarinjektorer Brännare Dubbel brännare ytterring Naturgas G20/20 mbar LPG G30/30 mbar Injektorer Injektorer 2x115 2x72 Brännare Dubbel brännare innerring Naturgas G20/20 mbar LPG G30/30 mbar Injektorer Injektorer 70 46 10. ENERGIEFFEKTIVITET 10.
www.aeg.
SVENSKA 35
867321567-A-152015 www.aeg.