B8875-5 Benutzerinformation Elektro-Einbauherd
Inhalt Vielen Dank, dass Sie sich für eines unserer Qualitätsprodukte entschieden haben. Lesen Sie diese Benutzerinformation aufmerksam durch, um Ihr Gerät optimal und über lange Zeit zuverlässig nutzen und alle Bedienvorgänge korrekt und Zeit sparend ausführen zu können. Bewahren Sie die Benutzerinformation an einem sicheren Ort auf und händigen Sie diese beim Weiterverkauf des Geräts dem zukünftigen Besitzer aus. Wir wünschen Ihnen viel Freude mit Ihrem neuen Gerät.
Gebrauchsanweisung 3 Gebrauchsanweisung 1 Sicherheitshinweise Elektrische Sicherheit • Das Gerät darf nur durch einen konzessionierten Fachmann angeschlossen werden. • Bei Störungen oder Beschädigungen am Gerät: Sicherungen herausdrehen bzw. ausschalten. • Reparaturen am Gerät dürfen nur von Fachkräften durchgeführt werden. Durch unsachgemäße Reparaturen können erhebliche Gefahren entstehen. Wenden Sie sich im Reparaturfall an unseren Kundendienst oder an Ihren Fachhändler.
Gerätebeschreibung • Bewahren Sie keine brennbaren Gegenstände im Backofen auf. Sie können sich beim Einschalten entzünden. • Bewahren Sie keine feuchten Lebensmittel im Backofen auf. Es können Schäden am Email entstehen. • Bewahren Sie nach dem Abschalten des Kühlgebläses keine offenen Speisen im Backofen auf. Im Backraum oder an den Türgläsern kann sich Feuchtigkeit niederschlagen, die auch auf die Möbel gelangen kann.
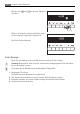
Gerätebeschreibung Bedienblende Backofen-Anzeigen Funktions-Tasten Backofen Ausstattung Backofen Oberhitze und Grillheizkörper Backofenbeleuchtung Fleischspießbuchse Fettfilter Backofenbeleuchtung Rückwandheizkörper Ventilator Unterhitze 5
Gerätebeschreibung Einsatzebenen An der Backwagen-Tür innen befinden sich 2 Halterungen mit 5 Öffnungen zum Einhängen des Zubehörs. Türinnenseite An der Innenseite der Backwagen-Tür ist die Nummerierung der Einsatzebenen beidseitig dargestellt. Außerdem finden Sie eine Kurzinformation zu Backofen-Funktionen, empfohlenen Einsatzebenen und Temperaturen für die Zubereitung der gebräuchlichsten Gerichte. Zubehör Backofen Einhängerost Für Geschirr, Kuchenformen, Braten und Grillstücke.
Vor dem ersten Gebrauch Fettpfanne Zum Backen und Braten bzw. als Auffangblech für Fett. Einlegerost Einsatz für die Fettpfanne zum Braten und Grillen. Fleischspieß Für genaue Bestimmung des Garzustandes von Fleischstücken. Vor dem ersten Gebrauch Tageszeit einstellen 3 Der Backofen funktioniert nur mit eingestellter Zeit. Nach dem elektrischen Anschluss oder einem Stromausfall blinkt Tageszeit automatisch.
Vor dem ersten Gebrauch Mit der Taste einstellen. oder die aktuelle Tageszeit Nach ca. 5 Sekunden erlischt das Blinken und die Uhr zeigt die eingestellte Tageszeit an. Das Gerät ist betriebsbereit. Erstes Reinigen 1 3 Bevor Sie den Backofen das erste Mal benutzen, sollten Sie ihn reinigen. Achtung: Benutzen Sie keine scharfen, scheuernden Reinigungsmittel! Die Oberfläche könnte beschädigt werden. Verwenden Sie bei Metallfronten handelsübliche Pflegemittel. 1. Backwagen-Tür öffnen.
Bedienen des Backofens 9 Bedienen des Backofens Die elektronische Backofen-Steuerung Temperatur/Tageszeit Backofen-Funktionen Uhr-Funktionen/Betriebszeit Heiz-Anzeige Ein/Aus Schnellheizen Backofen-Funktions-Wahl 3 Einstell-Tasten Uhr-Funktionen Fleischspieß Allgemeine Hinweise • Gerät immer zuerst mit der Taste Ein/Aus einschalten. • Wenn die gewählte Funktion leuchtet, beginnt der Backofen zu heizen bzw. die eingestellte Zeit abzulaufen.
Bedienen des Backofens Backofen-Funktion wählen 3 1. Gerät mit der Taste Ein/Aus einschalten. 2. Taste oder so oft drücken, bis die gewünschte Backofen-Funktion erscheint. • In der Temperatur-Anzeige erscheint ein Temperaturvorschlag. • Wird die vorgeschlagene Temperatur nicht innerhalb von ca. 5 Sekunden geändert, beginnt der Backofen zu heizen. Die Backofen-Funktion kann während des Betriebs geändert werden.
Bedienen des Backofens 11 Backofen ausschalten Gerät mit der Taste Ein/Aus 3 3 ausschalten. Kühlgebläse Das Gebläse schaltet sich automatisch ein, um die Geräteoberflächen kühl zu halten. Nachdem der Backofen ausgeschaltet wurde, läuft das Gebläse noch weiter, um das Gerät abzukühlen und schaltet sich dann selbständig ab. Heiz-Anzeige Anzeige Aufheizen Nach dem Einschalten der Backofen-Funktion zeigen die langsam nacheinander aufleuchtenden Balken an, wie weit der Backofen bereits aufgeheizt ist.
Bedienen des Backofens Anzeige Restwärme Nach dem Ausschalten des Backofens zeigen die noch leuchtenden Balken die verbleibende Restwärme im Backofen an. Schnellheizen 1 3 Nach Anwählen einer Backofen-Funktion kann durch die Zusatzfunktion Schnellheizen der leere Backofen in relativ kurzer Zeit vorgeheizt werden. Achtung: Gargut bitte erst in den Backofen legen, wenn Schnellheizen beendet ist und der Backofen in der gewünschten Funktion arbeitet. 1. Gewünschte Backofen-Funktion einstellen (z. B.
Bedienen des Backofens Backofen-Funktion 13 Anwendung Infrabraten Zum Braten größerer Fleischstücke oder Geflügel auf einer Ebene. Die Funktion eignet sich auch zum Gratinieren und Überbacken. Großflächengrill Zum Grillen flacher Lebensmittel in größeren Mengen und zum Toasten. Grill Zum Grillen flacher Lebensmittel, die in der Mitte des Rostes angeordnet werden und zum Toasten. Warmhalten Zum Warmhalten von Gerichten. Auftauen Zum An- und Auftauen von z. B.
Bedienen des Backofens Backblech oder Fettpfanne in Einhängerahmen einsetzen: Backblech oder Fettpfanne auf Haltestifte im Einhänge-Rahmen legen. 3 Bitte Backblech oder Fettpfanne nur mit Einhänge-Rahmen einsetzen. Einhängerost und Fettpfanne gemeinsam einsetzen: Bei gemeinsamer Benutzung von Einhängerost und Fettpfanne zuerst den Einhängerahmen mit der Fettpfanne und dann den Einhängerost in die nächste darüber liegende Ebene einsetzen.
Bedienen des Backofens Einlegerost tief einsetzen Einlegerost liegt in der Fettpfanne. Fettpfanne in die gewählte Einsatzebene der Backwagen-Tür einhängen. 3 Zum Braten größerer Fleischstücke oder Geflügel auf einer Ebene. Einlegerost hoch einsetzen Einlegerost schließt mit Rand der Fettpfanne ab. Fettpfanne in die gewählte Einsatzebene der Backwagen-Tür einhängen. 3 Zum Grillen flacher Lebensmittel in größeren Mengen und zum Toasten.
Bedienen des Backofens Fleischspieß 1 3 Zum gradgenauen Abschalten des Backofens bei Erreichen einer eingestellten Kern-Temperatur. Zwei Temperaturen sind zu beachten: – Die Backofen-Temperatur: Siehe Brattabelle – Die Kern-Temperatur: Siehe Tabelle Fleischspieß Achtung: Es darf nur die mitgelieferte Fleischsonde verwendet werden! Im Ersatzfall nur das Original-Ersatzteil verwenden! Die Fleischsonde kann nicht auf Einsatzebene 1 verwendet werden. 1. Gerät mit der Taste Ein/Aus einschalten. 2.
Bedienen des Backofens 17 5. Backofen-Funktion und Backofen-Temperatur einstellen. Sobald die eingestellte Kern-Temperatur erreicht ist, ertönt ein Signal und der Backofen schaltet sich automatisch aus. 3 6. Eine beliebige Taste drücken, um das Signal abzustellen. Innerhalb einiger Minuten wird eine vorläufige Endzeit berechnet, in der die eingestellte Kerntemperatur erreicht sein wird. Diese Zeit wird ständig neu berechnet und in der Anzeige aktualisiert.
Bedienen des Backofens Kern-Temperatur abfragen bzw. ändern – Taste Auswahl so oft drücken, bis die Funktion Fleischspieß stellte Kern-Temperatur in der Anzeige erscheint. – Temperatur gegebenenfalls mit oder ändern. blinkt und die einge- Backofen-Temperatur abfragen bzw. ändern – Temperatur gegebenenfalls mit oder ändern. Zusatz-Funktionen Zeit-Anzeige Uhr-Funktionen Tageszeit Dauer/Ende/Betriebszeit Uhr-Funktionen Einstell-Tasten Fleischspieß Kurzzeit Zum Einstellen einer Kurzzeit.
Bedienen des Backofens 19 Erinnerungsfunktion Die Erinnerungsfunktion erkennt, wann eine pyrolytische Reinigung nötig ist und weist darauf hin. 3 Hinweise zu den Uhr-Funktionen • Nach dem Auswählen einer Uhr-Funktion blinkt die dazugehörige Funktion ca. 5 Sekunden. Während dieser Zeit können mit der Taste oder die gewünschten Zeiten eingestellt oder verändert werden. • Nach dem Einstellen der gewünschten Zeit blinkt die Funktion nochmals ca. 5 Sekunden. Danach leuchtet die Funktion.
Bedienen des Backofens Kurzzeit 1. Taste Auswahl so oft drücken, bis Kurzzeit blinkt. 2. Mit der Taste zeit einstellen. oder die gewünschte Kurz- Nach ca. 5 Sekunden zeigt die Anzeige die verbleibende Zeit. Kurzzeit leuchtet. Wenn 90% der eingestellten Zeit abgelaufen ist, ertönt ein Signal. Wenn die Zeit abgelaufen ist, ertönt für 1 Minute ein Signal. „00.00“ und Kurzzeit blinken. Blinken und Signalton abstellen: Beliebige Taste drücken.
Bedienen des Backofens Dauer 1. Backofen-Funktion und Temperatur wählen. 2. Taste Auswahl so oft drücken, bis Dauer blinkt. 3. Mit der Taste oder dauer einstellen. Dauer die gewünschte Gar- leuchtet. Wenn die Zeit abgelaufen ist, blinkt „00.00“ und Dauer . Es ertönt für 2 Minuten ein Signal. Der Backofen schaltet sich aus. Blinken und Signalton abstellen: Beliebige Taste drücken.
Bedienen des Backofens Ende 1. Backofen-Funktion und Temperatur wählen. 2. Taste Auswahl so oft drücken, bis Ende blinkt. 3. Mit der Taste oder schaltzeit einstellen. die gewünschte Ab- Ende leuchtet und die Abschaltzeit wird angezeigt. Wenn die Zeit abgelaufen ist, blinkt „00.00“ und Ende . Es ertönt für 2 Minuten ein Signal. Der Backofen schaltet sich aus. Blinken und Signalton abstellen: Beliebige Taste drücken.
Bedienen des Backofens 3 Dauer und Ende 23 kombiniert Dauer und Ende können gleichzeitig verwendet werden, wenn der Backofen zu einem späteren Zeitpunkt automatisch ein- und ausgeschaltet werden soll. 1. Backofen-Funktion und Temperatur wählen. 2. Mit der Funktion Dauer die Zeit einstellen, die das Gericht zum Garen benötigt, z. B. : 1 Stunde. 3. Mit der Funktion Ende die Zeit einstellen, zu der das Gericht fertig sein soll, z. B. : 14:05 Uhr. Dauer und Ende leuchten.
3 Bedienen des Backofens Tageszeit ändern Die Tageszeit kann nur verändert werden, wenn die Kindersicherung ausgeschaltet, keine der Uhr-Funktionen Dauer oder Ende und keine Backofen-Funktion eingestellt ist. 1. Taste Auswahl so oft drücken, bis Tageszeit blinkt. 2. Mit der Taste einstellen. oder die aktuelle Tageszeit Nach ca. 5 Sekunden erlischt das Blinken und die Uhr zeigt die eingestellte Tageszeit an. Das Gerät ist betriebsbereit.
Bedienen des Backofens 3 25 Heat+Hold einschalten 1. Uhr-Funktionen Dauer und/oder Ende einstellen. 2. Taste Auswahl so oft drücken, bis das Symbol Warmhalten in der Anzeige erscheint. 3. Taste drücken. In der Anzeige erscheint „00.30“. 4. Sobald die Backofen-Funktion beendet ist, ertönt ein Signal und Heat+Hold startet. Die eingestellte Backofen-Funktion läuft mit 80°C für 30 Minuten. Sobald die 30 Minuten mit Heat+Hold beendet sind, schaltet sich der Backofen aus.
Bedienen des Backofens Weitere Funktionen Kindersicherung Sobald die Kindersicherung eingeschaltet ist, kann das Gerät nicht mehr in Betrieb genommen werden. Kindersicherung einschalten 1. Gerät gegebenenfalls mit der Taste Ein/Aus einschalten. Es darf keine Backofen-Funktion gewählt sein. 2. Tasten Auswahl und gleichzeitig gedrückt halten, bis in der Anzeige „SAFE“ erscheint. Die Kindersicherung ist jetzt in Betrieb. Kindersicherung ausschalten 1.
Bedienen des Backofens 27 Tastenverriegelung Zum Sichern aller eingestellten Backofen-Funktionen vor versehentlichem Verstellen. Tastenverrieglung einschalten 1. Gerät gegebenenfalls mit der Taste Ein/Aus einschalten. 2. Backofen-Funktion wählen. 3. Tasten Auswahl und gleichzeitig gedrückt halten, bis in der Anzeige „LOC“ erscheint. Die Tastenverriegelung ist jetzt in Betrieb. Tastenverriegelung ausschalten Tasten Auswahl und gleichzeitig gedrückt halten, bis in der Anzeige „LOC“ erlischt.
Anwendungen, Tabellen und Tipps Anwendungen, Tabellen und Tipps Backen Backofen-Funktion: Heißluft mit Ringheizkörper oder Ober-/Unterhitze Backformen • Für Ober-/Unterhitze eignen sich Formen aus dunklem Metall und beschichtete Formen. • Für Heißluft mit Ringheizkörper sind auch helle Metallformen geeignet. Einsatzebenen • Backen mit Ober-/Unterhitze ist auf einer Ebene möglich. • Mit Heißluft mit Ringheizkörper können Sie auf bis zu 3 Backblechen gleichzeitig backen: 1 Backblech: z. B.
Anwendungen, Tabellen und Tipps 29 2 Backbleche: z. B. Einsatzebenen 1 und 3 3 Backbleche: Einsatzebenen 1, 3 und 5 3 Allgemeine Hinweise • Backblech und Fettpfanne sind nur mit Einhänge-Rahmen für den Backwagen benutzbar. • Sie können mit Ober-/Unterhitze oder Heißluft mit Ringheizkörper auch zwei Formen gleichzeitig nebeneinander auf dem Rost backen. Die Backzeit verlängert sich nur unwesentlich. Bei Verwendung von Tiefkühlkost können sich beim Garvorgang die eingesetzten Bleche verziehen.
2 Anwendungen, Tabellen und Tipps • Beim Backen von Kuchen auf Backblechen oder in Formen auf mehreren Ebenen kann die Backzeit um 10-15 Minuten länger sein. • Feuchte Gebäcke (z. B. Pizzas, Obstkuchen etc.) werden auf einer Ebene zubereitet. • Höhenunterschiede des Backgutes können am Anfang des Backvorgangs zu unterschiedlicher Bräunung führen. In diesem Fall verändern Sie bitte nicht die Temperatureinstellung. Bräunungsunterschiede gleichen sich im Laufe des Backvorgangs aus.
Anwendungen, Tabellen und Tipps Art des Gebäcks Backofenfunktion Einsatzebene Temperatur °C Zeit Std.: Min.
Anwendungen, Tabellen und Tipps Art des Gebäcks Backofenfunktion Einsatzebene Temperatur °C Zeit Std.: Min. Blätterteigkleingebäck Heißluft mit Ringheizkörper 3 170-1801) 0:20-0:30 Brötchen Heißluft mit Ringheizkörper 3 1601) 0:20-0:35 Brötchen Ober-/Unterhitze 3 1801) 0:20-0:35 1) Small Cakes (20Stück/Blech) Heißluft mit Ringheizkörper 3 140 0:20-0:30 Small Cakes (20Stück/Blech) Ober-/Unterhitze 3 1701) 0:20-0:30 1) Backofen vorheizen 2) Auffangblech bzw.
Anwendungen, Tabellen und Tipps 33 Tipps zum Backen Backergebnis Der Kuchen ist unten zu hell Mögliche Ursache Falsche Einsatzebene Abhilfe Kuchen tiefer einschieben Der Kuchen fällt zusam- Zu hohe Backtemperatur men (wird klitschig, spundig, Wasserstreifen) Zu kurze Backzeit Backtemperatur etwas niedriger einstellen Zu viel Flüssigkeit im Teig Weniger Flüssigkeit verwenden.
Anwendungen, Tabellen und Tipps Gebäckart Einsatzebene Temperatur °C Zeit Std.: Min. 1 250 - 2701) 12 - 20 1 1) 15 - 25 Flammekuchen Piroggen 180 - 200 1) Backofen vorheizen Tabelle Aufläufe und Überbackenes Gericht Backofen-Funktion Einsatzebene Temperatur °C Zeit Std.: Min.
Anwendungen, Tabellen und Tipps 35 Braten Backofen-Funktion: Ober-/Unterhitze oder Infrabraten Beim Braten Fettfilter einsetzen! Bratgeschirr • Zum Braten ist jedes hitzebeständige Geschirr geeignet (Herstellerangaben beachten!). • Zum Braten können Sie das Grill-Set verwenden. • Alle mageren Fleischarten empfehlen wir im Bratentopf mit Deckel zu braten. So bleibt das Fleisch saftiger. • Alle Fleischarten, die eine Kruste bekommen sollen, können Sie im Bratentopf ohne Deckel braten.
Anwendungen, Tabellen und Tipps Fleischart Schweinehaxen (vorgekocht) Menge Backofenfunktion Einsatzebene Temperatur °C Zeit Std.: Min.
Anwendungen, Tabellen und Tipps 37 Tabelle Fleischspieß Gargut Fleischkern-Temperatur Rindfleisch Rostbraten oder Filetbraten innen rot (englisch) innen rosa (medium) innen durchgebraten 45 - 50 °C 60 - 65 °C 70 - 75°C Schweinefleisch Schweineschulter, Schinkenstück, Nacken 80 - 82 °C Kotelettstück (Rücken), Kasseler 75 - 80 °C Hackbraten 75 - 80 °C Kalbfleisch Kalbsbraten 75 - 80 °C Kalbshaxe 85 - 90 °C Hammel / Lamm Hammelkeule 80 - 85 °C Hammelrücken 80 - 85 °C Lammbraten, Lammkeule
3 Anwendungen, Tabellen und Tipps 1. Das Bratgut in der Pfanne sehr heiß anbraten. 2. In eine Bratenschale oder direkt auf das Grill-Set legen. 3. In den Backofen einsetzen. Backofenfunktion Niedertemperaturgaren Temperatur ändern und fertig garen (siehe Tabelle). Die Backofen-Funktion Niedertemperaturgaren Uhrfunktionen Dauer und Ende möglich. wählen, evtl. ist nicht zusammen mit den Tabelle Niedertemperaturgaren Gewicht g Einstellung Einsatzebene Gesamtzeit min.
Anwendungen, Tabellen und Tipps 39 Auftauen Backofen-Funktion: Auftauen (ohne Temperatureinstellung) • Ausgepackte Speisen auf einem Teller auf den Rost stellen. • Zum Abdecken keine Teller oder Schüsseln verwenden, da diese die Auftauzeit erheblich verlängern. • Zum Auftauen den Rost in die 1. Ebene von unten einsetzen. Auftautabelle Auftauzeit Min. Nachtauzeit Min.
Anwendungen, Tabellen und Tipps Dörrgut Temperatur in °C Einsatzebene 1 Ebene 2 Ebenen Zeit in Stunden (Richtwert) Aprikosen 60-70 3 1/4 8-10 Apfelschnitze 60-70 3 1/4 6-8 Birnen 60-70 3 1/4 6-9 Einkochen Backofen-Funktion: Unterhitze • Zum Einkochen nur handelsübliche Gläser gleicher Größe verwenden. • Gläser mit Twist-Off- oder Bajonettverschluss und Metalldosen sind ungeeignet. • Zum Einkochen die 1. Einsatzebene von unten verwenden. • Verwenden Sie zum Einkochen das Blech.
Reinigung und Pflege 41 Reinigung und Pflege 1 Warnung: Vor der Reinigung das Gerät abschalten und abkühlen lassen. Warnung: Aus Sicherheitsgründen das Gerät nicht mit Dampfstrahlern oder Hochdruckreinigern reinigen. Achtung: Keine ätzenden Reinigungmittel, scharfe Gegenstände oder Fleckenentferner benutzen. Die Glasbackwagentür nicht mit Scheuermitteln oder Reinigungsschabern reinigen, die die Oberfläche zerkratzen können. Das Glas kann dadurch zerspringen.
Reinigung und Pflege Pyrolytische Reinigung 1 1 3 3 3 3 3 Warnung: Der Backofen wird während dieses Vorgangs sehr heiß. Kleinkinder unbedingt fernhalten. Achtung! Vor Durchführung der pyrolytischen Reinigung müssen alle entnehmbaren Teile aus dem Backofen einschließlich der Einhängerahmen entfernt werden. Erscheint in der Zeitanzeige ’C3’, startet die pyrolytische Reinigung nicht. BackwagenTür richtig schließen. Pyrolytische Reinigung 1. Grobe Verschmutzungen vorher manuell entfernen. 2.
Reinigung und Pflege 43 Erinnerungsfunktion 3 Die Erinnerungsfunktion erkennt, wann eine pyrolytische Reinigung nötig ist und weist darauf hin. Die Erinnerungsfunktion kann ein- und ausgeschaltet werden (siehe Kapitel „Bedienen des Backofens“). Backofenbeleuchtung 1 3 Warnung: Stromschlaggefahr! Vor dem Austausch der Backofenlampe: – Backofen ausschalten! – Sicherungen am Sicherungskasten herausdrehen bzw. ausschalten.
3 Reinigung und Pflege Halogenbeleuchtung immer mit einem Tuch anfassen, um ein Einbrennen von Fettrückständen zu vermeiden. 3. Glasabdeckung wieder anbringen. Backwagen-Tür Zum leichteren Reinigen lässt sich die Backwagen-Tür Ihres Gerätes aushängen. 1 3 Backwagen-Tür abnehmen 1. Backwagen herausziehen. 2. Backwagen-Tür mit beiden Händen an den Seiten anfassen. 3. Backwagen-Tür senkrecht nach oben aus den Führungsstäben herausziehen.
Reinigung und Pflege 45 Backwagen-Tür einsetzen 1. Backwagen-Tür von der Griffseite her mit beiden Händen seitlich anfassen. Backwagen-Tür senkrecht auf die Führungsstäbe setzen und nach unten gleiten lassen. 2. Backwagen schließen. Backwagen-Türglas 3 1 Die Backwagen-Tür ist mit vier hintereinander angebrachten Glasscheiben ausgestattet. Die inneren Scheiben sind zur Reinigung abnehmbar. Entnahme der Backwagen-Türgläser nur bei ausgehängter Tür.
Reinigung und Pflege 4. Backwagen-Türglas nur wenig anheben. Nacheinander am oberen Rand anfassen und aus der Führung wegziehen. Backwagen-Türgläser reinigen Die Backwagen-Türgläser gründlich mit Spülmittellauge reinigen. Danach sorgfältig abtrocknen. 3 Backwagen-Türgläser einsetzen 1. Türgläser nacheinander schräg von oben in das Türprofil an der Türunterkante einführen und absenken. Zuerst die kleinere Scheibe, dann die größere Scheibe einsetzen. 2.
Was tun, wenn … 3 47 An der offenen Seite der Türabdeckung(B) befindet sich eine Führungsschiene(C). Diese muss zwischen der äußeren Türscheibe und dem Führungswinkel(D) eingeschoben werden. Der Klippverschluss(E) muss eingerastet sein. 4. Backwagen-Tür wieder einsetzen.
Was tun, wenn … Problem 1 3 3 Mögliche Ursache Abhilfe In der Zeitanzeige erscheint Tür nicht richtig geschlossen F2 oder Türverriegelung defekt Tür richtig schließen; Das Gerät über die Haussicherung oder den Schutzschalter im Sicherungskasten aus- und wieder einschalten; Bei wiederholter Anzeige wenden Sie sich bitte an den Kundendienst In der Zeitanzeige erscheint Elektronikfehler ein oben nicht aufgeführter Fehlercode Das Gerät über die Haussicherung oder den Schutzschalter im Sicherungskast
Entsorgung 49 Entsorgung 2 2 1 Verpackungsmaterial Die Verpackungsmaterialien sind umweltverträglich und wiederverwertbar. Die Kunststoffteile sind gekennzeichnet, z. B. >PE<, >PS< etc. Entsorgen Sie die Verpackungsmaterialien entsprechend ihrer Kennzeichnung bei den kommunalen Entsorgungsstellen in den dafür vorgesehenen Sammelbehältern.
Service Service Bei technischen Störungen prüfen Sie bitte zunächst, ob Sie mit Hilfe der Gebrauchsanweisung (Kapitel „Was tun, wenn...“) das Problem selbst beheben können. Wenn Sie das Problem nicht beheben konnten, wenden Sie sich bitte an den Kundendienst oder einen unserer Service-Partner. Um Ihnen schnell helfen zu können, benötigen wir folgende Angaben: – Modellbezeichnung – Produkt-Nummer (PNC) – Serien-Nummer (S-No.
www.electrolux.com 387 996 138-A-020609-01 Änderungen vorbehalten www.aeg-electrolux.de www.aeg-electrolux.at www.aeg-electrolux.be www.aeg-electrolux.lu www.aeg.