Wireless Optical Stow-N-GoTM Notebook Mouse USER GUIDE Visit our Website at www.targus.com Features and specifications subject to change without notice. © 2007 Targus Group International, Inc. and Targus, Inc.
WIRELESS OPTICAL STOW-N-GOTM NOTEBOOK MOUSE Introduction Congratulations on your purchase of the Wireless Optical Stow-N-GoTM Notebook Mouse. This mouse features a tracking resolution switch for users who require more precision or speed with various applications. The Stow-N-Go receiver clips onto the mouse for ease of use while traveling or on the go. This mouse also features a 4-way scrolling tiltwheel which allows for both vertical and horizontal navigation.
Wireless Optical Stow-N-GoTM Notebook Mouse Installing the Batteries 1. Remove the battery cover from the back of the mouse by sliding off the cover of the mouse. Hold the mouse in your hands and with the back of the mouse away from you. Press down on the corners of the battery cover and slide towards the back of the mouse. Lift the cover off from the back of the mouse. 2.
Wireless Optical Stow-N-GoTM Notebook Mouse Establishing the Connection (A) Remove the USB receiver from the bottom of the mouse. This will activate the on/off switch. NOTE: TO TURN THE MOUSE OFF, SIMPLY PLACE THE USB RECEIVER BACK INTO THE STORAGE SLOT. THIS WILL MAXIMIZE BATTERY LIFE WHEN NOT IN USE. (A) (B) Plug the USB receiver into an available USB port on your computer. (C) Press and release the setup key on the receiver. (C) (B) (D) Press the setup key on the bottom of the mouse.
Wireless Optical Stow-N-GoTM Notebook Mouse Installing the tilt-wheel software driver This mouse is equipped with a 4-way scrolling function. To enable the tilt-wheel function, the software driver must be installed. NOTE: THE TILT-WHEEL FEATURE IS SUPPORTED BY THE MAC OPERATING SYSTEM. NO DRIVER INSTALLATION IS NECESSARY. THE FOLLOWING STEPS ARE FOR WINDOWS OPERATING SYSTEMS ONLY. 1. Please download the software driver (Model # AMW25) from the official Targus web site: http://www.targus.
Wireless Optical Stow-N-GoTM Notebook Mouse Using the 4-way scrolling tilt-wheel Pressing the scroll-wheel left or right, enables the horizontal scrolling feature. NOTE: DOUBLE CLICK ON THE “TILT MOUSE” ICON IN THE TASK BAR WILL LAUNCH THE MOUSE SETTINGS SCREEN. YOU CAN EDIT THE SETTINGS AND PREFERENCES IN THIS WINDOW. Adjusting the DPI Setting This mouse features 3 selectable resolution settings (1600 / 1200 / 800 DPI).
Wireless Optical Stow-N-GoTM Notebook Mouse Windows XP: After selecting the desired resolution, you can also fine tune the sensitivity. This can be adjusted in the “control panel” of the Windows operating system. Click on Start --> Setting --> Control Panel --> Mouse In the “mouse properties” window, locate the “pointer options” tab. Under “motion”, use the slider to change the speed of the mouse. Click apply to confirm the changes.
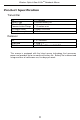
Wireless Optical Stow-N-GoTM Notebook Mouse Product Specification Transmitter RF Battery Type Effective RF Communication Range RF output Power Power Consumption • 27.045Mhz • Alkaline battery AA • 1.2 meters max • Below 1mW max • 15mA max Receiver RF Interface Power • 27.045Mhz • USB 1.1 • USB Bus Powered 5V DC This mouse is equipped with the latest sensor technology that conserves power and provides up to six months of battery life.
Wireless Optical Stow-N-GoTM Notebook Mouse Technical Support For technical questions, please visit: US Australia New Zealand Internet: www.targus.com/support.asp Internet: www.targus.com/au Email: infoaust@targus.com Telephone: 1800-641-645 Telephone: 0800-633-222 Product Registration Targus recommends that you register your Targus accessory shortly after purchasing it. Go to: http://www.targus.com/registration.asp.
Wireless Optical Stow-N-GoTM Notebook Mouse FCC Statement Tested to Comply This equipment has been tested and found to comply with the limits of a Class B digital device, pursuant to Part 15 of the FCC Rules. These limits are designed to provide reasonable protection against harmful interference in a residential installation.