
User Guide


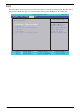


Table Of Contents
- System Specifications
- System Utilities
- Machine Disassembly and Replacement
- Disassembly Requirements
- General Information
- External Module Disassembly Process
- Main Unit Disassembly Process
- Main Unit Disassembly Flowchart
- Removing the Hinge Covers
- Removing the Switch Cover
- Removing the Keyboard
- Removing the Speaker Module
- Removing the LCD Module
- Removing the Upper Cover
- Removing the Finger Print Reader
- Removing the TouchPad Bracket
- Removing the Media Board
- Removing the USB Board
- Removing the Modem Module
- Removing the Bluetooth Module
- Removing the Mainboard
- Removing the RJ-11 Port
- Removing the Thermal Module
- Removing the CPU
- LCD Module Disassembly Process
- LCD Module Reassembly Procedure
- Main Module Reassembly Procedure
- Replacing the CPU
- Replacing the Thermal Module
- Replacing the RJ-11 Port
- Replacing the Mainboard
- Replacing the Bluetooth Module
- Replacing the Modem Module
- Replacing the USB Board
- Replacing the Media Board
- Replacing the TouchPad Bracket
- Replacing the Finger Print Reader
- Replacing the Upper Cover
- Replacing the LCD Module
- Replacing the Speaker Module
- Replacing the Keyboard
- Replacing the Switch Cover
- Replacing the Hinge Covers
- Replacing the ODD Module
- Replacing the Hard Disk Drive Module
- Replacing the DIMM Modules
- Replacing the WLAN Module
- Replacing the Lower Covers
- Replacing the SD Card Dummy Card
- Replacing the Battery
- Troubleshooting
- Common Problems
- Power On Issue
- No Display Issue
- Random Loss of BIOS Settings
- LCD Failure
- Built-In Keyboard Failure
- Touchpad Failure
- Internal Speaker Failure
- Internal Microphone Failure
- HDD Not Operating Correctly
- ODD Failure
- USB Failure (Rightside)
- Modem Function Failure
- Wireless Function Failure
- Bluetooth Function Failure
- EasyTouch Button Failure
- Media Board Failure
- Fingerprint Reader Failure
- Thermal Unit Failure
- External Mouse Failure
- Other Failures
- Intermittent Problems
- Undetermined Problems
- Post Codes
- Common Problems
- Jumper and Connector Locations
- FRU (Field Replaceable Unit) List
- Model Definition and Configuration
- Test Compatible Components
- Online Support Information
- Index

Chapter 2 33
Setting a Password
Follow these steps as you set the user or the supervisor password:
1. Use the ↑ and ↓ keys to highlight the Set Supervisor Password parameter and press the Enter key. The
Set Supervisor Password box appears:
2. Type a password in the “Enter New Password” field. The password length can not exceeds 8
alphanumeric characters (A-Z, a-z, 0-9, not case sensitive). Retype the password in the “Confirm New
Password” field.
IMPORTANT:Be very careful when typing your password because the characters do not appear on the screen.
3. Press Enter. After setting the password, the computer sets the User Password parameter to “Set”.
4. If desired, you can opt to enable the Password on boot parameter.
5. When you are done, press F10 to save the changes and exit the BIOS Setup Utility.
Removing a Password
Follow these steps:
1. Use the ↑ and ↓ keys to highlight the Set Supervisor Password parameter and press the Enter key. The
Set Password box appears:
2. Type the current password in the Enter Current Password field and press Enter.
3. Press Enter twice without typing anything in the Enter New Password and Confirm New Password fields.
The computer then sets the Supervisor Password parameter to “Clear”.
4. When you have changed the settings, press u to save the changes and exit the BIOS Setup Utility.
Set Supervisor Password
Enter New Password [ ][ ]
Confirm New Password [ ]
Set Supervisor Password
Enter Current Password [ ][ ]
Enter New Password [ ]
Confirm New Password [ ][ ]