
User Guide


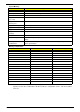
Table Of Contents
- System Specifications
- System Utilities
- Machine Disassembly and Replacement
- Disassembly Requirements
- General Information
- External Module Disassembly Process
- Main Unit Disassembly Process
- Main Unit Disassembly Flowchart
- Removing the Hinge Covers
- Removing the Switch Cover
- Removing the Keyboard
- Removing the Speaker Module
- Removing the LCD Module
- Removing the Upper Cover
- Removing the Finger Print Reader
- Removing the TouchPad Bracket
- Removing the Media Board
- Removing the USB Board
- Removing the Modem Module
- Removing the Bluetooth Module
- Removing the Mainboard
- Removing the RJ-11 Port
- Removing the Thermal Module
- Removing the CPU
- LCD Module Disassembly Process
- LCD Module Reassembly Procedure
- Main Module Reassembly Procedure
- Replacing the CPU
- Replacing the Thermal Module
- Replacing the RJ-11 Port
- Replacing the Mainboard
- Replacing the Bluetooth Module
- Replacing the Modem Module
- Replacing the USB Board
- Replacing the Media Board
- Replacing the TouchPad Bracket
- Replacing the Finger Print Reader
- Replacing the Upper Cover
- Replacing the LCD Module
- Replacing the Speaker Module
- Replacing the Keyboard
- Replacing the Switch Cover
- Replacing the Hinge Covers
- Replacing the ODD Module
- Replacing the Hard Disk Drive Module
- Replacing the DIMM Modules
- Replacing the WLAN Module
- Replacing the Lower Covers
- Replacing the SD Card Dummy Card
- Replacing the Battery
- Troubleshooting
- Common Problems
- Power On Issue
- No Display Issue
- Random Loss of BIOS Settings
- LCD Failure
- Built-In Keyboard Failure
- Touchpad Failure
- Internal Speaker Failure
- Internal Microphone Failure
- HDD Not Operating Correctly
- ODD Failure
- USB Failure (Rightside)
- Modem Function Failure
- Wireless Function Failure
- Bluetooth Function Failure
- EasyTouch Button Failure
- Media Board Failure
- Fingerprint Reader Failure
- Thermal Unit Failure
- External Mouse Failure
- Other Failures
- Intermittent Problems
- Undetermined Problems
- Post Codes
- Common Problems
- Jumper and Connector Locations
- FRU (Field Replaceable Unit) List
- Model Definition and Configuration
- Test Compatible Components
- Online Support Information
- Index

12 Chapter 1
Touchpad Basics (with fingerprint reader)
The following items show you how to use the touchpad with Acer Bio-Protection fingerprint reader:
• Move your finger across the touchpad (1) to move the cursor.
• Press the left (2) and right (4) buttons located beneath the touchpad to perform selection and
execution functions. These two buttons are similar to the left and right buttons on a mouse.
Tapping on the touchpad is the same as clicking the left button.
• Use Acer Bio-Protection fingerprint reader (3) supporting Acer FingerNav 4-way control function
(only for certain models) or the 4-way scroll (3) button (only for certain models) to scroll up or down
and move left or right a page. This fingerprint reader or button mimics your cursor pressing on the
right scroll bar of Windows applications.
NOTE: When using the touchpad, keep it - and your fingers - dry and clean. The touchpad is sensitive to finger
movement; hence, the lighter the touch, the better the response. Tapping too hard will not increase the
touchpad’s responsiveness.
Function Left Button (2) Right Button (4) Main touchpad (1)
Execute Quickly click twice. Tap twice (at the same speed
as double-clicking a mouse
button).
Select Click once. Tap once.
Drag Click and hold, then use
finger on the touchpad to
drag the cursor.
Tap twice (at the same speed
as double-clicking a mouse
button); rest your finger on
the touchpad on the second
tap and drag the cursor.
Access
context menu
Click once.