
Laptop User Manual


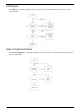

Table Of Contents
- System Specifications
- System Utilities
- Machine Disassembly and Replacement
- Disassembly Requirements
- General Information
- External Module Disassembly Process
- Main Unit Disassembly Process
- Main Unit Disassembly Flowchart
- Removing the Switch Cover
- Removing the Keyboard
- Removing the Antenna Cables
- Removing the LCD Module
- Removing the LED Board
- Removing the Upper Cover
- Removing the Launch Board
- Removing the Speaker Module
- Removing the Finger Print Reader
- Removing the Touch Pad Module
- Removing the Bluetooth board
- Removing the Mainboard
- Removing the Modem Module
- Removing the I/O Board
- Removing the Thermal/Fan Module
- Removing the CPU
- LCD Module Disassembly Process
- LCD Module Reassembly Procedure
- Main Module Reassembly Procedure
- Replacing the CPU
- Replacing the Thermal/Fan Module
- Replacing the I/O Board
- Replacing the Modem Module
- Replacing the Mainboard
- Replacing the Bluetooth Board
- Replacing the Touch Pad Module
- Replacing the Finger Print Reader
- Replacing the Speaker Module
- Replacing the Launch Board
- Replacing the Upper Cover
- Replacing the LED Board
- Replacing the LCD Module
- Replacing the Antenna Cables
- Replacing the Keyboard
- Replacing the Switch Cover
- Replacing the ODD Module
- Replacing the Hard Disk Drive Module
- Replacing the WLAN Module
- Replacing the DIMM Modules
- Replacing the Lower Cover
- Replacing the SD Dummy Card
- Replacing the ExpressCard Dummy Card
- Replacing the Battery
- Troubleshooting
- Common Problems
- Power On Issue
- No Display Issue
- Random Loss of BIOS Settings
- LCD Failure
- Built-In Keyboard Failure
- Touch Pad Failure
- Internal Speaker Failure
- Internal Microphone Failure
- HDD Not Operating Correctly
- ODD Failure
- USB Failure (Rightside)
- Modem Function Failure
- Wireless Function Failure
- EasyTouch Button Failure
- MediaTouch Button Failure
- Fingerprint Reader Failure
- Thermal Unit Failure
- HDTV Switch Failure
- External Mouse Failure
- Other Failures
- Intermittent Problems
- Undetermined Problems
- POST Codes Tables
- Common Problems
- Jumper and Connector Locations
- FRU (Field Replaceable Unit) List
- Model Definition and Configuration
- Test Compatible Components
- Online Support Information
- Index

112 Chapter 3
Replacing the WLAN Module
3. Place the HDD assembly in the HDD bay and push
in the direction shown to connect the interface.
4. Replace the two securing screws.
1. Insert the WLAN board into the WLAN socket. 2. Replace the two securing screws.
3. Connect the Antenna cables to the terminals as shown.
NOTE: The Antennas must be connected as shown, black to the upper terminal and white to the lower
terminal.