Chapter 4 Options Your notebook offers excellent expansion capabilities with its built-in ports and connectors. This chapter describes how to connect peripherals and hardware options that help you use your notebook computer with ease. When connecting peripherals, read the manual included with the peripheral for operating instructions. This chapter also includes sections on how to upgrade key components. Key component upgradeability guards your notebook from becoming obsolete.
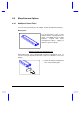
4.1 External Monitor To show graphical effects on a larger display, open the port cover and ). Read the monitor connect an external monitor to the CRT port ( manual for additional instructions.
4.2 External Keyboard This notebook has a keyboard with full-sized keys and an embedded keypad. If you feel more comfortable using a desktop keyboard, you can install a PS/2-compatible external keyboard. To connect an external keyboard, plug the external keyboard into the PS/2 ).
.3 External Keypad You can also use a 17-key numeric keypad for number-sensitive data entry applications. To connect the keypad, plug in the keypad connector to the ) at the rear of the notebook.
4.4 External Pointing Device This notebook accepts either a serial mouse or PS/2-compatible mouse or similar pointing device. The built-in touchpad works simultaneously with an external PS/2 mouse. If you use a serial mouse, open the port cover and plug it into the serial port ). If you use a PS/2-compatible mouse, plug it into the PS/2 port ( ).
4.5 Printer This notebook supports both serial and parallel printers. For a serial printer, ). For a parallel printer, open plug the printer cable into a serial port ( the port cover and plug the printer cable into the parallel port ( ). See your printer manual for operating instructions. If the printer does not function, enter Setup and see to it that the parallel port is enabled. Refer to section 6.5.5 for assistance.
4.6 Audio Devices To connect audio devices, open the mini port cover and plug in an external microphone, a line-in device and amplified speakers or headphones to the microphone-in, line-in and line-out ports, respectively. Figure 4-6 4.7 Connecting Audio Devices PC Cards The notebook has two PC card slots that accommodate two type I/II or one type III PC card(s). Please consult your dealer for PC card options available that you can purchase for your notebook.
4.8 Miscellaneous Options 4.8.1 Additional Power Packs You can order spare batteries, AC adapter, and an external battery charger. Battery Pack It is good practice to have a spare battery around, especially when you travel. The NiMH and Li-Ion smart batteries, coupled with power management features, supply you with more power on-the-go. Attaching the Battery Compartment Cover Each battery pack comes attached with a battery compartment cover.
2. Using a little force, slide the battery compartment cover over the battery until both the cover and the battery are firmly attached. See figure on the left. Detaching the Battery Compartment Cover Slightly pull up the battery compartment cover release latch and slide out the cover. AC Adapter The compact AC adapter charges your battery pack and supplies power to your notebook.
External Battery Charger The external battery charger allows you to fully recharge your NiMH and/or Li-Ion battery packs in a shorter period of time. It also automatically discharges the battery pack before charging for optimum recharge efficiency.
Using the External Battery Charger Follow these steps: 1. Plug the AC adapter into a power outlet. 2. Connect the AC adapter to the external battery charger. 3. Attach the battery pack to the battery charge connector. The charging LED lights up. The external battery charger automatically turns off after fully recharging the battery pack.
4.8.2 Cables Floppy Drive Cable The floppy drive cable allows you to use your floppy drive module externally. This cable is supplied along with a floppy drive module. Open the mini port cover of the notebook and connect one end of the floppy drive cable to the floppy drive port and the other end to the external floppy drive connector. PS/2 Y-Bridge Cable The PS/2 Y-bridge cable allows you to connect two PS/2 devices, mouse and keyboard, to your notebook simultaneously.
File Transfer Cable You can use a file transfer cable to transfer data between the notebook and other computers. Connect the file transfer cable between the two computers and use your file transfer utility to perform the transfer.
4.9 Key Component Upgrades The notebook delivers superior power and performance. However, some users and the applications they use may demand more. This notebook allows you to upgrade your key components when you need increased performance. Contact your authorized dealer if you decide to perform a key component upgrade. 4.9.1 Memory Upgrade 1 Memory is upgradeable from 8 to 64 MB, employing 8-/16-/32-MB 64-bit soDIMMs (Small Outline Dual Inline Memory Modules).
Table 4-1 Memory Configurations (continued) Slot 1 Slot 2 Total Memory 8 MB 32 MB 40 MB 32 MB 16 MB 48 MB 16 MB 32 MB 48 MB 32 MB 32 MB 64 MB After installing the memory modules, the system automatically detects and reconfigures the total memory size during the POST routines. 4.9.2 Hard Disk Upgrade You can upgrade your hard disk with a higher capacity drive when you need more storage space. The notebook uses a 12.5mm, 2.5-inch Enhanced-IDE hard disk that is auto-detected or user-defined.
4-16 User’s Manual