EN User manual Washing Machine ZWN 7120 L
Contents Safety information _ _ _ _ _ _ _ _ _ _ _ _ _ _ 2 Product description _ _ _ _ _ _ _ _ _ _ _ _ _ 4 Control Panel _ _ _ _ _ _ _ _ _ _ _ _ _ _ _ _ _ 5 First use _ _ _ _ _ _ _ _ _ _ _ _ _ _ _ _ _ _ _ _ 7 Personalisation _ _ _ _ _ _ _ _ _ _ _ _ _ _ _ _ 7 Daily use _ _ _ _ _ _ _ _ _ _ _ _ _ _ _ _ _ _ _ 8 Helpful hints and tips _ _ _ _ _ _ _ _ _ _ _ _ 11 Washing programmes _ _ _ _ _ _ _ _ _ _ _ Care and cleaning _ _ _ _ _ _ _ _ _ _ _ _ _ What to do if ...
• All packing and transit bolts must be removed before use. Serious damage can occur to the product and to property if this is not adhered to. See relevant section in the user manual. • After having installed the appliance, check that it is not standing on the inlet and drain hose and the worktop is not pressing the electrical supply cable against the wall. • If the machine is situated on a carpeted floor, please adjust the feet in order to allow air to circulate freely under the appliance.
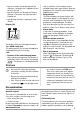
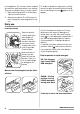
To activate this device, rotate the button (without pressing it) inside the door clockwise until the groove is horizontal. If necessary use a coin. To disable this device and restore the possibility of closing the door, rotate the button anti-clockwise until the groove is vertical. Product description 1 Detergent dispenser drawer 2 Control panel 1 2 3 Door opening handle 4 Rating plate 5 Drain pump 6 Adjustable feet 3 4 5 6 4 www.zanussi.
Detergent dispenser drawer Compartment for detergent used for prewash and soak phase or for stain remover used during the stain action phase (if available). The prewash and soak detergent is added at the beginning of the wash programme. The stain remover is added during the stain action phase. Compartment for powder or liquid detergent used for main wash. If using liquid detergent pour it just before starting the programme. Compartment for liquid additives (fabric softener, starch).
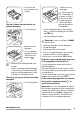
1 Programme selector dial 2 SPIN button 6 EXTRA RINSE button 7 START/PAUSE button 3 OPTIONS button 4 PREWASH button 8 DELAY START button 9 DOOR LOCKED pilot light 5 EASY IRON button 10 Display Table of symbols = Rinse hold = Child Safety Lock Programme selector dial, spin speed button and available options Programme Selector Dial It allows you to switch the appliance on/off and/ or to select a programme. Spin Reduction By pressing this button you can change the spin speed of the selected programme.
• light on: the door cannot be opened. The machine is working or has stopped with water left in the tub. • light off: the door can be opened. The programme is finished or the water has been emptied out. • light blinking: the door is opening in a few minutes. • Display (10) 10.1 10.2 • • The display shows the following information: 10.1: Child safety lock This device permits you to leave the appliance unattended during it's functioning. 10.
to the appliance. This function remains enabled also when the washing machine is not working. There are two different ways to set this option: 1. Before pressing button 7: it will be impossible to start the machine. 2. After pressing button 7: it will be impossible to change any other programme or option. To enable or disable this option press simultaneously for about 6 seconds buttons 2 and 3 appears or disuntil on the display, the icon appears.
• Pull out the dispenser drawer until it stops. • Measure out the detergent. MAX MAX The flap is down and you wish to use powder detergent: • Turn the flap up. MAX • Measure out the detergent. • Pour the powder detergent into the main wash com. partment • Remove the remaining powder form the flap. • There is remaining powder detergent in the main wash compartment at the end of a washing programme. Check if the flap is in the right position.
Select the spin speed by pressing button 2 When selecting a programme, the appliance proposes automatically the maximum spin speed provided for that programme. (See "Washing programmes" for the maximum allowed spin speed). Press this button repeatedly to change the spin speed, if you want your laundry to be spun at a different speed. The relevant pilot light illuminates. Select the available options by means of buttons 3, 4, 5 and 6 Depending on the programme, different options can be combined.
The washing water in the tub will be not emptied out. Interrupting a programme Press the button 7 to interrupt a programme which is running, the corresponding pilot light starts blinking. Press the button again to restart the programme. Cancelling a programme to cancel a proTurn the selector dial to gramme which is running. Now you can select a new programme. Opening the door after the programme has started First set the machine to pause by pressing the button 7.
Removing stains Stubborn stains may not be removed by just water and detergent. It is therefore advisable to treat them prior to washing. Blood: treat fresh stains with cold water. For dried stains, soak overnight in water with a special detergent then rub in the soap and water. Oil based paint: moisten with benzine stain remover, lay the garment on a soft cloth and dab the stain; treat several times.
Washing programmes Programme Maximum and Minimum Temperature - Cycle Description - Maximum Spin Speed - Maximum Fabrics Load - Type of Laundry Options Detergent Compartment COTTONS1) 90° - Cold Main wash - Rinses Maximum spin speed at 1200 rpm Max. load 8 kg - Reduced load 4 kg White and coloured cotton (normally soiled items). SPIN REDUCTION RINSE HOLD ECONOMY2) SUPER QUICK3) PREWASH EASY IRON EXTRA RINSE 4) SYNTHETICS 60° - Cold Main wash - Rinses Maximum spin speed at 900 rpm Max.
Programme Maximum and Minimum Temperature - Cycle Description - Maximum Spin Speed - Maximum Fabrics Load - Type of Laundry JEANS 40° Main wash - Rinses Maximum spin speed at 900 rpm Max. load 3 kg With this programme it is possible to wash items like pants, shirts or jackets in denim and also jersey realized with hi-tech materials. (The Extra Rinse option will be activated automatically).
Programme Maximum and Minimum Temperature - Cycle Description - Maximum Spin Speed - Maximum Fabrics Load - Type of Laundry Options SPIN Drain and long spin Maximum spin speed at 1200 rpm Max. load 8 kg Separate spin for hand washed garments and after programmes with the option selected, which ends with water left in the tub . You can choose the spin speed by pressing the relevant button to adapt it to the fabrics to be spun.
Cleaning the drawer recess Having removed the drawer, use a small brush to clean the recess, ensuring that all washing powder residue is removed from the upper and lower part of the recess. Replace the drawer and run the rinse programme without any clothes in the drum. Cleaning the pump The pump should be inspected regularly and particularly if: • the appliance does not empty and/or spin; • the appliance makes an unusual noise during draining due to objects such as safety pins, coins etc.
Close the pump door. Caution! When the appliance is in use and depending on the programme selected there can be hot water in the pump. Never remove the pump cover during a wash cycle, always wait until the appliance has finished the cycle, and is empty. When refitting the pump cover, ensure it is securely retightened so as to stop leaks and young children being able to remove it.
the bowl. Repeat the procedure until water stops flowing out; • clean the pump if necessary as previously described; • replace the emergency emptying hose in its seat after having plugged it; • screw the pump cover again and close the door. Important! Every time you drain the water through the emergency emptying hose you must pour 2 litres of water into the main wash compartment of the detergent drawer and then run the drain programme.
Problem Possible cause/Solution The machine does not empty and/or does not spin: The drain hose is squashed or kinked. • Check the drain hose connection. The drain filter is clogged. • Clean the drain filter. An option or a programme that ends with the water still in the tub or a that eliminates all the spinning phases has been selected. • Select the draining or spinning programme. The laundry is not evenly distributed in the drum. • Redistribute the laundry.
Problem Possible cause/Solution Spinning starts late or the machine does not spin: The electronic unbalance detection device has cut in because the laundry is not evenly distributed in the drum. The laundry is redistributed by reverse rotation of the drum. This may happen several times before the unbalance disappears and normal spinning can resume. If, after 10 minutes, the laundry is still not evenly distributed in the drum, the machine will not spin.
Programmes Load (kg) Energy consumption (kWh) Water consumption (litre) Approximate programme duration (minutes) Remaining moisture (%)1) Cottons 60 °C 8 1.4 63 120 53 Cottons 40 °C 8 0.6 63 140 53 Synthetics 40 °C 3,5 0.45 37 85 35 Delicates 40 °C 3 0.6 63 70 35 Wool/Hand wash 30 °C 2 0.25 55 30 30 Standard cotton programmes Standard 60 °C cotton 8 1.17 61 205 53 Standard 60 °C cotton 4 0.77 48 159 53 Standard 40 °C cotton 4 0.
thick under the appliance, secured to at least 2 floor beams with screws, the wood panel must extend beyond the front feet. If possible install the appliance in one of the corners of the room, where the floor is more stable. Open the porthole and remove the polystyrene block fitted on the door seal. Fill the smaller upper hole and the two large ones with the corresponding plastic plug caps supplied in the bag containing the instruction booklet. Positioning Install the machine on a flat hard floor.
The other end of the inlet hose which connects to the appliance can be turned as showed in the picture. Do not place the inlet hose downwards. Angle the hose to the left or right depending on the position of your water tap. Set the hose correctly by loosening the ring nut. After positioning the inlet hose, be sure to tighten the ring nut again to prevent leaks. Caution! The inlet hose must not be lengthened.
SHOWER SINK TOILET BATH BIDET Loop WASHING MACHINE If the outlet spigot has not been used before, remove any blanking plug that may be in place. Push the drain hose onto the spigot and secure with a clip, ensure a loop is formed in the drain hose (see above) to prevent waste from the sink entering the appliance. If you intend to drain the hose from the machine into a sink, make sure that the sink is empty and the plug hole is not blocked. Use the plastic “U - Piece” supplied.
Warning! A cut off plug inserted into a 13 amp socket is a serious safety (shock) hazard. Ensure that the cut off plug is disposed of safely. Should the appliance power supply cable need to be replaced, this MUST be carried out by our Service Force Centre. The appliance should not be connected to the electrical supply by means of an extension cable. Note! When the appliance is installed the power supply cable must be accessible.
www.zanussi.
www.zanussi.
192985341-A-112012 www.zanussi.