EN User manual Washing Machine ZWI 71201 WA
Contents Safety information _ _ _ _ _ _ _ _ _ _ _ _ _ _ _ 2 Safety instructions _ _ _ _ _ _ _ _ _ _ _ _ _ _ 3 Product description _ _ _ _ _ _ _ _ _ _ _ _ _ _ 4 Control panel _ _ _ _ _ _ _ _ _ _ _ _ _ _ _ _ _ 5 Washing programmes _ _ _ _ _ _ _ _ _ _ _ _ 8 Consumption values _ _ _ _ _ _ _ _ _ _ _ _ _ 11 Helpful hints and tips _ _ _ _ _ _ _ _ _ _ _ _ 12 First use _ _ _ _ _ _ _ _ _ _ _ _ _ _ _ _ _ _ _ 13 Personalisation _ _ _ _ _ _ _ _ _ _ _ _ _ _ _ 13 Daily use _ _ _ _ _ _ _ _ _ _ _ _ _ _ _ _ _ _ _ Care and c
• Do not change the specification of this appliance. • Obey the maximum load volume of 8 kg (refer to the “Programme chart” chapter). • If the supply cord is damaged, it must be replaced by the manufacturer, its service agent or similarly qualified persons in order to avoid a hazard. • The operating water pressure (minimum and maximum) must be between 0,5 bar (0,05 MPa) and 8 bar (0,8 MPa) • The ventilation openings in the base (if applicable) must not be obstructed by a carpet.
Water connection • Make sure not to cause damage to the water hoses. • The appliance is to be connected to the water mains using the new supplied hose-sets. Old hose sets must not be reused. • Before you connect the appliance to new pipes or pipes not used for a long time, let the water flow until it is clean. • The first time you use the appliance, make sure that there is no leakage. Use Warning! Risk of injury, electrical shock, fire, burns or damage to the appliance.
To activate this device, rotate the button (without pressing it) inside the door clockwise until the groove is horizontal. If necessary use a coin. To disable this device and restore the possibility of closing the door, rotate the button anti-clockwise until the groove is vertical. Detergent dispenser drawer Compartment for detergent used for prewash and soak phase or for stain remover used during the stain action phase (if available).
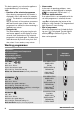
1 2 3 4 5 6 7 8 10 9 1 Programme selector dial 2 SPIN reduction button 6 EXTRA RINSE button 7 START/PAUSE button 3 OPTIONS button 4 PREWASH button 8 DELAY START button 9 DOOR LOCKED pilot light 5 EASY IRON button 10 Display Table of symbols Spin Programme selector dial Cotton Push buttons Spin Synthetics Rinse Hold Delicates Options Handwash Eco (Economy) Cold wash Super Quick Wool Prewash Jeans Easy Iron Mix Extra Rinse Soak Start/Pause Miniprogramme Delay start Rinses Child lock
Door locked Programme selector dial, spin speed button and available options Programme Selector Dial It allows you to switch the appliance on/off and/ or to select a programme. Spin Reduction By pressing this button you can change the spin speed of the selected programme. Available options: Rinse hold By selecting this function the water of the last rinse is not emptied out to prevent the fabrics from creasing. Before opening the door it will be necessary to empty out the water.
This device permits you to leave the appliance unattended during it's functioning. 10.2: • Duration of the selected programme After selecting a programme, the duration is displayed in hours and minutes (for example ). The duration is calculated automatically on the basis of the maximum recommended load for each type of fabric. After the programme has started, the time remaining is updated every minute.
Programme Maximum and Minimum Temperature Cycle Description Maximum Spin Speed Maximum Fabrics Load Type of Laundry HANDWASH 40° - Cold Main wash - Rinses Maximum spin speed at 900 rpm Max. load 2 kg Special programme for delicate fabrics with «hand washing» care symbol. WOOL 40° Main wash - Rinses Maximum spin speed at 900 rpm Max. load 2 kg Washing programme for machine washable wool as well as for hand washable woollens and delicate fabrics. Note: A single or bulky item may cause imbalance.
Programme Maximum and Minimum Temperature Cycle Description Maximum Spin Speed Maximum Fabrics Load Type of Laundry Options Detergent Compartment SOAK 30° Prewash - Soak for about 40 minutes - Stop with water in the tub Max. load 7 kg Special programme for heavily soiled laundry. The machine performs a soak at 30°C. At the end of this time the machine will stop automatically with water left in the tub.
Programme Maximum and Minimum Temperature Cycle Description Maximum Spin Speed Maximum Fabrics Load Type of Laundry Detergent Compartment Options SPIN Drain and long spin Spin at the maximum speed Max. load 7 kg Separate spin for hand washed cotton garments and after programmes with the Rinse Hold option selected. You can choose the spin speed by pressing the relevant button to adapt it to the fabrics to be spun.
Programmes Load (kg) Energy consumption (kWh) Water consumption (litre) Approximate programme duration (minutes) Remaining moisture (%)1) Standard 60 °C cotton 7 1.01 53 180 53 Standard 60 °C cotton 3.5 0.78 47 149 53 Standard 40 °C cotton 3.5 0.61 47 140 53 1) At the end of spin phase. Off Mode (W) Left On Mode (W) 0.10 0.98 The information given in the charts above are in compliance with the EU Commission regulation 1015/2010 implementing directive 2009/125/EC.
treat any residual marks on white fabrics with bleach and then rinse thoroughly. Tar stains: first treat with stain remover, methylated spirits or benzine, then rub with detergent paste. Detergents and additives Good washing results also depend on the choice of detergent and use of the correct quantities to avoid waste and protect the environment. Although biodegradable, detergents contain substances which, in large quantities, can upset the delicate balance of nature.
activated (except if there is a fault). By pressing these 2 buttons again, the acoustic signal is reactivated. Child safety lock This device permits you to leave the appliance unattended so you do not need to worry that children might be injured by or cause damage to the appliance. This function remains enabled also when the washing machine is not working. There are two different ways to set this option: 1. Before pressing button 7: it will be impossible to start the machine. 2.
Select the spin speed by pressing button 2 When selecting a programme, the appliance proposes automatically the maximum spin speed provided for that programme. (See "Washing programmes" for the maximum allowed spin speed). Press this button repeatedly to change the spin speed, if you want your laundry to be spun at a different speed. The relevant pilot light illuminates. Select the available options by means of buttons 3, 4, 5 and 6 Depending on the programme, different options can be combined.
Interrupting a programme Press the button 7 to interrupt a programme which is running, the corresponding pilot light starts blinking. Press the button again to restart the programme. Cancelling a programme to cancel a proTurn the selector dial to gramme which is running. Now you can select a new programme. Opening the door after the programme has started First set the machine to pause by pressing the button 7. If the pilot light 9 blinks and after a few minutes goes off, the door can be opened.
Place a container close to the pump (A) to collect any spillage. Pull out the emergency emptying hose (B), place it in the container and remove its cap. Remove the drawer by pressing the catch downwards and by pulling it out. Flush it out under a tap, to remove any traces of accumulated powder. To aid cleaning, the top part of the additive compartment should be removed.
Caution! When the appliance is in use and depending on the programme selected there can be hot water in the pump. Never remove the pump cover during a wash cycle, always wait until the appliance has finished the cycle, and is empty. When refitting the pump cover, ensure it is securely retightened so as to stop leaks and young children being able to remove it.
• screw the pump cover again and close the door. Important! Every time you drain the water through the emergency emptying hose you must pour 2 litres of water into the main wash compartment of the detergent drawer and then run the drain programme. This will activate the ECO Valve device avoiding that part of the detergent remains unused at next washing. What to do if ... Certain problems are due to lack of simple maintenance or oversights, which can be solved easily without calling out an engineer.
Problem Possible cause/Solution The machine does not empty and/or does not spin: The drain hose is squashed or kinked. • Check the drain hose connection. The drain filter is clogged. • Clean the drain filter. An option or a programme that ends with the water still in the tub or a that eliminates all the spinning phases has been selected. • Select the draining or spinning programme. The laundry is not evenly distributed in the drum. • Redistribute the laundry.
Problem Possible cause/Solution Spinning starts late or the machine does not spin: The electronic unbalance detection device has cut in because the laundry is not evenly distributed in the drum. The laundry is redistributed by reverse rotation of the drum. This may happen several times before the unbalance disappears and normal spinning can resume. If, after 10 minutes, the laundry is still not evenly distributed in the drum, the machine will not spin.
After removing all the packaging, carefully lay machine on it's back to remove the polystyrene base from the bottom. Remove the power supply cable and the hose from the hose holders on the rear of the appliance. raising or lowering the feet. The feet may be tight to adjust as they incorporate a self locking nut, but the machine MUST be level and stable. Any necessary adjustment can be made with a spanner. Accurate levelling prevents vibration, noise and displacement of the machine during operation.
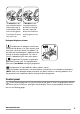
Open the porthole and extract the inlet hose. Connect the appropriate end of the hose to the appliance with the angled connection as showed in the picture. Do not place the inlet hose downwards. Angle the hose to the left or right depending on the position of your water tap. After positioning the inlet hose, be sure to tighten the ring nut again to prevent leaks . Connect the other end of the inlet hose to a tap with a 3/4” thread. Always use the hose supplied with the appliance.
Caution! Should the appliance power supply cable need to be replaced, this must be carried out by a Service Centre. Building in This appliance has been designed to be built into the kitchen furniture. The recess should have the dimensions shown in picture A. 6 600 min. 560 596 1 555 5 4 7 min. 820 176,5 416 75 60 100 3 818 170 A When installing the appliance into the kitchen furniture ensure, if possible, the hoses are placed in either of the two recesses on the back of the appliance.
• a) Door The dimensions of the door should be: - width 595-598 mm - thickness 16-22 mm The height (C-Fig. C) depends on the height of the adjacent furniture's base. • b) Hinges To mount the hinges it is necessary to drill two holes (dia. 35 mm, depth 12.5-14 mm depending on the depth of door furniture) on the inner side of the door. The distance between the holes hobs fixing centres must be 416 mm.
Environment concerns Recycle the materials with the symbol . Put the packaging in applicable containers to recycle it. Help protect the environment and human health and to recycle waste of electrical and electronic appliances. Do not dispose appliances marked with the symbol with the household waste. Return the product to your local recycling facility or contact your municipal office. Packaging materials are reThe materials marked with the symbol cyclable.
www.zanussi.
132928493-A-252013 www.zanussi.