EN User manual Washing Machine ZWI 71201 WA
Contents Safety information _ _ _ _ _ _ _ _ _ _ _ _ _ _ _ _ _ _ 2 Product description _ _ _ _ _ _ _ _ _ _ _ _ _ _ _ _ _ 4 Control panel _ _ _ _ _ _ _ _ _ _ _ _ _ _ _ _ _ _ _ _ 4 Washing programmes _ _ _ _ _ _ _ _ _ _ _ _ _ _ _ _ 7 Helpful hints and tips _ _ _ _ _ _ _ _ _ _ _ _ _ _ _ 10 First use _ _ _ _ _ _ _ _ _ _ _ _ _ _ _ _ _ _ _ _ _ _ 11 Personalisation _ _ _ _ _ _ _ _ _ _ _ _ _ _ _ _ _ _ 12 Daily use _ _ _ _ _ _ _ _ _ _ _ _ _ _ _ _ _ _ _ _ _ 12 Care and cleaning _ _ _ _ _ _ _ _ _ _ _ _ _ _ _ _ _ What
• • • • • not pressing the electrical supply cable against the wall. If the machine is situated on a carpeted floor, please adjust the feet in order to allow air to circulate freely under the appliance. Always be sure, that there is no water leakage from hoses and their connections after the installation. If the appliance is installed in a location subject to frost, please read the “dangers of freezing” chapter.
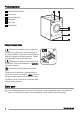
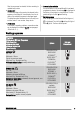
Product description 1 Detergent dispenser drawer 2 Control panel 1 2 3 Door opening handle 4 Rating plate 5 Drain pump 6 Adjustable feet 3 4 5 6 Detergent dispenser drawer Compartment for detergent used for prewash and soak phase or for stain remover used during the stain action phase (if available). The prewash and soak detergent is added at the beginning of the wash programme. The stain remover is added during the stain action phase. Compartment for powder or liquid detergent used for main wash.
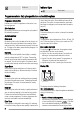
1 2 3 4 5 6 7 8 10 9 1 Programme selector dial 2 SPIN reduction button 6 EXTRA RINSE button 7 START/PAUSE button 3 OPTIONS button 4 PREWASH button 8 DELAY START button 9 DOOR LOCKED pilot light 5 EASY IRON button 10 Display Table of symbols Programme selector dial Cotton Synthetics Delicates Handwash Cold wash Spin Push buttons Spin Rinse Hold Options Economy Wool Super Quick Jeans Prewash Curtains Easy Iron Soak Extra Rinse Miniprogramme Start/Pause Rinses Delay start Drain w
Child lock Indicator lights Door locked Programme selector dial, spin speed button and available options Programme Selector Dial It allows you to switch the appliance on/off and/or to select a programme. Spin Reduction By pressing this button you can change the spin speed of the selected programme. Available options: Rinse hold By selecting this function the water of the last rinse is not emptied out to prevent the fabrics from creasing.
After the programme has started, the time remaining is updated every minute. • Delayed start The Selected delay set by pressing the relevant button appears on the display for a few seconds, then the duration of the selected programme is displayed again. The delay time value decreases by one unit every hour and then, when 1 hour remains, every minute. • Alarm codes In the event of operating problems, some alarm codes can be displayed, for example (see paragraph «What to do if...»).
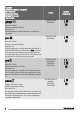
Programme Maximum and Minimum Temperature Cycle Description Maximum Spin Speed Maximum Fabrics Load Type of Laundry HANDWASH 40° - Cold Main wash - Rinses Maximum spin speed at 900 rpm Max. load 2 kg Special programme for delicate fabrics with «hand washing» care symbol. WOOL 40° Main wash - Rinses Maximum spin speed at 900 rpm Max. load 2 kg Washing programme for machine washable wool as well as for hand washable woollens and delicate fabrics. Note: A single or bulky item may cause imbalance.
Programme Maximum and Minimum Temperature Cycle Description Maximum Spin Speed Maximum Fabrics Load Type of Laundry Options Detergent Compartment SOAK 30° Prewash - Soak for about 40 minutes - Stop with water in the tub Max. load 7 kg Special programme for heavily soiled laundry. The machine performs a soak at 30°C. At the end of this time the machine will stop automatically with water left in the tub.
Programme Maximum and Minimum Temperature Cycle Description Maximum Spin Speed Maximum Fabrics Load Type of Laundry Options SPIN Drain and long spin Spin at the maximum speed Max. load 7 kg Separate spin for hand washed cotton garments and after programmes with the Rinse Hold option selected. You can choose the spin speed by pressing the relevant button to adapt it to the fabrics to be spun.
Ball point pen and glue: moisten with acetone1), lay the garment on a soft cloth and dab the stain. Lipstick: moisten with acetone as above, then treat stains with methylated spirits. Treat any residual marks with bleach. Red wine: soak in water and detergent, rinse and treat with acetic or citric acid, then rinse. Treat any residual marks with bleach.
Personalisation Acoustic signals The machine is provided with an acoustic device, which sounds in the following cases: • at the end of the cycle • if there is a fault. By pressing the 4 and 5 buttons simultaneously for about 6 seconds, the acoustic signal is deactivated (except if there is a fault). By pressing these 2 buttons again, the acoustic signal is reactivated.
Select the spin speed by pressing button 2 When selecting a programme, the appliance proposes automatically the maximum spin speed provided for that programme. (See "Washing programmes" for the maximum allowed spin speed). Press this button repeatedly to change the spin speed, if you want your laundry to be spun at a different speed. The relevant pilot light illuminates. Select the available options by means of buttons 3, 4, 5 and 6 Depending on the programme, different options can be combined.
If you cannot open the door but you need to open it, you have to switch the machine off by turning the selector dial . After a few minutes the door can be opened. to (Pay attention to the water level and temperature!). After closing the door, it is necessary to select the programme and options again and to press button 7. At the end of the programme The machine stops automatically. Some acoustic signals sound and a blinking appears on the display. The pilot light of button 7 and the pilot light 9 go off.
Cleaning the drawer recess Having removed the drawer, use a small brush to clean the recess, ensuring that all washing powder residue is removed from the upper and lower part of the recess. Replace the drawer and run the rinse programme without any clothes in the drum. Cleaning the pump The pump should be inspected regularly and particularly if: • the appliance does not empty and/or spin; • the appliance makes an unusual noise during draining due to objects such as safety pins, coins etc.
• Turn off the water tap. • Unscrew the hose from the tap. • Clean the filter in the hose with a stiff brush. • Screw the hose back onto the tap. Make sure the connection is tight. • Turn off the water tap. • Unscrew the inlet hose. • Place the end of the emergency emptying hose and that of the inlet hose in a bowl placed on the floor and let water drain out. • Screw the water inlet hose back on and reposition the emergency emptying hose after having put the cap on again.
• : door open. Problem Once the problem has been eliminated, press the button 7 to restart the programme. If after all checks, the problem persists, contact your local Service Centre. Possible cause/Solution The machine does not start: The door has not been closed. • Close the door firmly. The plug is not properly inserted in the power socket. • Insert the plug into the power socket. There is no power at the socket. • Please check your domestic electrical installation. The main fuse has blown.
Problem Possible cause/Solution There is water on the floor: Too much detergent or unsuitable detergent (creates too much foam) has been used. • Reduce the detergent quantity or use another one. Check whether there are any leaks from one of the inlet hose fittings. It is not always easy to see this as the water runs down the hose; check to see if it is damp. • Check the water inlet hose connection. The drain or inlet hose is damaged. • Replace it with a new one.
Problem Possible cause/Solution Spinning starts late or the machine does not spin: The electronic unbalance detection device has cut in because the laundry is not evenly distributed in the drum. The laundry is redistributed by reverse rotation of the drum. This may happen several times before the unbalance disappears and normal spinning can resume. If, after 10 minutes, the laundry is still not evenly distributed in the drum, the machine will not spin.
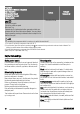
Consumption values Programme Energy consumption (KWh) Water consumption (litres) White Cottons 90° 2.2 72 Cottons 60° 1.35 67 Cottons 60° +ECONOMY 1) 1.05 52 Cottons 40° 0.85 67 Synthetics 40° 0.55 42 Delicates 40° 0.55 63 Wool/ Handwash 30° 0.25 55 Programme duration (Minutes) For the duration of the programmes, please refer to the display on the control panel.
rugs etc. Check that the machine does not touch the wall or other kitchen units. Connect the hose to a tap with a 3/4” thread. Always use the hose supplied with the appliance. Level the washing machine by raising or lowering the feet. The feet may be tight to adjust as they incorporate a self locking nut, but the machine MUST be level and stable. If necessary, check the setting with a spirit level. Any necessary adjustment can be made with a spanner.
In a sink drain pipe branch. This branch must be above the trap so that the bend is at least 60 cm above the ground. Directly into a drain pipe at a height of not less than 60 cm and not more than 90 cm. The end of the drain hose must always be ventilated, i.e. the inside diameter of the drain pipe must be larger than the outside diameter of the drain hose. The drain hose must not be kinked.
Caution! Do not remove the screw 8 ! Preparation and assembly of the door The machine is originally prearranged for the assembly of a door opening from right to left. In this case it is sufficient to screw in the hinges (1) and the counter-magnet (6) provided with the appliance, at the right level (Fig. B). 35 Ø 12,5-14 depth 16-22 B C 416 22±1,5 C 595-598 • a) Door The dimensions of the door should be: - width 595-598 mm - thickness 16-22 mm The height (C-Fig.
d) Counter-magnet (6) The appliance is prearranged for a magnetic closure of the door. To enable a correct operation of this device, it is necessary to screw the counter-magnet (6) (steel disk + rubber ring) into the inner side of the door. Its position must correspond to the magnet (4) on the appliance (see picture D). Caution! Do not remove the screw 8 ! If the door has to be opened from left to right, invert the position of the plates (7), the magnet (4) and the plate (5) (Fig. B and E).
132928500-A-502011 www.zanussi.