EN ES User manual Manual de instrucciones Washing Machine Lavadora ZWI 71000 WA 2 26
Contents Safety information _ _ _ _ _ _ _ _ _ _ _ _ _ _ _ 2 Safety instructions _ _ _ _ _ _ _ _ _ _ _ _ _ _ 3 Product description _ _ _ _ _ _ _ _ _ _ _ _ _ _ 4 Control panel _ _ _ _ _ _ _ _ _ _ _ _ _ _ _ _ _ 5 Washing Programmes _ _ _ _ _ _ _ _ _ _ _ _ 7 Consumption values _ _ _ _ _ _ _ _ _ _ _ _ _ 10 First use _ _ _ _ _ _ _ _ _ _ _ _ _ _ _ _ _ _ _ 11 Daily use _ _ _ _ _ _ _ _ _ _ _ _ _ _ _ _ _ _ _ 11 Helpful hints and tips _ _ _ _ _ _ _ _ _ _ _ _ Care and cleaning _ _ _ _ _ _ _ _ _ _ _ _ _ _ What to do if
• Obey the maximum load volume of 7 kg (refer to the “Programme chart” chapter). • If the supply cord is damaged, it must be replaced by the manufacturer, its service agent or similarly qualified persons in order to avoid a hazard. • The operating water pressure (minimum and maximum) must be between 0,5 bar (0,05 MPa) and 8 bar (0,8 MPa) • The ventilation openings in the base (if applicable) must not be obstructed by a carpet.
• Before you connect the appliance to new pipes or pipes not used for a long time, let the water flow until it is clean. • The first time you use the appliance, make sure that there is no leakage. Use Warning! Risk of injury, electrical shock, fire, burns or damage to the appliance. • Use this appliance in a household environment. • Obey the safety instructions on the detergent packaging. • Do not put flammable products or items that are wet with flammable products in, near or on the appliance.
Detergent dispenser drawer Compartment for detergent used for prewash and soak phase or for stain remover used during the stain action phase (if available). The prewash and soak detergent is added at the beginning of the wash programme. The stain remover is added during the stain action phase. Compartment for powder or liquid detergent used for main wash. If using liquid detergent pour it just before starting the programme. Compartment for liquid additives (fabric softener, starch).
1 2 3 4 5 6 7 A B C 1 Programme selector dial 2 SPIN reduction button (Centifug.) and Rinse Hold option (Agua en cuba) 3 OPTIONS button (Opciones): – Prewash (Prelavado) – Super Quick (Super rápido) 4 EXTRA RINSE button (AquaCare) 5 START/PAUSE button (Inicio/Pausa) 6 DELAY START button (Inicio diferido) 7 Indicator pilot lights Programme selector dial, spin speed button and available options Programme Selector Dial It allows you to switch the appliance on/off and/ or to select a programme.
Indicator pilot light A B C When selecting a washing programme both lights A and B illuminate. After having pressed the button 5 the only light corresponding to the running phase stays on. The machine starts working and the door is locked. The light C illuminates at the end of the washing cycle. After a few minutes the door can be opened. If the draining programme is selected any light will illuminate.
Programme Maximum and Minimum Temperature Cycle Description Maximum Spin Speed Maximum Fabrics Load Type of Laundry Detergent Compartment Options 4 3) Algodón Eco 40°3) Main wash - Rinses Maximum spin speed at 1000 rpm Max. load 7 kg White or non fast colour cotton (normally or slightly soiled items). This programme can be selected for slightly or normally soiled cotton items. The temperature will decrease and the washing time will be extended.
Programme Maximum and Minimum Temperature Cycle Description Maximum Spin Speed Maximum Fabrics Load Type of Laundry Options 15 Mixtos 20° 4) 20° Main wash - Rinses Maximum spin speed 900 rpm Max. load kg 3 Special programme for cotton, synthetic and mixed fabrics with light soil. Set this programme to decrease the energy consumption. Make sure that the detergent is for low temperature in order to have good washing results.
Programme Maximum and Minimum Temperature Cycle Description Maximum Spin Speed Maximum Fabrics Load Type of Laundry Detergent Compartment Options = OFF For cancelling the programme which is running or to switch the machine off . 1) If you select the Super Quick option by pressing button 3, we recommend that you reduce the maximum load as indicated. Full loading is possible however with somewhat reduced cleaning results. 2) If using liquid detergents, a programme without PREWASH must be selected.
Off Mode (W) Left On Mode (W) 0.98 0.10 The information given in the charts above are in compliance with the EU Commission regulation 1015/2010 implementing directive 2009/125/EC. First use • Ensure that the electrical and water connections comply with the installation instructions. • Remove the polystyrene block and any material from the drum. • Pour 2 litres of water into the main wash of the detergent drawer compartment in order to activate the ECO valve.
You can change this value by pressing the corresponding button. The green pilot light of the button 5 starts to flash. The selector dial can be turned either clockwise to reor counterclockwise. Turn to position set programme/Switching the machine off. At the end of the programme the selector dial must be turned to position , to switch the machine off.
Press the button again to restart the programme. Cancelling a programme to cancel a proTurn the selector dial to gramme which is running. Now you can select a new programme. Opening the door After the programme has started the door is locked. If, for any reason, you need to open it, set firstly the machine to PAUSE by pressing the button 5. After a few minutes it will be possible to open the door. If the door remains locked, this means that the machine is already heating or that the water level is too high.
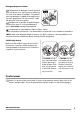
Blood: treat fresh stains with cold water. For dried stains, soak overnight in water with a special detergent then rub in the soap and water. Oil based paint: moisten with benzine stain remover, lay the garment on a soft cloth and dab the stain; treat several times. Dried grease stains: moisten with turpentine, lay the garment on a soft surface and dab the stain with the fingertips and a cotton cloth. Rust: oxalic acid dissolved in hot water or a rust removing product used cold.
Care and cleaning Warning! You must DISCONNECT the appliance from the electricity supply, before you can carry out any cleaning or maintenance work. Descaling The water we use normally contains lime. It is a good idea to periodically use a water softening powder in the machine. Do this separately from any laundry washing, and according to the softening powder manufacturer's instructions. This will help to prevent the formation of lime deposits.
tightened so as to stop leaks and young children being able to remove it. Cleaning the water inlet filters When no more water comes out, unscrew the pump cover by turning it anti-clockwise and remove the filter. Use pliers, if necessary. Always keep a rag nearby to dry up any water spillage when removing the cover. Clean the filter under a tap, to remove any traces of fluff. To clean the water inlet filters: • Turn off the water tap. • Unscrew the hose from the tap.
Frost precaution If the machine is exposed to temperatures below 0°C, certain precautions should be taken. • Turn off the water tap. • Unscrew the inlet hose. • Place the end of the emergency emptying hose and that of the inlet hose in a bowl placed on the floor and let water drain out. • Screw the water inlet hose back on and reposition the emergency emptying hose after having put the cap on again. • When you intend to start the machine up again, make sure that the room temperature is above 0°C.
Problem Possible cause/Solution The washing machine does not start: The door has not been closed (the button 5 red light blinks). • Close the door firmly. The plug is not properly inserted in the power socket. • Insert the plug into the power socket. There is no power at the socket. • Please check your domestic electrical installation. The main fuse has blown. • Replace the fuse. The programme selector dial is not correctly positioned and the button 5 has not been pressed.
Problem Possible cause/Solution Unsatisfactory washing results: Too little detergent or unsuitable detergent has been used. • Increase the detergent quantity or use another one. Stubborn stains have not been treated prior to washing. • Use commercial products to treat the stubborn stains. The correct temperature was not selected. • Check if you have selected the correct temperature. Excessive laundry load. • Reduce the laundry load. The door will not open: The programme is still running.
Mod Prod . ... . No. ... ... ... ... .. Ser. No. ... ... ... If you are unable to identify or solve the problem, contact our service centre. Before telephoning, make a note of the model, serial number and purchase date of your machine: the Service Centre will require this information. Mod. ... ... ... Prod. No. ... ... ... Ser. No. ... ... ...
Any necessary adjustment can be made with a spanner. Unscrew the three bolts with the supplied spanner. Slide out the relevant plastic spacers. Accurate levelling prevents vibration, noise and displacement of the machine during operation. Caution! Never place cardboard, wood or similar materials under the machine to compensate for any unevenness in the floor. After having levelled the appliance, tighten the lock nuts.
Open the porthole and extract the inlet hose. Connect the appropriate end of the hose to the appliance with the angled connection as showed in the picture. Do not place the inlet hose downwards. Angle the hose to the left or right depending on the position of your water tap. After positioning the inlet hose, be sure to tighten the ring nut again to prevent leaks . Connect the other end of the inlet hose to a tap with a 3/4” thread. Always use the hose supplied with the appliance.
Preparation and assembly of the door The machine is originally prearranged for the assembly of a door opening from right to left. In this case it is sufficient to screw in the hinges (1) and the counter-magnet (6) provided with the appliance, at the right level (Fig. B). 600 min. 560 596 555 min.
• a) Door The dimensions of the door should be: - width 595-598 mm - thickness 16-22 mm The height (C-Fig. C) depends on the height of the adjacent furniture's base. • b) Hinges To mount the hinges it is necessary to drill two holes (dia. 35 mm, depth 12.5-14 mm depending on the depth of door furniture) on the inner side of the door. The distance between the holes hobs fixing centres must be 416 mm.
Environmental concerns Recycle the materials with the symbol . Put the packaging in applicable containers to recycle it. Help protect the environment and human health and to recycle waste of electrical and electronic appliances. Do not dispose appliances marked with the symbol with the household waste. Return the product to your local recycling facility or contact your municipal office. Packaging materials are reThe materials marked with the symbol cyclable.
Índice de materias Información sobre seguridad _ _ _ _ _ _ _ _ Instrucciones de seguridad _ _ _ _ _ _ _ _ _ Descripción del producto _ _ _ _ _ _ _ _ _ _ Panel de mandos _ _ _ _ _ _ _ _ _ _ _ _ _ _ Programas de lavado _ _ _ _ _ _ _ _ _ _ _ _ Valores de consumo _ _ _ _ _ _ _ _ _ _ _ _ _ Primer uso _ _ _ _ _ _ _ _ _ _ _ _ _ _ _ _ _ _ Uso diario _ _ _ _ _ _ _ _ _ _ _ _ _ _ _ _ _ _ 26 27 29 30 32 35 35 36 Consejos útiles _ _ _ _ _ _ _ _ _ _ _ _ _ _ _ Mantenimiento y limpieza _ _ _ _ _ _ _ _ _ _ Qué hacer si… _
Seguridad general • Antes de proceder con el mantenimiento, apague el aparato y desconecte el enchufe de la red. • No cambie las especificaciones de este aparato. • Respete la carga máxima de 7 kg (consulte el capítulo “Tabla de programas”). • Si el cable eléctrico sufre algún daño, el fabricante, su servicio técnico o un profesional tendrán que cambiarlo para evitar riesgos.
ción. Asegúrese de tener acceso al enchufe del suministro de red una vez finalizada la instalación. • No desconecte el aparato tirando del cable de conexión a la red. Tire siempre del enchufe. • No toque el cable de red ni el enchufe con las manos mojadas. • Este aparato cumple las directivas CEE. Conexión de agua • Asegúrese de no provocar daños en los tubos de agua. • El aparato debe conectarse a la toma de agua utilizando los nuevos juegos de tubos suministrados.
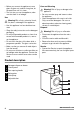
Descripción del producto 1 Depósito dosificador de detergente 2 Panel de mandos 1 2 3 Palanca de apertura de la puerta 4 Placa de datos técnicos 5 Bomba de desagüe 6 Patas ajustables 3 4 5 6 Depósito dosificador de detergente Compartimento del detergente utilizado en la fase de prelavado y remojo o del quitamanchas utilizado durante la fase de acción antimanchas (si está disponible). El detergente de prelavado y remojo se deposita al principio del programa de lavado.
Para activar este dispositivo, gire el botón (sin presionarlo) del interior de la puerta hacia la derecha hasta que la ranura esté en posición horizontal. Si es necesario, utilice una moneda. Para desactivar el dispositivo y permitir el cierre de la puerta, gire el botón hacia la izquierda hasta que la ranura se sitúe en posición vertical.
Selector de programas, tecla de velocidad de centrifugado y opciones disponibles Selector de programas Permite conectar/desconectar el aparato y/o seleccionar un programa. nales. Se recomienda esta opción para personas alérgicas al detergente y en zonas en las que el agua es muy blanda. Opciones disponibles: Inicio/Pausa Este botón permite iniciar o interrumpir el programa seleccionado.
Programas de lavado Programa Temperaturas máxima y mínima Descripción del ciclo Velocidad de centrifugado máxima Carga máxima Tipo de prenda Compartimento de detergente Opciones 1y3 ALGODÓN 90° - 60° Lavado principal - Aclarados Velocidad de centrifugado máx. 1000 rpm Carga máxima 7 kg - Carga reducida 3,5 kg1) Algodón blanco (prendas con suciedad normal o muy sucias).
Programa Temperaturas máxima y mínima Descripción del ciclo Velocidad de centrifugado máxima Carga máxima Tipo de prenda Opciones 8–11 SINTÉTICOS 60° - 40° - 30° - Frío Lavado principal - Aclarados Velocidad de centrifugado máx. 900 rpm Carga máxima 3 kg - Carga reducida 1,5 kg1) Tejidos sintéticos o mezclas: ropa interior, prendas de color, camisas que no encogen, blusas.
Programa Temperaturas máxima y mínima Descripción del ciclo Velocidad de centrifugado máxima Carga máxima Tipo de prenda Compartimento de detergente Opciones 16–17 LANA/A MANO 30° Lavado principal - Aclarados Velocidad de centrifugado máx. 1000 rpm Carga máxima 2 kg Programa de lavado para lana lavable a máquina, así como lanas de lavado a mano y tejidos delicados. Nota: Una prenda suelta o muy voluminosa puede causar desequilibrio.
La temperatura de lavado en la fase de lavado puede ser distinta de la declarada para el programa seleccionado. 4) El aparato ejecuta la fase de calentamiento rápido si el agua está por debajo de 20°C. El aparato muestra el ajuste de temperatura “Frío”. Valores de consumo Los datos de esta tabla son aproximados. Los datos pueden cambiar por varios motivos: la cantidad y tipo de colada, el agua y la temperatura ambiente.
Uso diario Cargue la ropa Abra la puerta tirando cuidadosamente de la palanca de la puerta hacia fuera. Sacuda la ropa cuanto pueda e introdúzcala en el tambor prenda por prenda. Cierre la puerta. valor máximo de centrifugado del programa elegido. Puede modificar la velocidad de centrifugado presionando el botón correspondiente. El piloto verde del botón 5 empieza a parpadear. El selector de programas puede girarse hacia la derecha y hacia la izquierda.
seleccionar el tiempo de retraso deseado. Se enciende el piloto correspondiente. Esta opción debe seleccionarse después de elegir el programa y antes de iniciarlo. Es posible cancelar o modificar el tiempo de retraso en cualquier momento antes de pulsar la tecla 5. Selección del inicio diferido: 1. Seleccione el programa y las opciones necesarias. 2. Seleccione el inicio diferido con la tecla 6. 3. Pulse la tecla 5: – la lavadora inicia la cuenta atrás horaria.
Siga las instrucciones que se indican a continuación para vaciar el agua: 1. Gire el selector de programas hasta la posición . 2. Seleccione el programa de descarga o de centrifugado. 3. Si fuera necesario, reduzca la velocidad de centrifugado. 4. Pulse la tecla 5. Al final del programa se puede abrir la puerta. para Gire el selector de programas hasta apagar la máquina. Retire las prendas del tambor y cerciórese de que el tambor queda vacío. Si no va a realizar otro lavado, cierre la toma del agua.
trico y vuelva a aclarar. Utilice lejía para eliminar las marcas que puedan quedar. Tinta: dependiendo del tipo de tinta, primero humedezca con acetona y después con ácido acético2); aplique lejía si quedan marcas en las prendas blancas y, seguidamente, enjuáguelas bien. Alquitrán:primero aplique un quitamanchas, alcohol desnaturalizado o disolvente y luego frote la mancha con un detergente en pasta.
Limpieza de la cubeta de detergente La cubeta del detergente y de los aditivos de lavado debe limpiarse con regularidad. Advertencia Antes de abrir la puerta del filtro, apague el aparato y desenchúfelo de la toma de corriente. Proceda de la siguiente manera: • Desconecte el enchufe de la toma de corriente. • Si es necesario, espere hasta que el agua se enfríe. Retire la cubeta presionando el tope hacia abajo y tirando hacia fuera.
Tapone de nuevo la manguera de desagüe de emergencia y coloque la manguera en su sitio. Vuelva a colocar el filtro en la bomba insertándolo correctamente en las guías especiales. Enrosque la tapa de la bomba firmemente girándola hacia la derecha. Precaución Cuando la lavadora está en marcha, dependiendo del programa seleccionado, puede haber agua caliente en el filtro. Nunca extraiga la tapa del filtro durante un ciclo de lavado; espere siempre a que la lavadora haya terminado el ciclo y esté vacía.
Descarga de emergencia Si la lavadora no descarga, proceda de la siguiente manera para vaciarla: • desconecte la clavija de la toma de corriente; • cierre la toma de agua; • si es necesario, espere a que el agua se enfríe; • abra la puerta del filtro; • coloque un recipiente en el suelo e introduzca el extremo de la manguera de descarga de emergencia en él. Quite el tapón de la manguera. El agua debería dirigirse al recipiente por acción de la gravedad.
Problema Causa y soluciones posibles La lavadora no se pone en marcha La puerta no está cerrada (el piloto rojo de la tecla 5 parpadea). • Cierre firmemente la puerta. El enchufe no está correctamente insertado en la toma de corriente. • Inserte el enchufe en la toma. No hay tensión en la toma de corriente. • Compruebe la instalación eléctrica doméstica. El fusible principal se ha quemado. • Cambie el fusible. El selector de programas no está en la posición correcta y la tecla 5 no se ha pulsado.
Problema Causa y soluciones posibles Hay agua en el suelo. Se ha utilizado demasiado detergente o un detergente inadecuado (que produce demasiada espuma). • Reduzca la cantidad de detergente o utilice otro. Compruebe si hay fugas en alguno de los racores de la manguera de entrada de agua. No siempre resulta fácil detectar las fugas, ya que el agua desciende por la manguera; compruebe que el racor no está mojado. • Compruebe la conexión de la manguera de entrada de agua.
Causa y soluciones posibles El centrifugado se retrasa o la máquina no centrifuga: El dispositivo que detecta desequilibrios en la carga ha interrumpido el proceso debido a que las prendas no están uniformemente distribuidas en el tambor. La ropa se redistribuye mediante la rotación inversa del tambor. Es posible que el tambor gire varias veces antes de que deje de detectarse el problema y se reanude el ciclo de centrifugado normal.
Instalación Desembalaje Es preciso retirar todo el material de embalaje y los pasadores antes de utilizar la lavadora. Se aconseja guardar todo este material para usarlo de nuevo en caso de que sea necesario transportar el aparato. Tape el orificio superior más pequeño y los dos más grandes con los tapones de plástico incluidos en la bolsa con el manual de instrucciones.
Precaución No coloque cartón, madera ni otros materiales similares bajo la máquina para compensar los desniveles del suelo. Apriete las tuercas de seguridad cuando haya terminado de nivelar el aparato. Entrada de agua Precaución • Este aparato debe conectarse a un suministro de agua fría. • Antes de conectar el aparato a tubos nuevos o a tubos que no se hayan utilizado durante algún tiempo, deje correr bastante agua para eliminar los restos que puedan haberse acumulado en los tubos.
En un empalme de derivación para descarga en el fregadero. El empalme debe estar encima de la toma para que haya 60 cm como mínimo entre el codo y el suelo. Directamente en un tubo de desagüe a una altura superior 60 cm e inferior a 90 cm. El extremo de la manguera de desagüe debe estar siempre ventilado, lo que significa que el diámetro interno del tubo de desagüe debe ser mayor que el diámetro externo de la manguera. El tubo de descarga no debe estar retorcido.
35 Ø 12,5-14 depth 16-22 B C 4 416 6 8 22±1,5 C 595-598 • a) Puerta La puerta debe tener las siguientes medidas: - Anchura 595 - 598 mm - Grosor 16 - 22 mm La altura (C - Fig. C) depende de la distancia vertical de la base del mueble adyacente. • b) Bisagras Para poner las bisagras es preciso taladrar dos orificios (diámetro de 35 mm, fondo 12,5 - 14 mm dependiendo del fondo del mueble) por el lado interno de la puerta. La distancia entre los centros de ambos orificios debe ser de 416 mm.
Si la puerta se va a abrir de izquierda a derecha, invierta la posición de las placas (7), el imán (4) y el tope de goma (5) (fig. B y E). Monte el contraimán (6) y las bisagras (1) como se ha descrito anteriormente. Aspectos medioambientales Recicle los materiales con el símbolo . Coloque el material de embalaje en los contenedores adecuados para su reciclaje. Ayude a proteger el medio ambiente y la salud pública, así como a reciclar residuos de aparatos eléctricos y electrónicos.
www.zanussi.
132927112-A-312013 www.zanussi.