EN User manual Washing Machine ZWI 71000 WA
Contents Safety information _ _ _ _ _ _ _ _ _ _ _ _ _ _ _ _ _ _ 2 Product description _ _ _ _ _ _ _ _ _ _ _ _ _ _ _ _ _ 4 Control panel _ _ _ _ _ _ _ _ _ _ _ _ _ _ _ _ _ _ _ _ 4 Washing Programmes _ _ _ _ _ _ _ _ _ _ _ _ _ _ _ _ 6 Helpful hints and tips _ _ _ _ _ _ _ _ _ _ _ _ _ _ _ _ 8 First use _ _ _ _ _ _ _ _ _ _ _ _ _ _ _ _ _ _ _ _ _ _ 10 Daily use _ _ _ _ _ _ _ _ _ _ _ _ _ _ _ _ _ _ _ _ _ 10 Care and cleaning _ _ _ _ _ _ _ _ _ _ _ _ _ _ _ _ _ What to do if… _ _ _ _ _ _ _ _ _ _ _ _ _ _ _ _ _ _ Technica
• If the machine is situated on a carpeted floor, please adjust the feet in order to allow air to circulate freely under the appliance. • Always be sure, that there is no water leakage from hoses and their connections after the installation. • If the appliance is installed in a location subject to frost, please read the “dangers of freezing” chapter. • Any plumbing work required to install this appliance should be carried out by a qualified plumber or competent person.
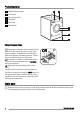
Product description 1 Detergent dispenser drawer 2 Control panel 1 2 3 Door opening handle 4 Rating plate 5 Drain pump 6 Adjustable feet 3 4 5 6 Detergent dispenser drawer Compartment for detergent used for prewash and soak phase or for stain remover used during the stain action phase (if available). The prewash and soak detergent is added at the beginning of the wash programme. The stain remover is added during the stain action phase. Compartment for powder or liquid detergent used for main wash.
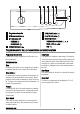
1 2 3 4 5 6 7 A B C 1 Programme selector dial 5 START/PAUSE button 2 SPIN reduction button 6 DELAY START button 7 Indicator pilot lights – PREWASHING + WASHING 3 OPTIONS button – PREWASH – SUPER QUICK 4 EXTRA RINSE button – RINSE + SPIN – END + + Programme selector dial, spin speed button and available options Programme Selector Dial Extra Rinse It allows you to switch the appliance on/off and/or to select a programme. This appliance is designed to save energy.
Indicator pilot light (7) A B C When selecting a washing programme both lights A and B illuminate. After having pressed the button 5 the only light corresponding to the running phase stays on. The machine starts working and the door is locked. The light C illuminates at the end of the washing cycle. After a few minutes the door can be opened. If the draining programme is selected any light will illuminate.
Programme Maximum and Minimum Temperature Cycle Description Maximum Spin Speed Maximum Fabrics Load Type of Laundry Options COTTON + ECO 40° Main wash - Rinses Maximum spin speed at 1000 rpm Max. load 7 kg STANDARD PROGRAMME for the Energy Label consumption values. White or non fast colour cotton (normally or slightly soiled items). This programme can be selected for slightly or normally soiled cotton items. The temperature will decrease and the washing time will be extended.
Programme Maximum and Minimum Temperature Cycle Description Maximum Spin Speed Maximum Fabrics Load Type of Laundry Options WOOL/HANDWASH 30° - Cold Main wash - Rinses Maximum spin speed at 1000 rpm Max. load 2 kg Washing programme for machine washable wool as well as for hand washable woollens and delicate fabrics. Note: A single or bulky item may cause imbalance. If the appliance doesn’t perform the final spin phase, add more items, redistribute the load manually and then select the spinning programme.
Before loading the laundry Detergents and additives Never wash whites and coloureds together. Whites may lose their whiteness in the wash. New coloured items may run in the first wash; they should therefore be washed separately the first time. Button up pillowcases, close zip fasteners, hooks and poppers. Tie any belts or long tapes. Remove persistent stains before washing. Rub particularly soiled areas with a special detergent or detergent paste. Treat curtains with special care.
When the degree of hardness is soft, readjust the quantity of the detergent. First use • Ensure that the electrical and water connections comply with the installation instructions. • Remove the polystyrene block and any material from the drum. • Pour 2 litres of water into the main wash comof the detergent drawer in order to partment activate the ECO valve. Then run a cotton cycle at the highest temperature without any laundry in the machine, to remove any manufacturing residue from the drum and tub.
When selecting a programme, the light corresponding to the maximum speed allowed for that programme will illuminate. Select the available options by pressing buttons 3 and 4 Depending on the programme, different functions can be combined. These must be selected after choosing the desired programme and before starting the programme. When these buttons are pressed, the corresponding pilot lights illuminate. When they are pressed again, the pilot lights go out.
continues to run at regular intervals until the water draining. Follow the below instructions to empty out the water: 1. Turn the programme selector dial to . 2. 3. 4. Set the draining or spinning programme. If needed, reduce the spin speed, . Press button 5. Stand by: once the programme has finished after a few minutes the energy saving system is enabled At the end of the programme, the door can be now to switch opened. Turn the programme selector dial to the machine off.
Place a container close to the pump (A) to collect any spillage. Pull out the emergency emptying hose (B), place it in the container and remove its cap. securely re-tightened so as to stop leaks and young children being able to remove it. Cleaning the water inlet filters Important! If the appliance doesn't fill, takes long to fill with water, the starting button blinks yellow or the display (if available) shows the relevant alarm (see chapter "What to do if...
Frost precaution If the machine is exposed to temperatures below 0°C, certain precautions should be taken. • Turn off the water tap. • Unscrew the inlet hose. • Place the end of the emergency emptying hose and that of the inlet hose in a bowl placed on the floor and let water drain out. • Screw the water inlet hose back on and reposition the emergency emptying hose after having put the cap on again. • When you intend to start the machine up again, make sure that the room temperature is above 0°C.
Problem Possible cause/Solution The door has not been closed (the button 5 red light blinks). • Close the door firmly. The plug is not properly inserted in the power socket. • Insert the plug into the power socket. There is no power at the socket. • Please check your domestic electrical installation. The washing machine does not start: The main fuse has blown. • Replace the fuse. The programme selector dial is not correctly positioned and the button 5 has not been pressed.
Problem Possible cause/Solution There is water on the floor: Too much detergent or unsuitable detergent (creates too much foam) has been used. • Reduce the detergent quantity or use another one. Check whether there are any leaks from one of the inlet hose fittings. It is not always easy to see this as the water runs down the hose; check to see if it is damp. • Check the water inlet hose connection. The drain or inlet hose is damaged. • Replace it with a new one.
Problem Possible cause/Solution Spinning starts late or the machine does not spin: The electronic unbalance detection device has cut in because the laundry is not evenly distributed in the drum. The laundry is redistributed by reverse rotation of the drum. This may happen several times before the unbalance disappears and normal spinning can resume. If, after 10 minutes, the laundry is still not evenly distributed in the drum, the machine will not spin.
Consumption values Programme Energy consumption (KWh)1) Water consumption (litre)1) Programme duration (Minutes)1) White Cottons 90 °C 2.20 72 160 Cottons 60 °C 1.35 67 150 Cottons 40 °C 0.85 67 140 Synthetics 40 °C 0.55 42 90 Delicates 40 °C 0.55 63 70 Wool/ Handwash 30 °C 0.25 55 60 1) The consumption information shown in this chart is indicative.
Positioning Install the machine on a flat hard floor. Make sure that air circulation around the machine is not impeded by carpets, rugs etc. Check that the machine does not touch the wall or other kitchen units. Caution! Do not use the hose from your previous appliance to connect to water supply. Connect the hose to a tap with a 3/4” thread. Always use the hose supplied with the appliance. Level the washing machine by raising or lowering the feet.
In a sink drain pipe branch. This branch must be above the trap so that the bend is at least 60 cm above the ground. Directly into a drain pipe at a height of not less than 60 cm and not more than 90 cm. The end of the drain hose must always be ventilated, i.e. the inside diameter of the drain pipe must be larger than the outside diameter of the drain hose. The drain hose must not be kinked. Building in This appliance has been designed to be built into the kitchen furniture.
35 Ø 12,5-14 depth 16-22 B C 4 416 6 8 22±1,5 C 595-598 • a) Door The dimensions of the door should be: - width 595-598 mm - thickness 16-22 mm The height (C-Fig. C) depends on the height of the adjacent furniture's base. • b) Hinges To mount the hinges it is necessary to drill two holes (dia. 35 mm, depth 12.5-14 mm depending on the depth of door furniture) on the inner side of the door. The distance between the holes hobs fixing centres must be 416 mm.
If the door has to be opened from left to right, invert the position of the plates (7), the magnet (4) and the plate (5) (Fig. B and E). Mount the counter-magnet (6) and the hinges (1) as previously described. Environmental concerns The symbol on the product or on its packaging indicates that this product may not be treated as household waste. Instead it should be taken to the appropriate collection point for the recycling of electrical and electronic equipment.
132928520-A-512011 www.zanussi.