GB User manual Washing machine ZWH 6125 2
Contents Safety information _ _ _ _ _ _ _ _ _ _ _ _ _ _ _ _ 2 Product description _ _ _ _ _ _ _ _ _ _ _ _ _ _ _ _ 4 Control Panel _ _ _ _ _ _ _ _ _ _ _ _ _ _ _ _ _ _ _ 4 Washing programmes _ _ _ _ _ _ _ _ _ _ _ _ _ _ _ 7 Helpful hints and tips _ _ _ _ _ _ _ _ _ _ _ _ _ _ _ 9 First use _ _ _ _ _ _ _ _ _ _ _ _ _ _ _ _ _ _ _ _ 10 Personalisation _ _ _ _ _ _ _ _ _ _ _ _ _ _ _ _ _ 11 Daily Use _ _ _ _ _ _ _ _ _ _ _ _ _ _ _ _ _ _ _ _ Care and cleaning _ _ _ _ _ _ _ _ _ _ _ _ _ _ _ _ What to do if ...
• Always be sure, that there is no water leakage from hoses and their connections after the installation. • If the appliance is installed in a location subject to frost, please read the “dangers of freezing” chapter. • Any plumbing work required to install this appliance should be carried out by a qualified plumber or competent person. • Any electrical work required to install this appliance should be carried out by a qualified electrician or competent person.
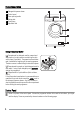
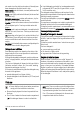
Product description 1 2 3 4 5 6 Detergent dispenser drawer Control panel Door opening handle Rating plate Drain pump Adjustable feet 1 2 3 4 5 6 Detergent dispenser drawer Compartment for detergent used for prewash and soak phase or for stain remover used during the stain action phase (if available). The prewash and soak detergent is added at the beginning of the wash programme. The stain remover is added during the stain action phase. Compartment for powder or liquid detergent used for main wash.
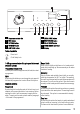
10 9 1 1 2 3 4 5 2 Programme selector dial SPIN button OPTIONS button PREWASH button EASY IRON button 3 4 6 7 8 9 10 5 6 7 8 EXTRA RINSE button START/PAUSE button DELAY START button DOOR LOCKED pilot light Display Table of symbols = Rinse hold = Child Safety Lock 1-8 Programme selector dial, spin speed button and available options Programme Selector Dial It allows you to switch the appliance on/off and/or to select a programme.
rinses in some programmes. On other programmes (e.g. cotton) the maximum spin speed is reduced automatically. Extra Rinse This appliance is designed for saving energy. If it necessary to rinse the laundry using an extra quantity of water (extra rinse), select this option. Some additional rinses will be performed. This option is recommended for people who are allergic to detergents, and in areas where the water is very soft.
Washing programmes Programme Maximum and Minimum Temperature - Cycle Description Maximum Spin Speed - Maximum Fabrics Load - Type of Laundry Options COTTONS 90° - Cold1) Main wash - Rinses Maximum spin speed at 1200 rpm Max. load 7 kg - Reduced load 3.5 kg 2) White and coloured cotton (normally soiled items). SPIN REDUCTION RINSE HOLD ECONOMY3) SUPER QUICK PREWASH4) EASY IRON EXTRA RINSE SYNTHETICS 60° - Cold Main wash - Rinses Maximum spin speed at 900 rpm Max. load 3.5 kg - Reduced load 1.
Programme Maximum and Minimum Temperature - Cycle Description Maximum Spin Speed - Maximum Fabrics Load - Type of Laundry JEANS 40° Main wash - Rinses Maximum spin speed at 1200 rpm Max. load 3.5 kg With this programme it is possible to wash items like pants, shirts or jackets in denim and also jersey realized with hi-tech materials. (The Extra Rinse option will be activated automatically).
Programme Maximum and Minimum Temperature - Cycle Description Maximum Spin Speed - Maximum Fabrics Load - Type of Laundry Options Detergent Compartment DRAIN Draining of water Max. load7 kg For emptying out the water of the last rinse in programmes with theRinse Hold option selected. SPIN Drain and long spin Maximum spin speed at 1200 rpm Max. load 7 kg Separate spin for hand washed garments and after programmes with the Rinse Hold option selected.
not recent since the cellulose structure will already have been damaged and the fabric tends to hole. Mould stains: treat with bleach, rinse well (whites and fast coloureds only). Grass: soap lightly and treat with bleach (whites and fast coloureds only). Ball point pen and glue: moisten with acetone1), lay the garment on a soft cloth and dab the stain. Lipstick: moisten with acetone as above, then treat stains with methylated spirits. Treat any residual marks with bleach.
Personalisation Acoustic signals The machine is provided with an acoustic device, which sounds in the following cases: • at the end of the cycle • if there is a fault. By pressing the 4 and 5 buttons simultaneously for about 6 seconds , the acoustic signal is deactivated (except if there is a fault). By pressing these 2 buttons again, the acoustic signal is reactivated. Child safety lock damage to the appliance. This function remains enabled also when the washing machine is not working.
When these buttons are pressed, the corresponding pilot lights illuminate. When they are pressed again, the pilot lights go out. If an incorrect option is selected, the integrated red pilot light of the button 7 flashes 3 times and the message Err is displayed. For the compatibility among the washing programmes and the options see chapter «Washing programmes» . Start the programme by pressing button 7 To start the selected programme, press this button; the corresponding green pilot light stops blinking.
1. Turn the programme selector dial to . 2. Select the draining or spinning programme. 3. Reduce the spin speed if needed, by pressing the relevant button. 4. Press button 7 . At the end of the programme, the door is released and can to be opened. Turn the programme selector dial to switch the machine off. Remove the laundry from the drum and carefully check that the drum is empty. If you do not intend to carry out another wash, close the water tap.
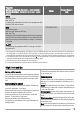
Pull out the emergency emptying hose, place it in the container and remove its cap. When no more water comes out, unscrew the pump cover and remove it. Always keep a rag nearby to dry up spillage of water when removing the cover. • Turn off the water tap. • Unscrew the hose from the tap. • Clean the filter in the hose with a stiff brush. • Screw the hose back onto the tap. Make sure the connection is tight. Remove any objects from the pump impeller by rotating it.
• When you intend to start the machine up again, make sure that the room temperature is above 0°C. Emergency emptying out If the water is not discharged, proceed as follows to empty out the machine: • pull out the plug from the power socket; • close the water tap; • if necessary, wait until the water has cooled down; • open the pump door; • place a bowl on the floor and place the end of the emergency emptying hose into the bowl. Remove its cap. The water should drain by gravity into the bowl.
Problem The machine does not fill: Possible cause/Solution The water tap is closed. • Open the water tap. The inlet hose is squashed or kinked. • Check the inlet hose connection. The filter in the inlet hose is blocked. • Clean the water inlet hose filter. The door is not properly closed. • Close the door firmly. The drain hose is squashed or kinked. • Check the drain hose connection. The drain filter is clogged. The machine does not empty and/or • Clean the drain filter.
Problem Possible cause/Solution The door will not open: The programme is still running. • Wait the end of washing cycle. The door lock has not been released. • Wait until the pilot light 9 goes off. There is water in the drum. • Select drain or spin programme to empty out the water. The machine vibrates is noisy: The transit bolts and packing have not been removed. • Check the correct installation of the appliance. The support feet have not been adjusted • Check the correct levelling of the appliance.
Technical data Dimensions Width Height Depth 60 cm 85 cm 63 cm Electrical connection Voltage - Overall power - Fuse Information on the electrical connection is given on the rating plate, on the inner edge of the appliance door. Water supply pressure Minimum Maximum 0,05 MPa 0,8 MPa Maximum Load Cotton 7 kg Spin Speed Maximum 1200 rpm Consumption values Programme Energy consumption (KWh) Water consumption (litres) White Cottons 90° 2.1 65 Cottons 60° 1.4 60 Cottons + ECONOMY 60° 1.
Accurate levelling prevents vibration, noise and displacement of the machine during operation. Never place cardboard, wood or similar materials under the machine to compensate for any unevenness in the floor. If necessary, check the setting with a spirit level. After removing all the packaging, carefully lay machine on it's back to remove the polystyrene base from the bottom. Remove the power supply cable and the hoses from the hose holders on the rear of the appliance.
The other end of the inlet hose which connects to the appliance can be turned as showed in the picture. Do not place the inlet hose downwards. Angle the hose to the left or right depending on the position of your water tap. Set the hose correctly by loosening the ring nut. After positioning the inlet hose, be sure to tighten the ring nut again to prevent leaks. In this case, make sure the end cannot come unhooked when the machine is emptying.
www.zanussi.