EN User manual ZWC 1301
Contents Safety information _ _ _ _ _ _ _ _ _ _ _ _ _ _ _ _ _ _ 2 Product description _ _ _ _ _ _ _ _ _ _ _ _ _ _ _ _ _ 3 Control panel _ _ _ _ _ _ _ _ _ _ _ _ _ _ _ _ _ _ _ _ 5 Before first use _ _ _ _ _ _ _ _ _ _ _ _ _ _ _ _ _ _ _ 6 Daily use _ _ _ _ _ _ _ _ _ _ _ _ _ _ _ _ _ _ _ _ _ _ 7 Helpful hints and tips _ _ _ _ _ _ _ _ _ _ _ _ _ _ _ _ 9 International wash code symbols _ _ _ _ _ _ _ _ _ _ 11 Washing programmes _ _ _ _ _ _ _ _ _ _ _ _ _ _ _ Care and cleaning _ _ _ _ _ _ _ _ _ _ _ _ _ _ _ _ _ What to
• If the machine is situated on a carpeted floor, please adjust the feet in order to allow air to circulate freely under the appliance. • Always be sure, that there is no water leakage from hoses and their connections after the installation. • If the appliance is installed in a location subject to frost, please read the “dangers of freezing” chapter. • Any plumbing work required to install this appliance should be carried out by a qualified plumber or competent person.
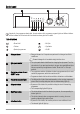
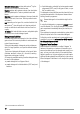
Machine front Machine rear 2 1 2 1 3 4 3 4 1 2 3 4 Detergent dispenser drawer Control panel Door opening handle Adjustable feet (front) 1 2 3 4 Transit locking devices Drain hose Electrical lead Inlet hose Detergent dispenser drawer Compartment for powder or liquid detergent used for main wash. If using liquid detergent pour it just before starting the programme. Compartment for liquid additives (fabric softener, starch).
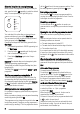
Control panel 1 2 3 Spin Cottons 90° 1300 Quick 60° eco Drain 8h Daily Time Prewash Extra Rinse Start Pause Delay Start 900 4h 60° Rinses 2h Washing 40° eco Mini 30 End 700 Door Wool Cold 500 30° Wool 40° Specials Handwash 30° Delicate 40° 40° 30° Synthetics 9 8 7 6 5 4 Henceforth, the programme selector dial, the spin selector dial, programme progress lights and different buttons will be indicated in all the book with the relevant numbers given in this table.
8 Prewash button • By means of this button, the machine performs a prewash cycle before the main wash phase. • The relevant light will light up. 9 Time Saving button Quick Daily • By means of this button, you can select only one of the options. • The relevant light will light up. Functions Rinse hold or No spin 2 Rinse hold By selecting this position the water of the last rinse is not emptied out to prevent the fabrics from creasing.
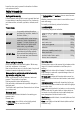
Important! Remove any material from the drum. Important! We recommend you to run a wash programme without any load, to clear any residues which may have been left by the manufacturing process. Pour approx. 100 ml of detergent straight into the drum and run a cotton cycle at 60°C. When the programme is finished the machine will be ready to use. Daily use Load the laundry At the end of the programme the selector dial must be to switch the machine off.
Select the Delay Start by pressing button 5 Before you start the programme, if you wish to delay the start, press the button 5 repeatedly, to select the desired delay. The corresponding pilot light will light up. 8h Delay Start 4h Washing Press the button 6 to interrupt a programme which is running, the corresponding light starts to flash. Press the button again to restart the programme. Turn the selector dial to position to cancel a programme which is running. Now you can select a new programme.
Leave the door open to prevent the formation of mildew and unpleasant smells. Helpful hints and tips Sorting out the laundry Follow the wash code symbols on each garment label and the manufacturer’s washing instructions. Sort the laundry as follows: whites, coloureds, synthetics, delicates, woollens. • Delicate fabrics and woollens: drum no more than one third full. Washing a maximum load makes the most efficient use of water and energy. For heavily soiled laundry, reduce the load size.
Ball point pen and glue: moisten with acetone1), lay the garment on a soft cloth and dab the stain. Lipstick: moisten with acetone as above, then treat stains with methylated spirits. Treat any residual marks with bleach. Red wine: soak in water and detergent, rinse and treat with acetic or citric acid, then rinse. Treat any residual marks with bleach.
International wash code symbols Energetic wash Max. wash temperature 95°C Max. wash temperature 60°C Max. wash temperature 40°C Max.
Washing programmes Programme/ Temperature Type of laundry Options Description of the programme COTTONS 90° - 60° - 30° White and coloured cotton (heavily and normally soiled cotton items) SPIN REDUCTION/RINSE HOLD/NO SPIN QUICK/DAILY PREWASH EXTRA RINSE DELAY START COTTONS ECO 60° - 40° White cotton economy This programme can be selected for normally soiled cotton items. The temperature will decrease and the washing time will be extended.
Programme/ Temperature Type of laundry Options Description of the programme RINSES With this programme it is possible to rinse and spin cotton garments which have been washed by hand. The machine performs 3 rinses, followed by a final long spin. The spin speed can be reduced. DRAIN For emptying out the water of the last rinse in programmes with the Rinse Hold option selected.
If necessary, the whole detergent drawer can be taken out of the machine for cleaning. You need to pull it firmly outwards, so that it comes free of retaining stop. To remove the siphon at the inside edge of the drawer for cleaning, you need to press it inwards and pull it upwards at the same time. Flush it out under a tap, to remove any traces of accumulated powder. When you put it back, press it downwards until you hear a distinct click.
Problem Possible cause/Solution The machine does not start: The door has not been closed. • Close the door firmly. The plug is not properly inserted in the power socket. • Insert the plug into the power socket. There is no power at the socket. • Please check your domestic electrical installation. The main fuse has blown. • Replace the fuse. The selector dial is not correctly positioned and the button Start has not been pressed. • Please turn the selector dial and press the button Start again.
Problem Possible cause/Solution Unsatisfactory washing results: Too little detergent or unsuitable detergent has been used. • Increase the detergent quantity or use another one. Stubborn stains have not been treated prior to washing. • Use commercial products to treat the stubborn stains. The correct temperature was not selected. • Check if you have selected the correct temperature. Excessive laundry load. • Reduce the laundry load. The door will not open: The programme is still running.
Mod. ... ... ... Prod. No. ... ... ... Ser. No. ... ... ... Technical data Dimensions Width Height Depth 50 cm 67 cm 55 cm Electrical connection Voltage - Overall power - Fuse Information on the electrical connection is given on the rating plate, on the inner edge of the appliance door.
Programme Spin Energy consumption (kWh)1) Water consumption (litres)1) Programme duration (Minutes)1) - - ~5 1) The consumption information shown in this chart is indicative. It can vary depending on the quantity and the type of laundry, on the temperature of the water supply and on the ambient temperature. Standard programmes for the Energy Label consumption values The cotton 60 °C economy and cotton 40 °C economy are the standard cotton programmes for normally soiled cotton laundry.
some time, run off a reasonable amount of water to flush out any debris that may have collected Caution! Do not use the hose from your previous appliance to connect to water supply. Connect the hose to a tap with a 3/4” thread. Always use the hose supplied with the appliance. With a suitable spanner unscrew and remove the three screws and their spacers on machine's rear.
signed in such a way, that the end of the drain hose cannot be covered with water. 40 mm 650-800 mm Min 30 cm (12”) Whether discharging into a sink or a standpipe, check that the end of the drain hose is neither too high or too low. The top of the curve in the hose’s end should be no more than 800 mm (31.5”), and no less than 650 mm (25.6”) above floor level. Warning! THIS APPLIANCE MUST BE EARTHED. The manufacturer declines any liability should this safety measure not be observed.
When the appliance is installed the power supply cable must be accessible. Permanent connection n the case of permanent connection it is necessary that you install a double pole switch between the appliance and the electricity supply (mains), with a minimum gap of 3 mm between the switch contacts and of a type suitable for the required load in compliance with the current electrical regulations. The switch must not break the yellow and green earth cable at any point.
192987440-A-062011 www.zanussi.